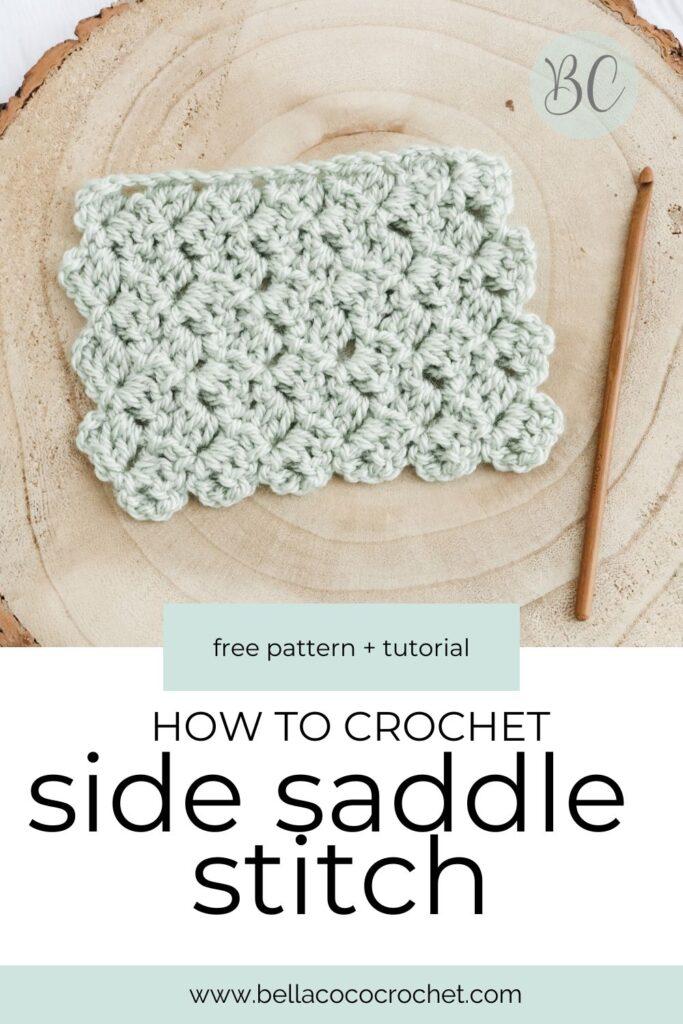
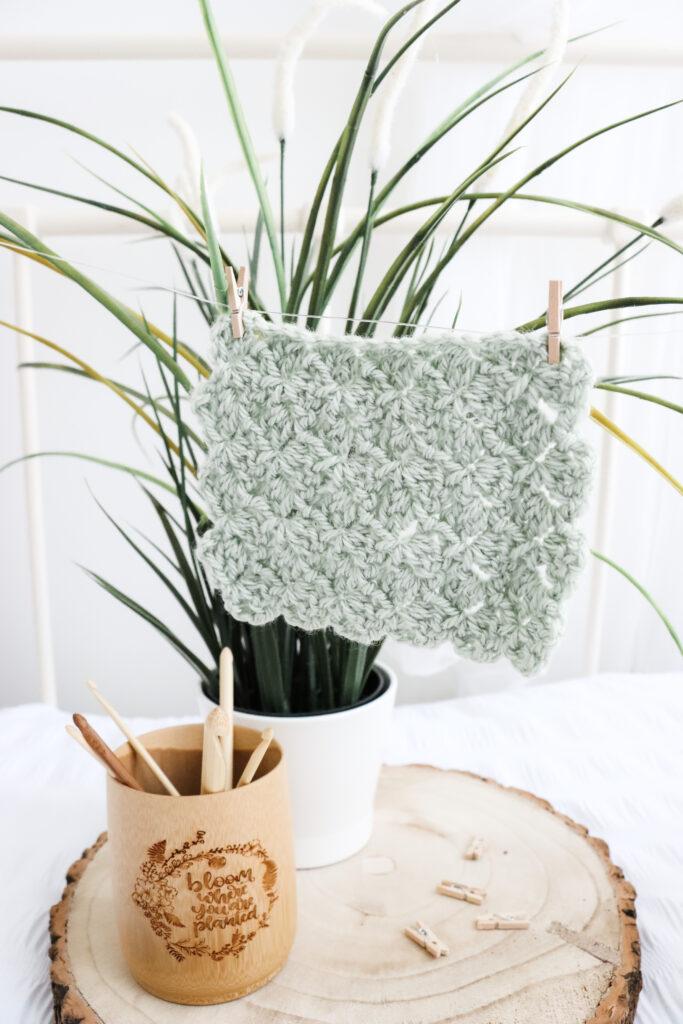
Learn how to crochet the side saddle stitch with my free step-by-step pattern and video tutorial. The crochet side saddle stitch is a beautiful, textured stitch pattern. Known for its unique, staggered design that resembles interlocking “saddles,” this stitch creates a dynamic look that’s ideal for blankets, scarves, and even clothing. While it might look complex, the side saddle stitch is surprisingly approachable once you get the rhythm down, making it a rewarding choice for those who want to expand on their personal crochet stitch library.


Pattern Use Ideas
The side saddle stitch is versatile and works beautifully in projects that benefit from both texture and structure. Here are some ideas for crochet projects that suit this stitch well:
- Blankets and Throws: The textured look of the side saddle stitch creates a cozy, intricate effect, making it perfect for blankets that will add warmth and style to any space.
- Scarves and Shawls: With its eye-catching texture, this stitch creates striking accessories. Scarves and shawls with the side saddle stitch stand out and add extra warmth, making them ideal for cooler months.
- Pillows and Cushions: Add dimension to home decor by using the side saddle stitch for pillows or cushion covers. Its texture brings a modern yet cozy vibe to any room.
- Bags and Totes: The side saddle stitch provides a sturdy fabric, making it great for creating bags that maintain their shape. It’s an ideal choice for market totes, handbags, or even small clutches.
- Beanies and Ear Warmers: This stitch gives hats and ear warmers a snug, warm texture that’s perfect for winter accessories, providing both style and function.
- Cardigans and Sweaters: If you’re comfortable with garment-making, the side saddle stitch can add a beautiful element to cardigans or sweaters, especially when used as a panel or accent section.
Materials & tools
- Yarn: Caron Simply Soft in the colour Sage
- Hook: 5mm
- Scissors
- Darning Needle
pattern Notes
- Written in UK terms but switchable to US terms below.
- Skill Level: Intermediate
- Stitch Multiple: 5 + 2
- Video tutorial can be found at the base of the post.
Gauge & Size
- Please check your specific patterns for the gauge needed.
- If you are just practicing this stitch the gauge isn’t important.
Crochet Terms & Abbreviations
Chain(s): ch(s): Yarn over, pull through loop on the hook.
Slip Stitch(s): ss(s): Insert hook, yarn over, pull through stitch and loop on hook.
Double Crochet(s): dc(s): Insert hook into stitch, yarn over, pull up a loop, you will have two loops on the hook. Yarn over, pull through remaining two loops.
Treble Crochet(s): tr(s): Yarn over, insert into stitch, yarn over, pull up a loop, you will have three loops on the hook. Yarn over, pull through two loops, yarn over, pull through remaining two loops.
Stitch(es) (st(s))
*__*- Repeat instructions
Special Stitches
Beginning Treble Crochet 4 Together: begtr4tog: yarn over and insert your hook into the next ch, yarn over and pull through, yarn over and pull through two (two loops remaining on hook); yarn over and insert your hook into the next ch, yarn over and pull through, yarn over and pull through two (three loops remaining on hook), yarn over and insert your hook into the third ch, yarn over and pull through, yarn over and pull through two (four loops remaining on hook), yarn over and insert your hook into the next ch, yarn over and pull through, yarn over and pull through two (five loops remaining on hook), yarn over and pull through all five loops together, and then chain one to secure. These stitches will be referred to as a cluster.
Treble Crochet 4 Together: tr4tog: This is the same as the beginning Treble Crochet 4 Together; however, your stitches will be worked into the ch-3 sp from previous row.

Unsure of the differences between UK and US terms? Need a refresher on how to do your stitches? In my ‘How to crochet: A handy reference guide’ EBook I help you with all of these terms and you can always have them to hand! You will also get exclusive access to free video instructions. Learn more about the eBook here.
Pattern Support
The fastest way to get pattern support is to ask in our dedicated facebook group for Bella Coco Crochet patterns. This is the best place for you to connect with other crocheters.
Please note, if you wish to change and adapt this pattern in any way, this must be done at your own exploration and we cannot offer assistance with this.
Pin For Later
Free Pattern: Crochet Side Saddle Stitch
You are viewing this pattern in UK terms.
Chain in multiples of 5 +2.
Row 1: dc in second ch from hook (skipped ch does not count as st), *3 ch, tr4tog over next 4 ch, 1 ch (this secures the cluster), dc in next ch; rep from * across. Turn.
Row 2: 5 ch (counts as ch sp), *dc in top of tr4tog cluster from previous row, 3 ch, tr4tog in 3-ch sp from previous row, 1 ch; rep from * across until 1 st rem, tr in last st. Turn.
Row 3: 1 ch (does not count as st), skip first st, dc in top of first cluster, *3 ch, tr4tog in ch sp from previous row, 1 ch, dc in top of next cluster; rep from * across, working final dc in ch sp. Turn.
Rep Rows 2 and 3 until desired height.
Fasten off and sew in ends.
Additional Information
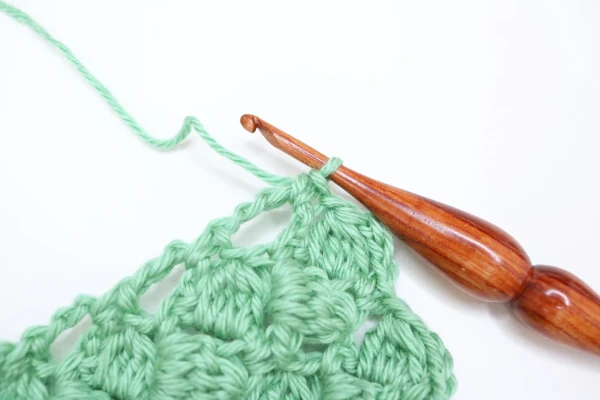
- Row 2: Instructions Working your treble crochet into the last stitch of the previous row. Photo Needle indicates the stitch to work into.
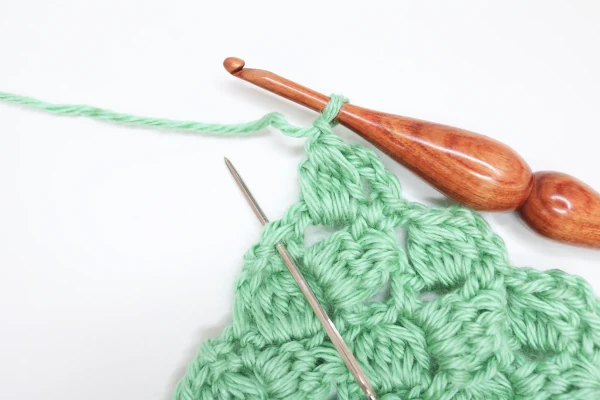
- Row 3: Instructions You will be left at the chain 5 space from the previous row, see photo for reference.

- Instructions dc into ch5 space. Photo How you work will look once you have done the double crochet into the chain 5 space.
Video Tutorials
Right-handed
[adthrive-in-post-video-player video-id=”MGF6BXAU” upload-date=”2025-03-27T11:44:48+00:00″ name=”CROCHET_ Side Saddle Stitch | Bella Coco.mp4″ description=”null” player-type=”default” override-embed=”default”]Or you can watch on YouTube
Left-handed
[adthrive-in-post-video-player video-id=”rIWnja4g” upload-date=”2025-03-27T11:44:49+00:00″ name=”LEFT HANDED CROCHET_ Side Saddle Stitch | Bella Coco.mp4″ description=”null” player-type=”default” override-embed=”default”]Or you can watch on YouTube
I always love to see your makes so if you try any of my patterns or follow my stitch tutorials please tag me @bellacococrochet or use the #bellacococrochet
sarah-jayne
Why can’t you do more rows I have a had to redo mine a million times cause I’m not good enough at crocheting to be able to repeat 2 and 3 how are you supposed to go from ro 3 to row to again I don’t understand why you can’t do a few more rose to make it easier on us
Hi colleen I am so sorry that you are finding this difficult, I think it’s just a matter of keep going and practicing and i’m sure it will soon get easier 🙂
There’s no description for the tr4tog stitch, which is the most important part. I’m having trouble finding this part written down anywhere, can you add a description please?
I’m sorry the description for the tr4tog stitch is missing; to make this stitch you need to: yarn over and insert your hook into the first stitch, yarn over and pull through, yarn over and pull through two (two loops remaining on hook); yarn over and insert your hook into the second stitch; yarn over and pull through, yarn over and pull through two (three loops remaining on hook); yarn over and insert your hook into the third stitch, yarn over and pull through; yarn over and pull through two (four loops remaining on hook); yarn over and insert your hook into the fourth stitch, yarn over and pull through, yarn over and pull through two (five loops remaining on hook); yarn over and pull through all five loops together, and then chain one to secure. 🙂
Hi Bella, how are you?
First of all I want thank you for this amazing blog full off interesting materials. I’m in love.
Now let me ask you something, is it possible to make this stitch in circle so I would not back, just keep it going?
Kisses and hugs ♡☆
Hi Thaissa
Thank you for your kind words, I’m glad you find my blog helpful I’ve not worked this stitch in the round before but it would involve reworking the pattern quite significantly. You could always work a flat piece and them seam along one side.
Can you advise if the terms (double crochet, treble etc) are English or American terms.
I work in UK terms, this handy chart maybe of help to you :- https://blog.tcctest.co.uk/wp-content/uploads/2019/07/Conversion-chart.png 🙂
I would like to use the side saddle stitch in place of the C2C pattern I am making which is a wall hanging for a count down to Christmas. I just cannot get the C2C but this stitch looks close enough to it. I would be changing colors for the graph. Is this possible?
You could certainly try using the side saddle stitch in place of the c2c but as it gives a zigzag pattern you will find that it looks slightly different. Another option would be to work plain trebles and count three stitches as one block. If you haven’t already I would definitely watch my tutorial for the c2c stitch here: https://www.youtube.com/watch?v=I5G9IM24LFU – it’s worth persevering with as it’s super simple once you get the hang of it