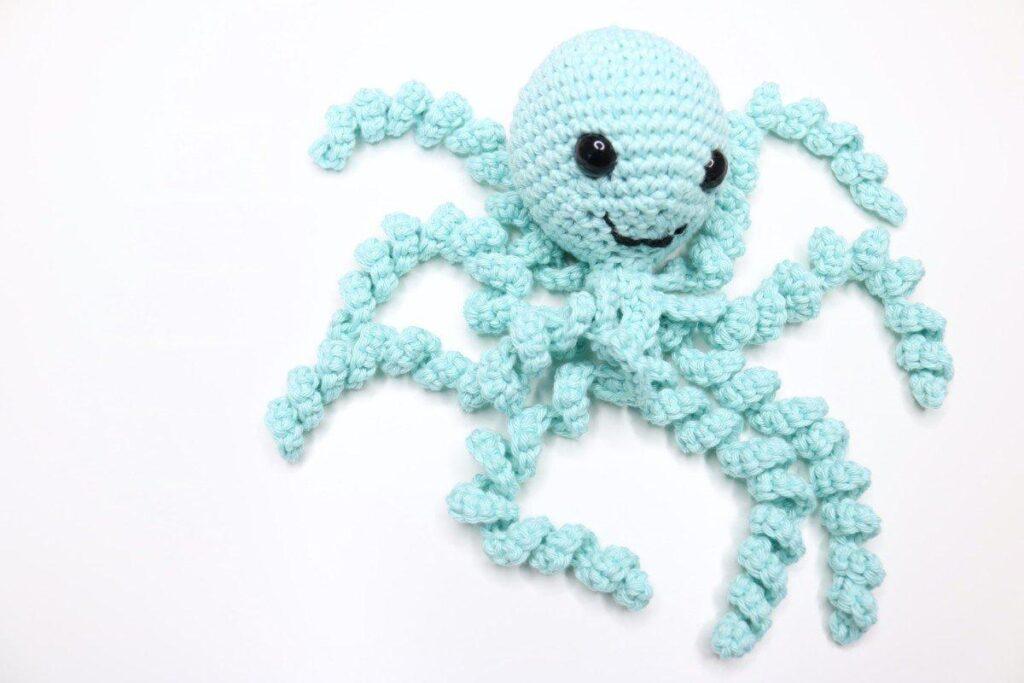
A crochet mini octopus is a fun and adorable project that can be completed in just a few hours. These tiny creatures are perfect for using up scraps of yarn and making unique crochet gifts for friends and family.
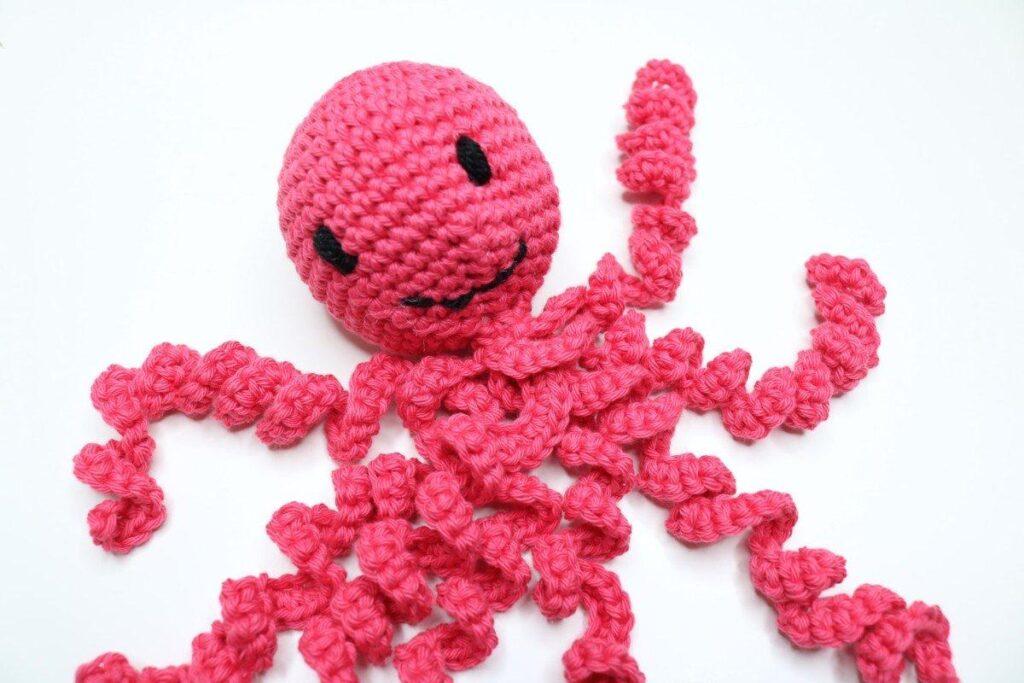
The octopus is worked in the round using double crochet (UK term) stitches. You can add eyes and a little smile to give your mini octopus some personality, or experiment with different colour combinations to create a collection of sea creatures. Not only is the crochet mini octopus a cute addition to your amigurumi collection, but it also provides a great opportunity to practice your crochet skills and learn new techniques.

What is Amigurumi?
Amigurumi is a Japanese art form of creating small crocheted or knitted stuffed toys, dolls or figurines. The word “amigurumi” comes from the Japanese words “ami”, meaning crocheted or knitted, and “nuigurumi”, meaning stuffed doll.
The art of making amigurumi involves using simple crochet techniques to create small and detailed shapes, which are then stuffed with fiberfill to create cute and often whimsical characters. Amigurumi toys are typically worked in the round and are made with a combination of basic stitches. Amigurumi has become increasingly popular in recent years, with crafters around the world sharing patterns and designs to create their own unique amigurumi creations.
To get started, you’ll need some basic crochet supplies, including a crochet hook, yarn, and stuffing. You’ll also need some basic crochet skills, including how to make a magic ring, double crochet (UK term), and increasing and decreasing stitches.

Materials & Tools
- Yarn: Cotton yarn for main body colour. I used Stylecraft Classique Cotton in Peppermint for Ollie and Dizzy Lizzy for Olivia and Black for facial features.
- Hook: 3mm
- Scissors
- Darning Needle
- Toy Stuffing
- 12mm Safety eyes (optional, alternatively you cause black embroidery thread to create the eyes)
- Black Embroidery Thread
pattern Notes
- Written in UK terms but switchable to US terms below.
- Tension should be tight so no stuffing can be seen, adjust hook size to suit your tension.
- Each round starts with a chain 1 which does not class as a stitch. Each stitch from each round is to be worked into the base of the initial chain 1.
Convert Pattern Terms
Here you can quickly switch between UK and US crochet terms. This will make following the pattern easier as all terms will be converted to your preferred version.
crochet terms & Abbreviations
Slip stitch (sl-st): Insert hook, yarn over, pull through both stitch and loop on hook.
Double crochet (dc): Insert hook into stitch, yarn over, pull up a loop, you will have two loops on the hook. Yarn over, pull through remaining two loops.
Double Crochet 2 Together (dc2tog): Insert hook into next st, yarn over, pull through (2 loops on hook), insert hook into next st, yarn over, pull through (3 loops on hook), yarn over, pull through all loops on hook.
*__*: Repeat sequence

Unsure of the differences between UK and US terms? Need a refresher on how to do your crochet stitches? In my ‘How to crochet: A handy reference guide’ EBook I help you with all of these terms and you can always have them to hand! You will also get exclusive access to free video instructions. You can find my EBook HERE.
Pin For Later
Crochet mini Octopus Pattern
You are viewing this pattern in UK terms.
head
Round 1: Create a magic circle. 6 dc and connect.
Round 2: 2dc in each stitch (12 stitches)
Round 3: *2dc in stitch, dc in next stitch* repeat 6 times and connect (18 stitches)
Round 4: *2dc in stitch, dc, dc* repeat 6 times and connect (24 stitches)
You are viewing this pattern in UK terms.
Begin to stuff the head using your Microfiber filling. Do not over stuff at this point as you will be adding more shortly.
Round 17: *dc2tog, dc* repeat 6 times and connect (12 stitches)
Continue to stuff the head until firm.
Round 18: dc2tog 6 times. DO NOT connect (6 stitches)
In order to pull the remaining hold tight, dc2tog a further 2-3 times. ss across to the opposite side. do not tie off.
Neck
Tentacles
You are viewing this pattern in UK terms.
- Once the tentacles have begun, you will complete all 8 in once continuous section, attaching to the neck as you go (please see video tutorial)
- Chain 45, 2dc into 2nd chain from the hook and into each chain. Only 1dc into the last chain.
- Attach the tentacle to the lower (round 2) row of dc on the ‘neck’ section using a SS.
- Continue to create the following tentacles by chaining 45 and working your way back along the chain with 2dc in each chain. Attach to the ‘neck again’. Do this 4 times in total.
- Chain 2 and ss into the upper (round1) round of dc on the neck section. Create 4 additional tentacles as previously described.
- Tie off and sew in ends.
Facial Features
Now it’s time to add some personality and charm to your mini octopus by adding some facial features. Using your black embroidery thread and darning needed get creative and sew on the facial features. You can use the images below if you need some guidance or for more help instructions can be found in the video tutorial if you are unsure how to do this, see below.

Video Tutorials


More Amigurumi Patterns

I always love to see your makes so if you try any of my patterns or follow my stitch tutorials please tag me @bellacococrochet or use the #bellacococrochet
sarah-jayne
Hi,
My high school’s National Art Honor Society was using this pattern to make our own octopuses to donate. As someone who has been crocheting for a good couple years, I decided to follow the written pattern as videos nearly always are far too slow paced for me. However, when I watched the video, you were using single crochets when you were saying double crochets, which makes quite a large difference in the size of the stitches and the look of the final project and is also very confusing. Could you please clarify what stitches you were using?
Thanks
Hi there, as mentioned in the video their is a difference between the UK and US terms which can be very confusing. A UK double crochet is the same as a US single crochet. I hope that clarifies things for you 🙂
My 10 year old daughter and I had so much fun making these cute little friends! As always, thank you so much for the video tutorial. As a visual learner, the video is such a blessing. We’ve enjoyed your tutorials over the years and appreciate you greatly.
you’re very welcome 🙂
I was wondering if l can use Stylecraft Special DK or Paintbos Dk yarn. I have loads left from a previous project.
Look forward to hearing from you.
Thanks
Hi Dora
You are welcome to use whatever yarn you choose to follow the pattern with, just bearing in mind that the results may look slightly different to that shown.
Hope this helps 🙂
I made one for my 6 month old using a size G hook and a worsted weight yarn. Turned out wonderful and she especially loves the springy tentacles! Thank you so much for all your great tutorials. I am a long time follower and you never let me down with your clear videos and pretty patterns. Thanks so much!
Hi Angela you are very welcome and thank you for your lovely comments 🙂
Thanks for this one Sarah-Jane. I have really enjoyed making it. It came out so stunning.
You are very welcome 🙂
Hi there,
Thank you for your left handed videos I can finally crochet mini projects. Could you please upload a left handed video for the mini octopus. I have tried your right handed one but I am again completely lost. I would love to make these for my boys.
Thank you once again.
Hi Dawn I don’t have a left handed tutorial for this, however you can find the written pattern on my blog which maybe of help to you – https://blog.tcctest.co.uk/mini-crochet-octopus/ 🙂