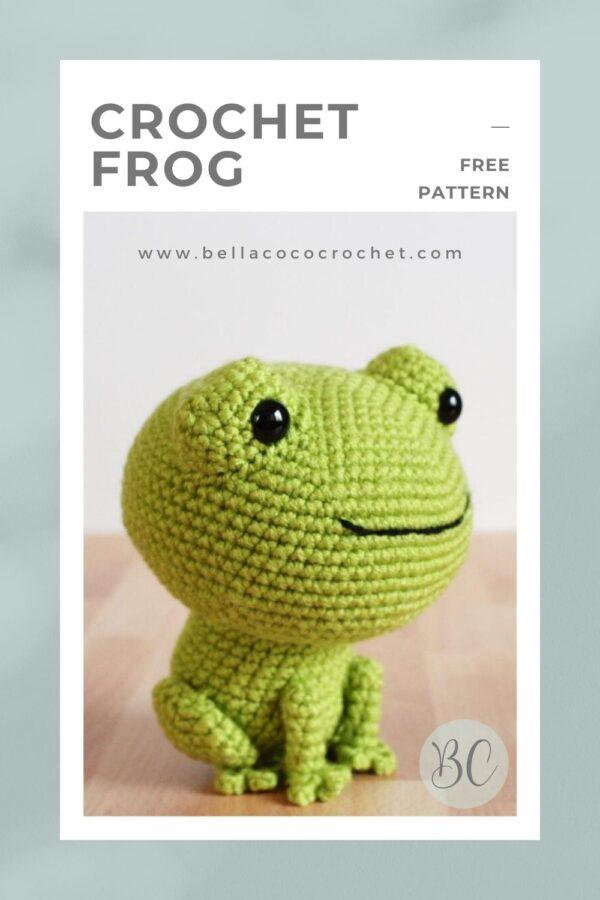
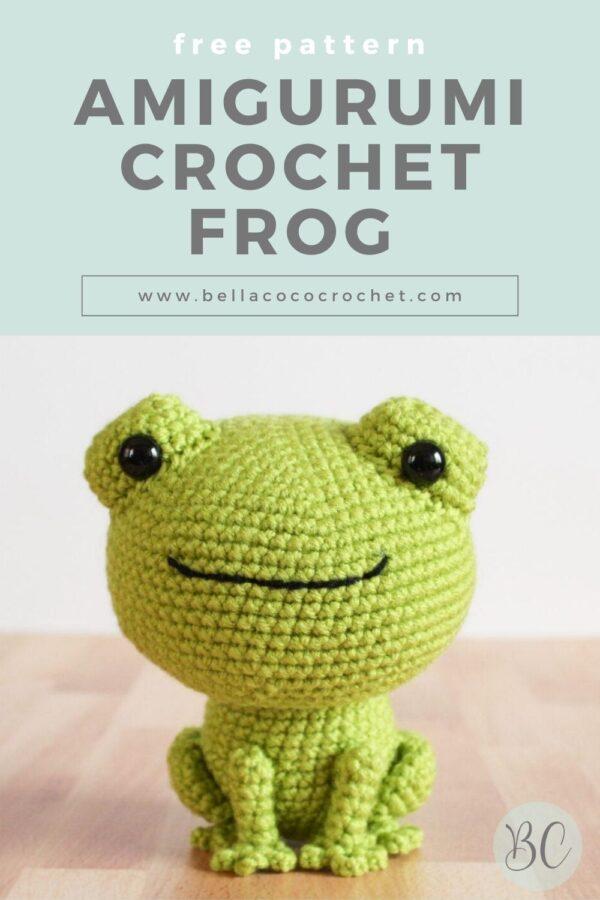
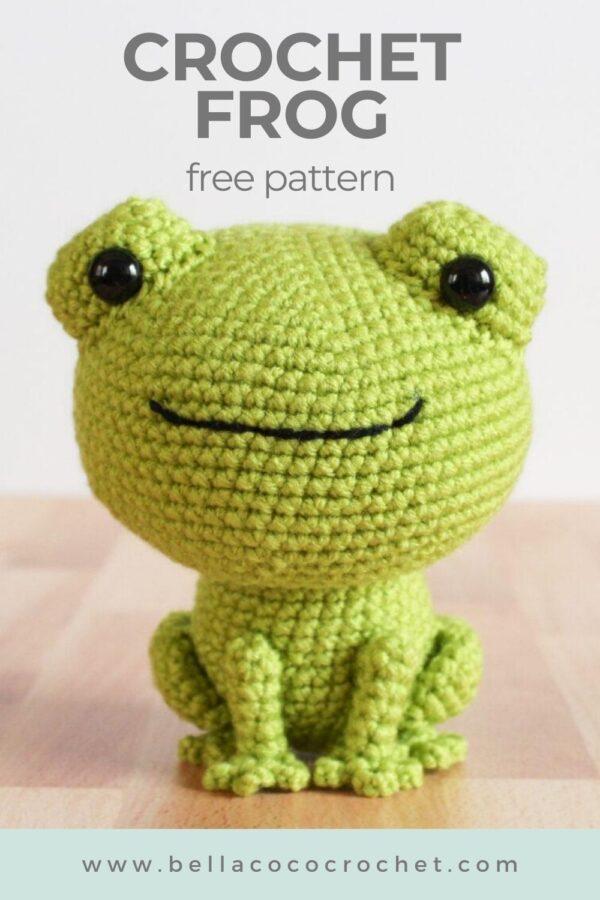
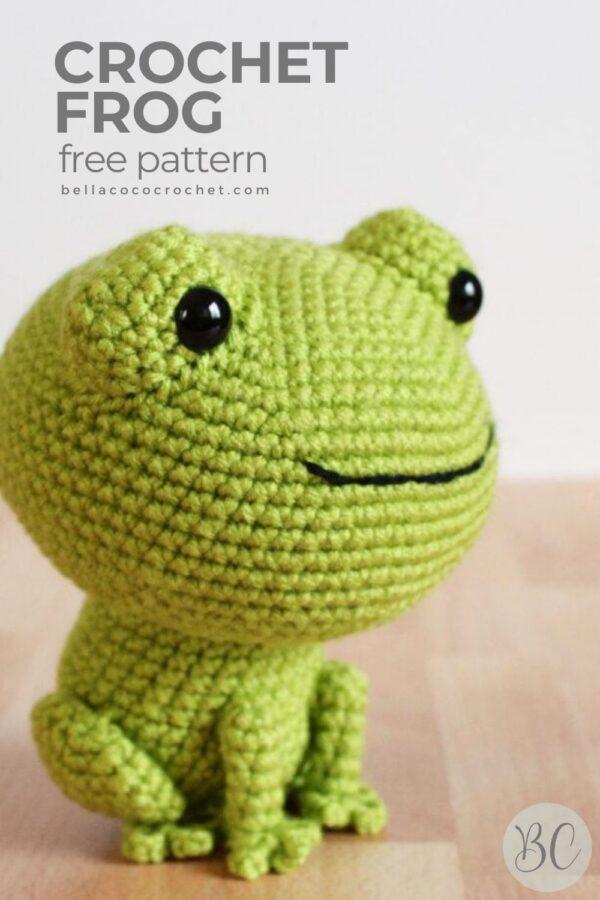
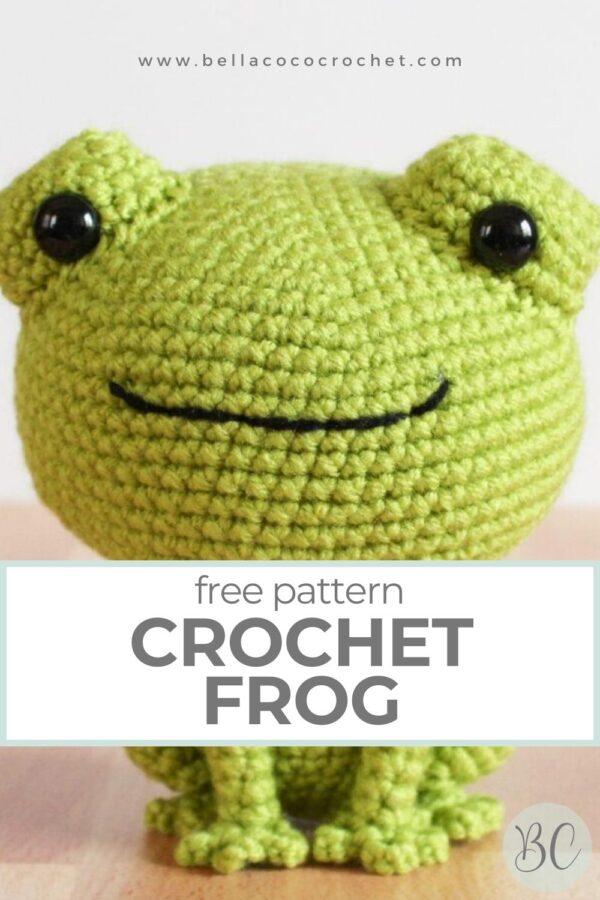
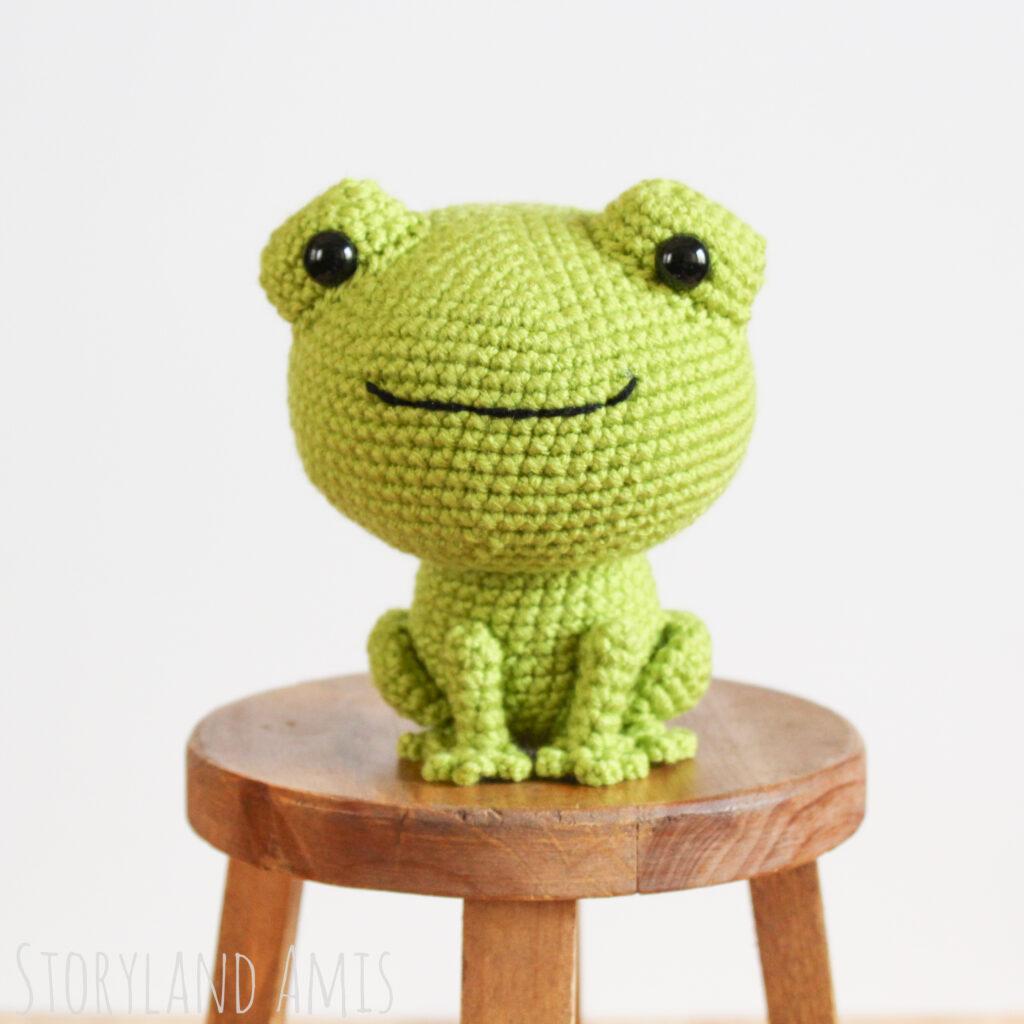
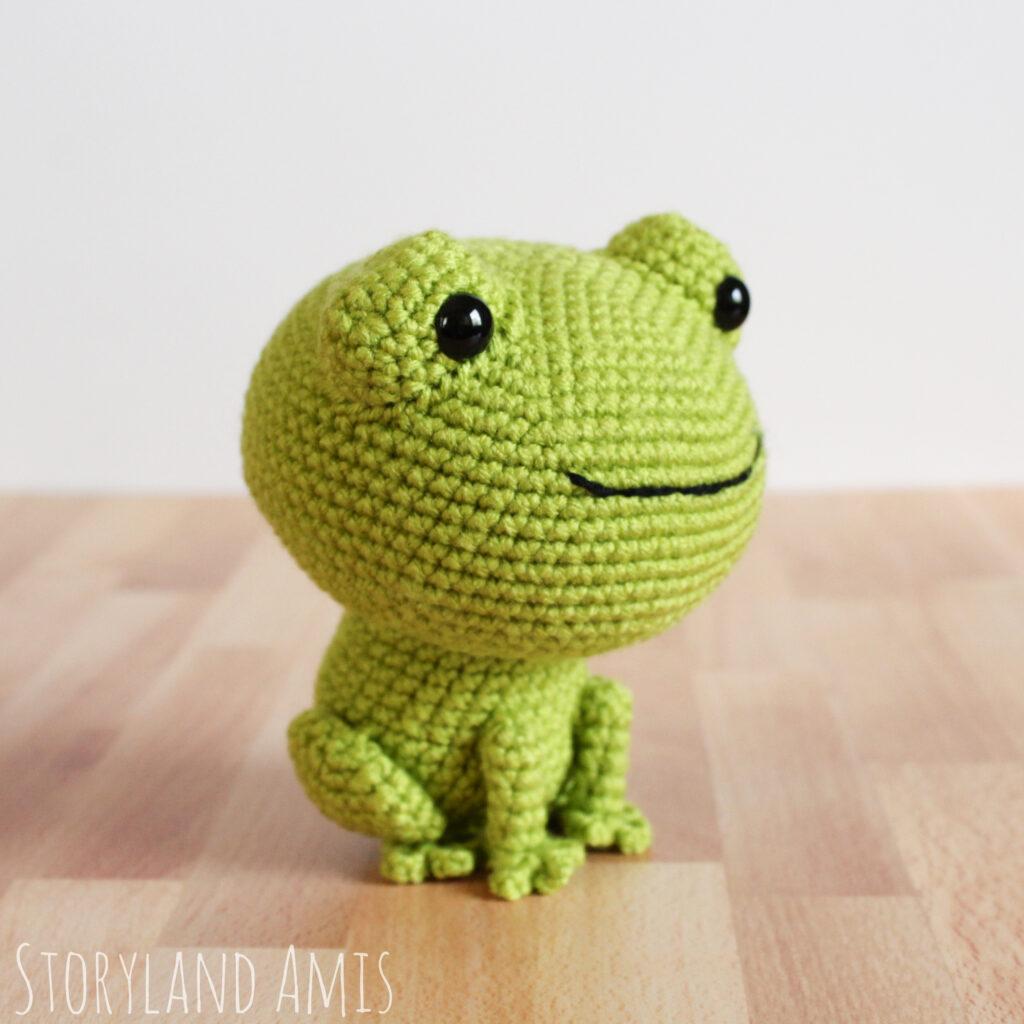
Crochet Frog, Ribbert by guest designer Holly of @storyland_amis shares this adorable free pattern for you! Crochet amigurumi toys are a fantastic way to bring a bit of joy and whimsy into your life. One of the cutest and most popular amigurumi designs is the frog, and it’s not hard to see why.
As this is a guest post, Bella Coco Crochet is unable to answer any queries. If you have a question, please contact the designer directly and they will be happy to help you.
About the Designer
Tell us about how you got into crochet.
Seriously, I can’t remember a time when I wasn’t creating, crafting, or designing something. I’ve always loved creating new things and even before I learned how to crochet back in 2012, you could find me drawing, embroidering, or knitting.
Enter Crochet. When I learned how to crochet I realized that this was “my” craft and I hadn’t loved (and still haven’t loved) any craft as much since.
With the right hook and yarn, I can create anything my heart desires. And I can create it just how I want it. There’s something quite special about that in a world where custom items and handmade things have taken a bit of a back seat to a mass-consumer society.
When did you start Storyland Amis?
I started Storyland Amis in 2015. This little business is my dream come true. The realization of all my efforts and creativity back when I was a little girl working on various crafts. I put all my heart and soul into everything about Storyland Amis. Before I release each pattern, I make sure I love it and I’m proud of it. And I keep you in mind, too, when I’m designing, making sure every design is easy to understand and crochet.
Can you tell us about your design
“Meet Ribbert the Crochet Frog! Ribbert is a Cajun frog from the Louisiana Bayou. He loves everything about his home, but especially the delicious food his mama makes! His favourites are gumbo and jambalaya. He loves listening to jazz and enjoys spending time with his friend Richie the Gator.”

Holly says, “The original Japanese style of amigurumi is an animal with a large, oversized head and a small body. The arms and legs are also usually small and short and the face is distinctive because the eyes are far apart with the mouth/muzzle directly between the eyes. This creates a cute or look.“
What is Amigurumi?
Amigurumi is a Japanese art form of creating small crocheted or knitted stuffed toys, dolls or figurines. The word “amigurumi” comes from the Japanese words “ami”, meaning crocheted or knitted, and “nuigurumi”, meaning stuffed doll. The art of making amigurumi involves using simple crochet techniques to create small and detailed shapes, which are then stuffed with fiberfill to create cute and often whimsical characters.
Worked typically in the round and are made with a combination of basic stitches such as double crochet and slip stitch. Amigurumi has become increasingly popular in recent years, with crafters around the world sharing patterns and designs to create their own unique amigurumi creations.
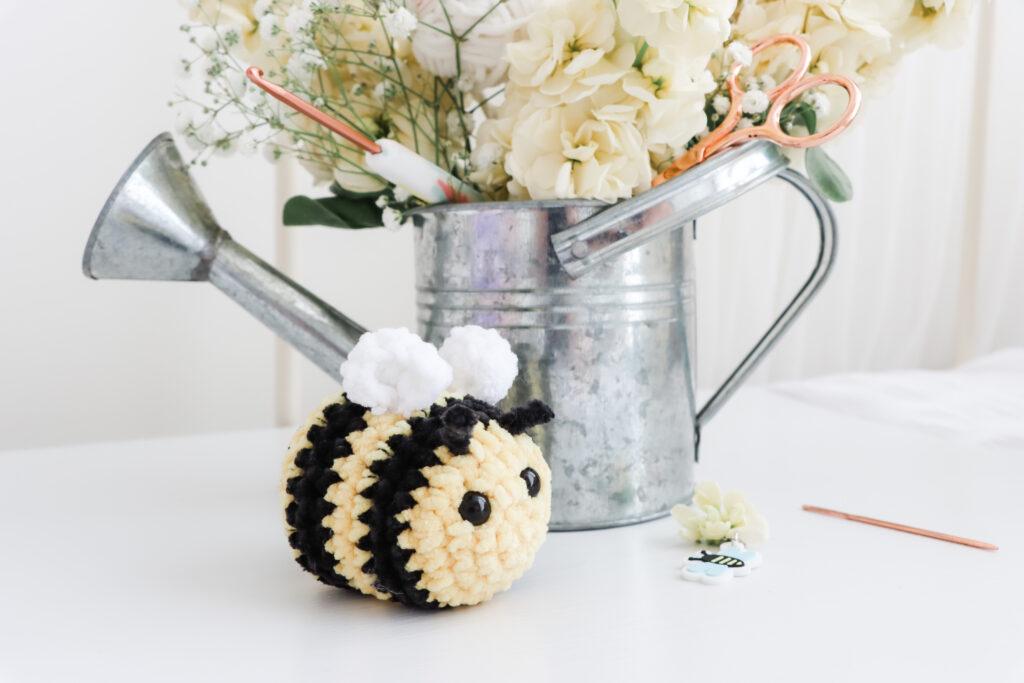
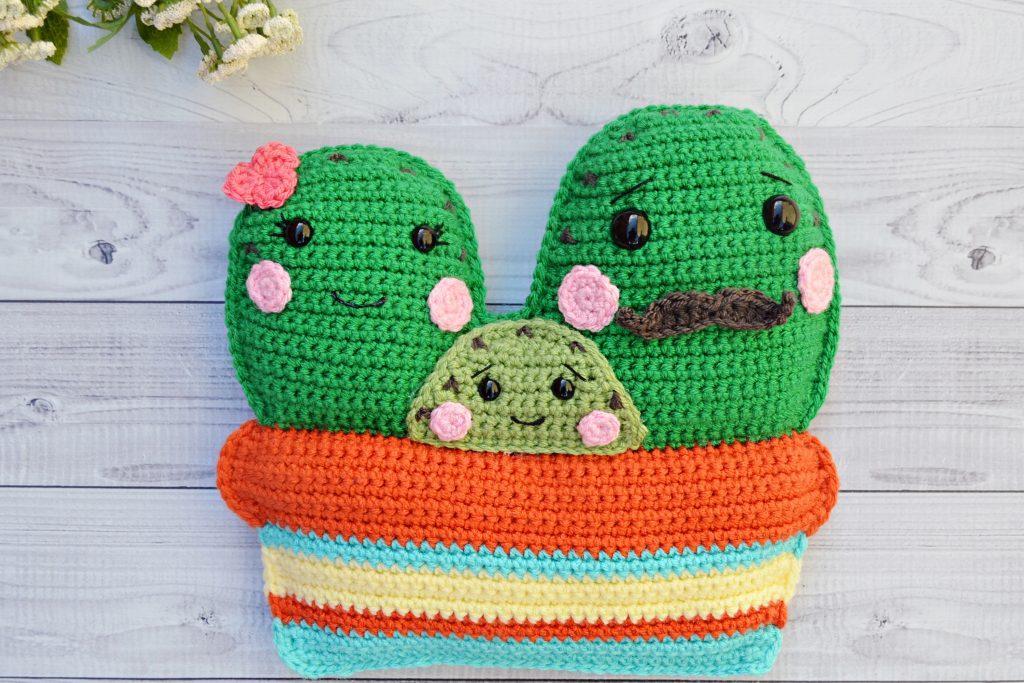
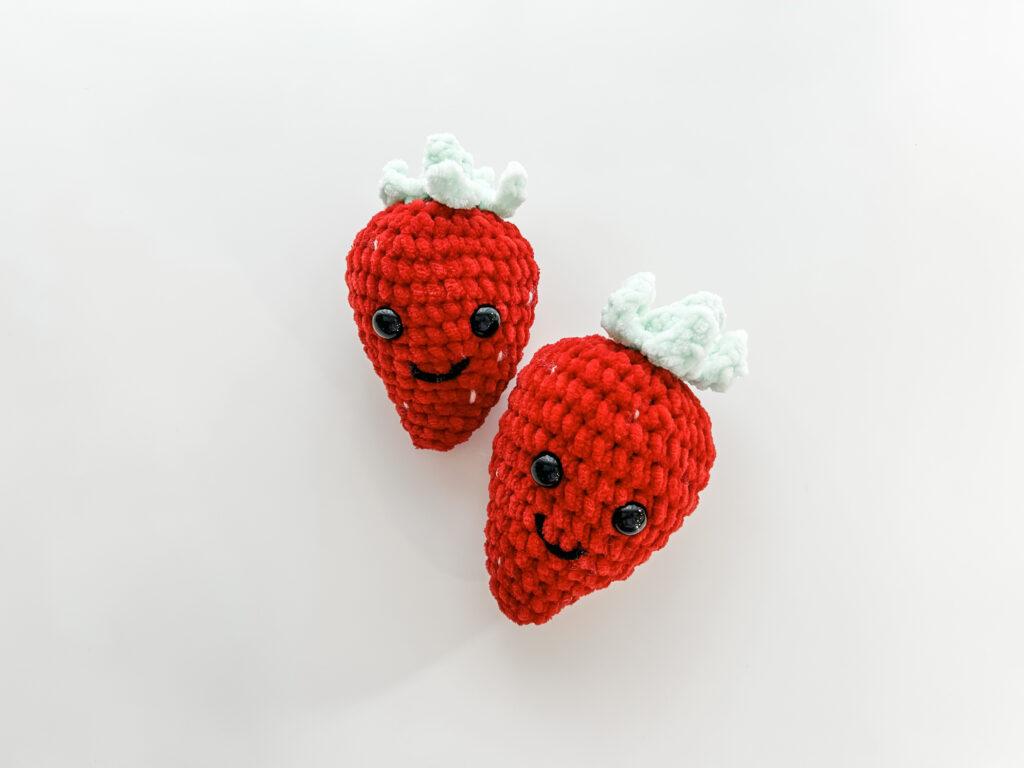
Explore More Amigurumi Patterns
If you love amigurumi why not check out these adorable FREE patterns available on the blog and get inspired for your next make:

Materials and tools
- Yarn: Worsted weight yarn (approx 86g) in green & small amount of black (UK equivalent is Aran & AUS/NZ is 8 ply).
- Hook: 4mm
- Safety Eyes: 12mm
- Fiberfill (or your stuffing of choice)
- Darning Needle
- Scissors
- Stitch Markers
Pattern Notes
- Written in US terms
- All rounds are worked continuously (that is, vs. joined rounds.) All pieces are sewn together using the whip stitch unless otherwise specified.
- **: repeat this group of instructions amount of times indicated
Finished Size
- Finished size approximately: 5.5 inches (14 cm)

Terms and Abbreviations
- Chain(s): ch(s):Yarn over, pull through
- Slip Stitch (ss): Insert hook, yarn over, pull through all loops.
- Single Crochet(s): sc(s): Insert hook into stitch, yarn over, pull up a loop, you will have two loops on the hook. Yarn over, pull through remaining two loops.
- Increase (inc): two single crochet stitches in the same stitch
- Decrease (dec): insert the hook into the front loop of the first stitch (two loops on hook) and immediately insert it again into the front loop of the next stitch (three loops on the hook). Yarn over and draw through the first two loops on the hook (two loops on the hook). Yarn over and draw through the two loops on the hook to finish your invisible decrease.

Unsure of the differences between UK and US terms? Need a refresher on how to do your stitches? In my ‘How to crochet: A handy reference guide’ EBook I help you with all of these terms and you can always have them to hand! You will also get exclusive access to free video instructions. Learn more about the eBook here.
Free Pattern: Crochet Frog
Head (using green yarn) Round 1-10:
- R1: Ch 2, 6 sc in 2nd ch from hook
- R2: *Inc* rep 6 times (12 sts)
- R3: *Sc 1, inc* rep 6 times (18 sts)
- R4: *Sc 2, inc* rep 6 times (24 sts)
- R5: *Sc 3, inc* rep 6 times (30 sts)
- R6: *Sc 4, inc* rep 6 times (36 sts)
- R7: *Sc 5, inc* rep 6 times (42 sts)
- R8: *Sc 6, inc* rep 6 times (48 sts)
- R9: *Sc 7, inc* rep 6 times (54 sts)
- R10: *Sc 8, inc* rep 6 times (60 sts)
Round 11-30:
- R11: *Sc 9, inc* rep 6 times (66 sts)
- R12-20: Sc in all 66 sts (9 rounds total—66 sts)
- R21: *Sc 9, dec* rep 6 times (60sts)
- R22: *Sc 8, dec* rep 6 times (54 sts)
- R23: *Sc 7, dec* rep 6 times (48 sts)
- R24: *Sc 6, dec* rep 6 times (42 sts)
- R25: *Sc 5, dec* rep 6 times (36 sts)
- R26: *Sc 4, dec* rep 6 times (30 sts)
- Start to stuff the head, continuing to stuff as you go on.
- R27: *Sc 3, dec* rep 6 times (24 sts)
- R28: *Sc 2, dec* rep 6 times (18 sts)
- R29: *Sc 1, dec* rep 6 times (12 sts)
- R30: *Dec* rep 6 times (6 sts)
- Finish off and weave in ends. We will embroider the smile after we sew the eyes on.
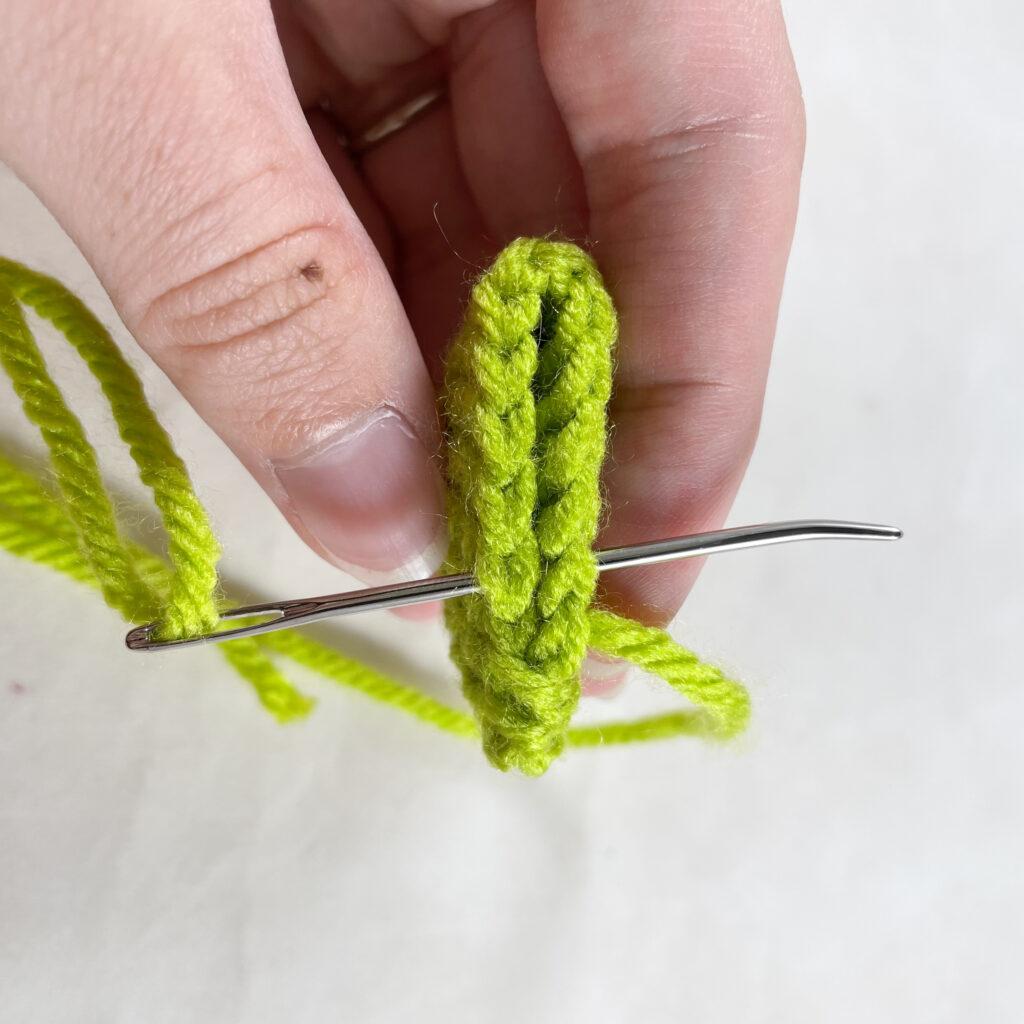
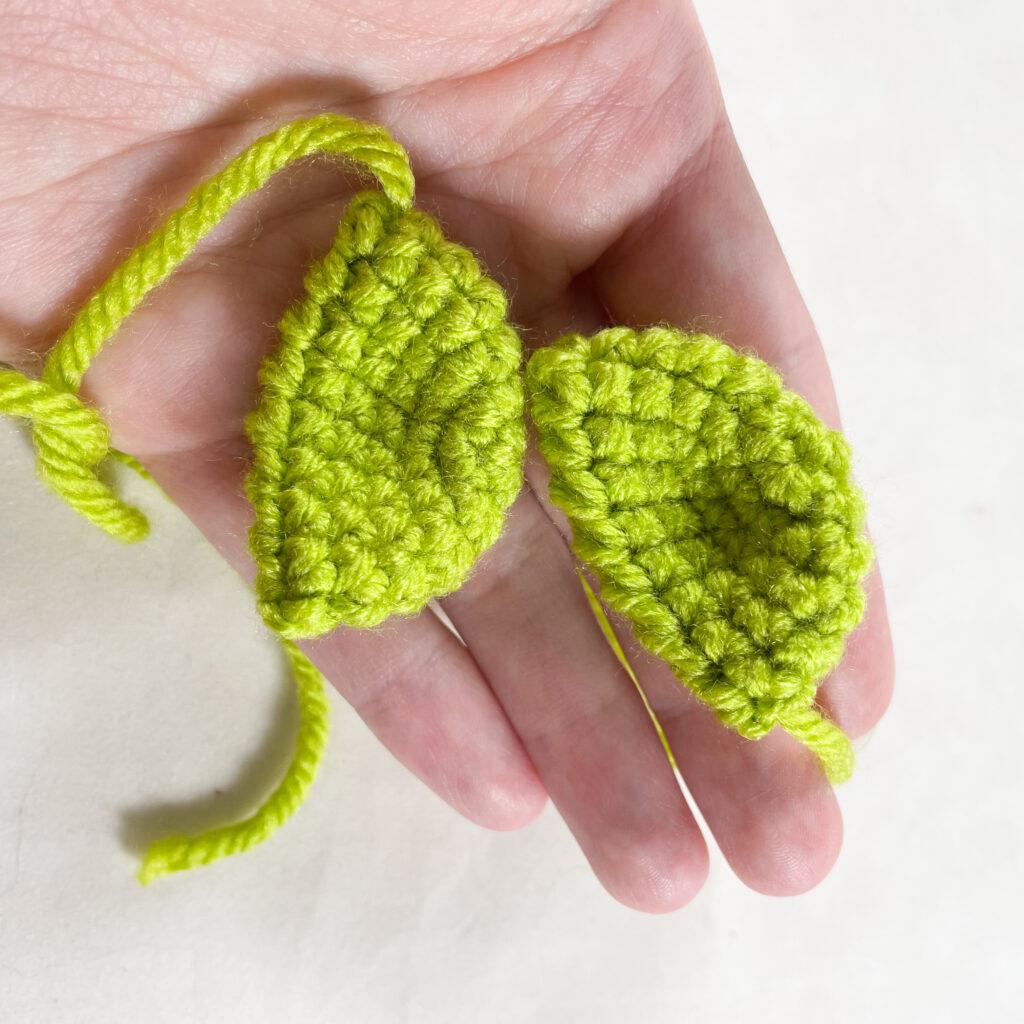
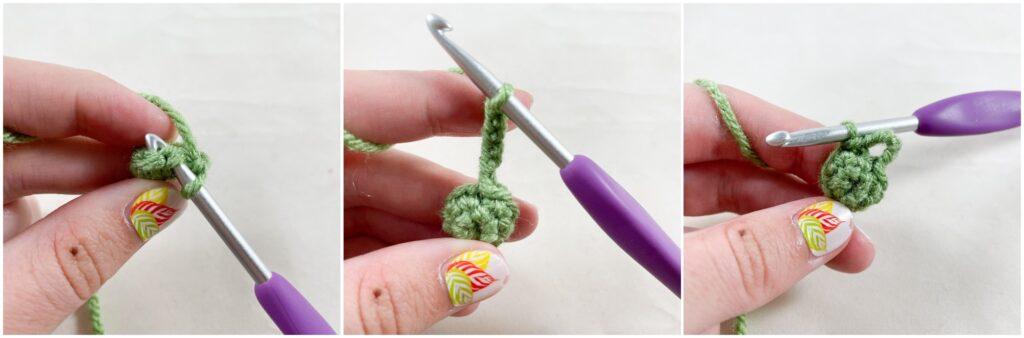
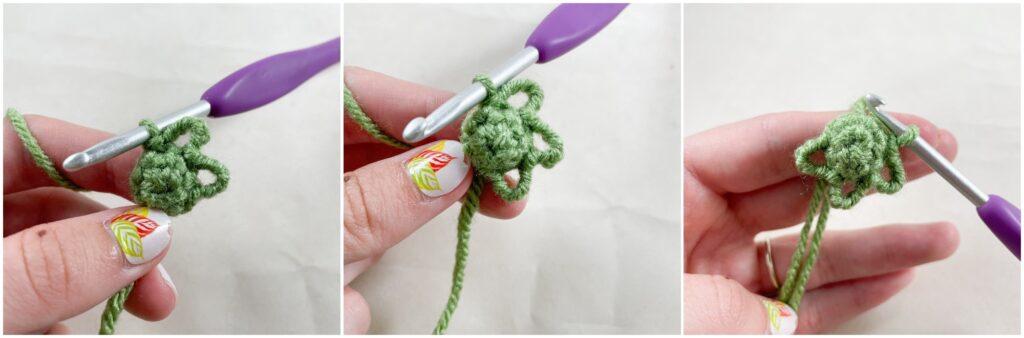
Eyes (make 2 using green yarn)
- R1: Ch 7, starting in 2nd ch from hook, sc 6, rotate your work 180 degrees and in the front loops of the ch, sc 6 (12 sts)
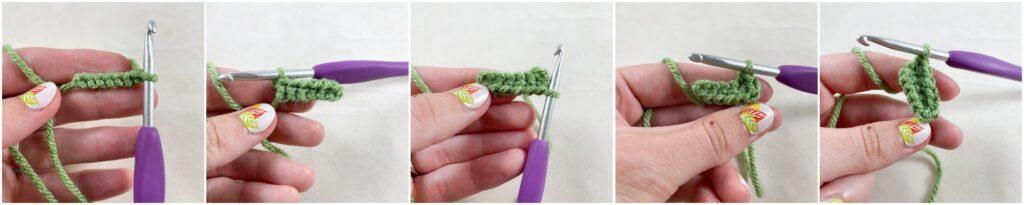
This is called a foundation chain and is a great way to start a piece that you want to be more oval than round. After crocheting through the top loops of the chain, you turn your work around and crochet in the bottom loops of the chain. The first round is complete! Now you just continue as you normally would working in the round.
- R2: Inc 1, sc 3, inc 3, sc 3, inc 2 (18 sts)
- R3-4: Sc in all 18 sts (2 rounds total—18 sts)
- R5: Sc 1, inc 1, sc 3, *sc 1, inc 1* repeat 3 times, sc 3, *sc 1, inc 1* rep 2 times (24 sts)
- Finish off leaving a long tail for sewing.
Facial Features
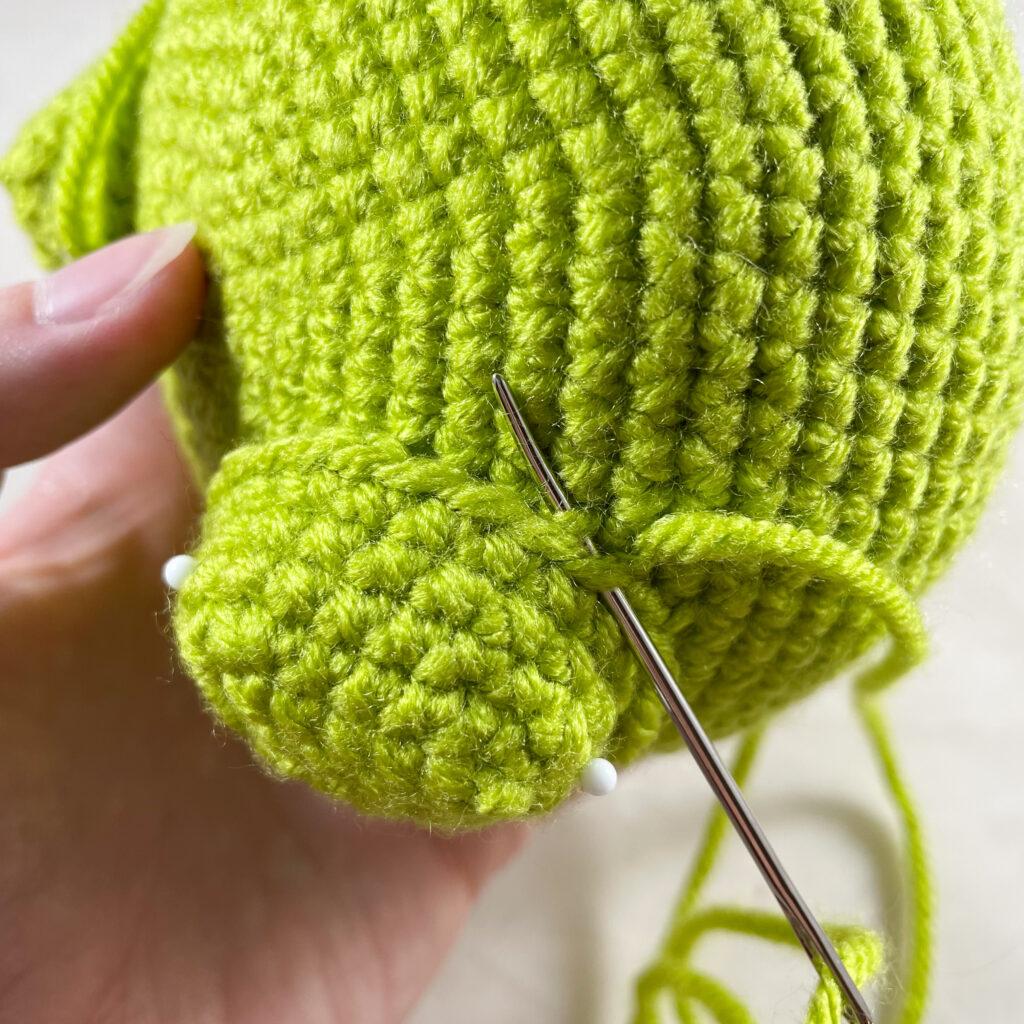
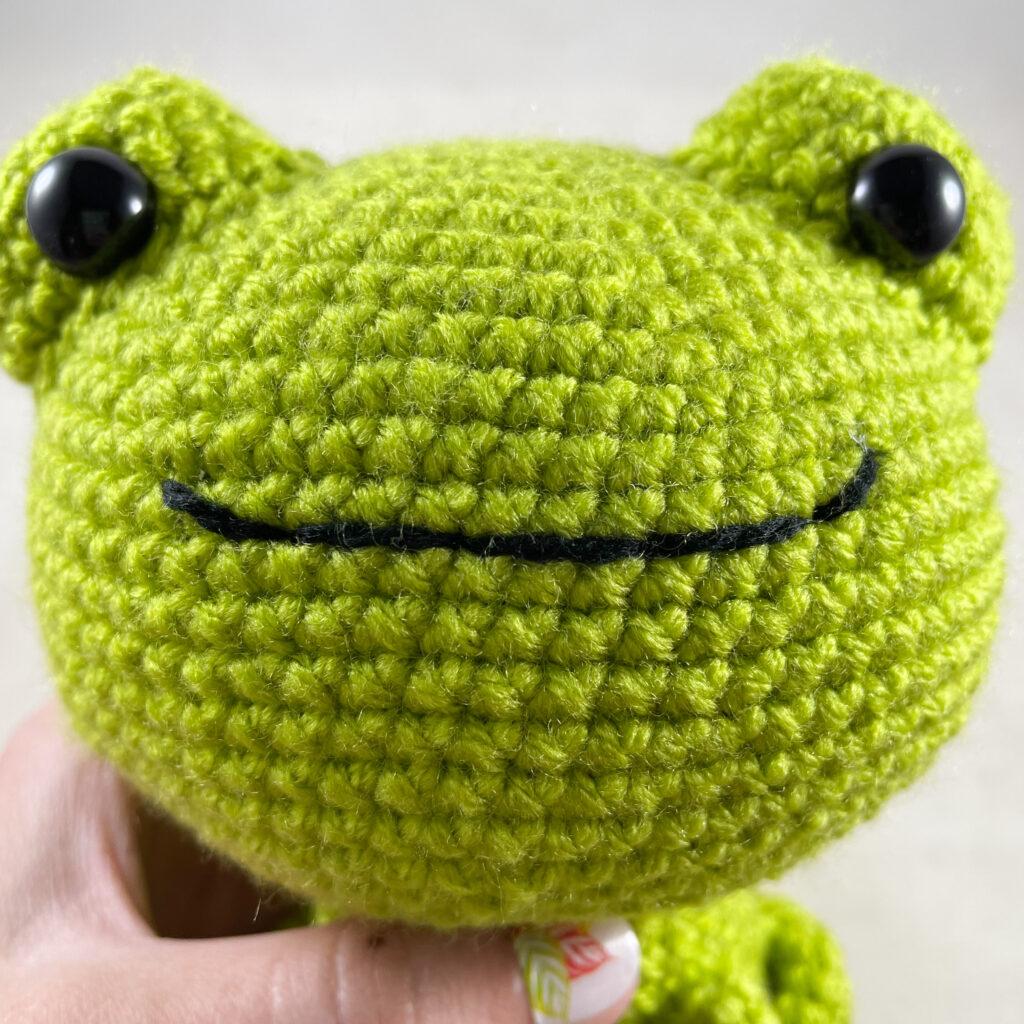
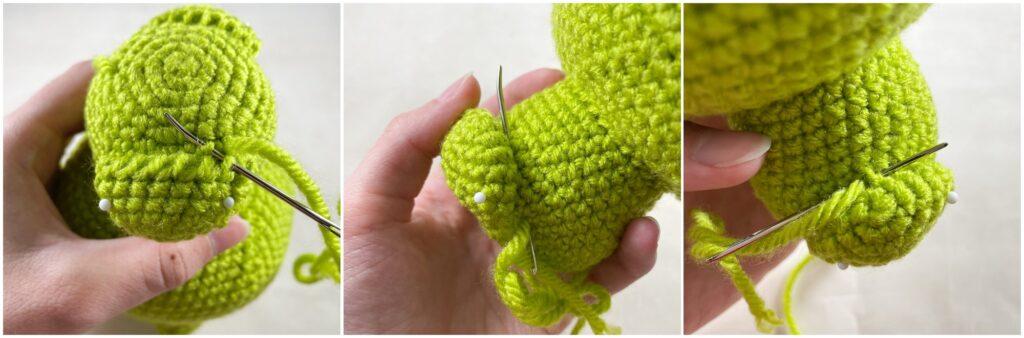
- Insert your 12mm eyes between R4 & 5 of the eye pieces.
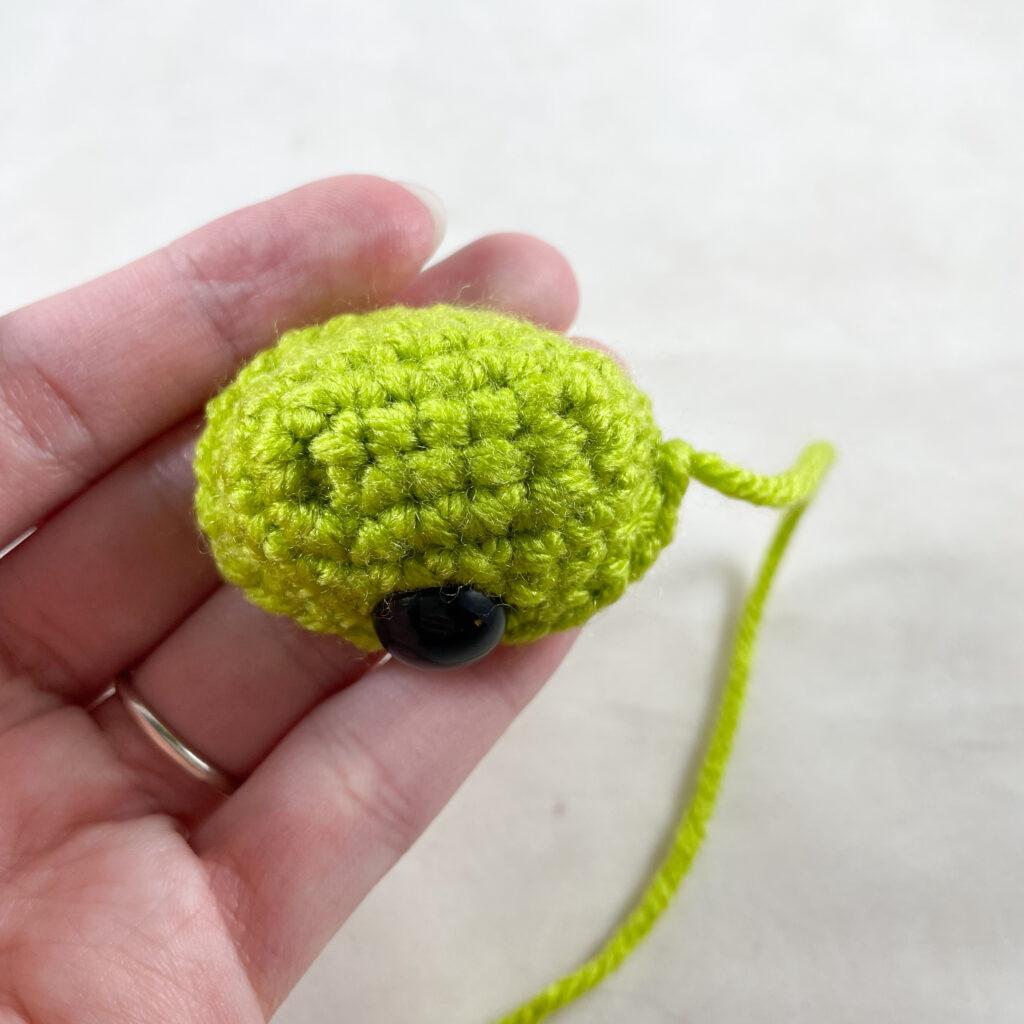
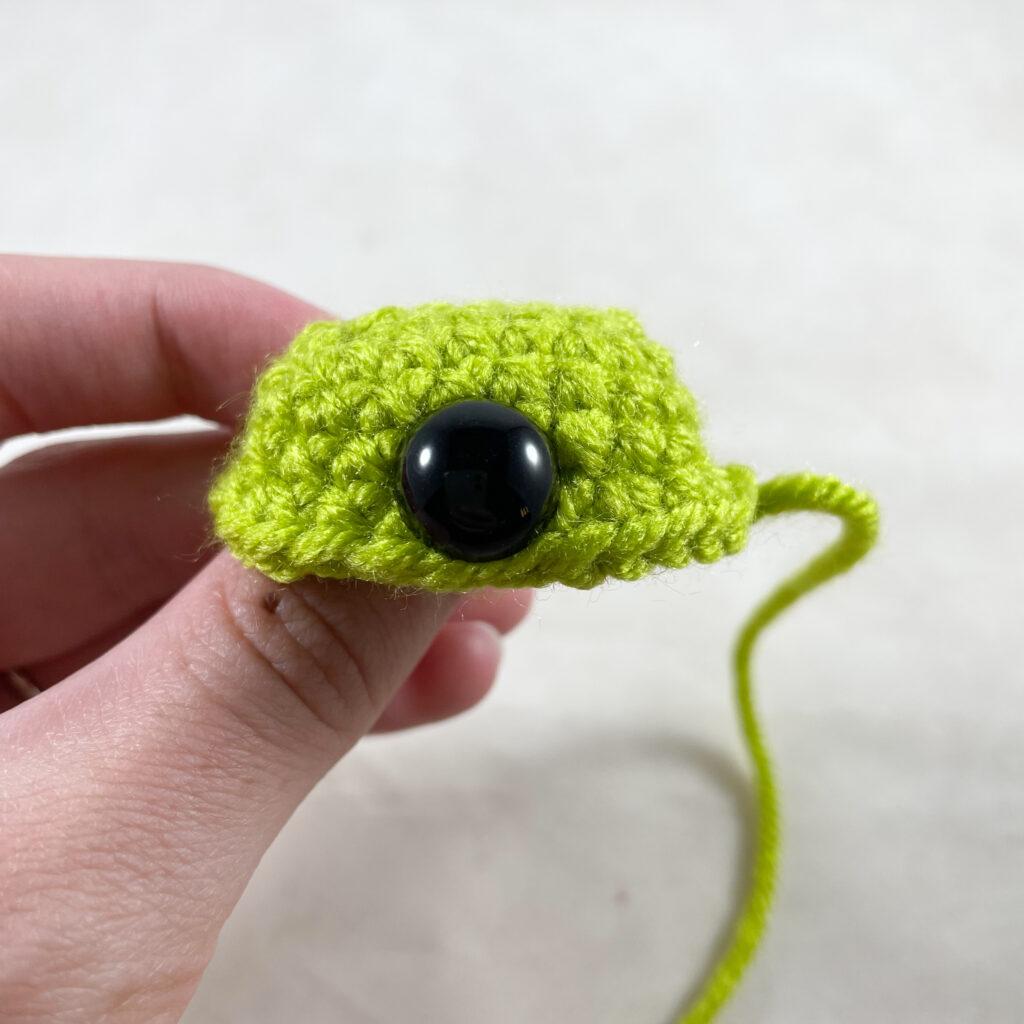
- You can stuff them lightly before sewing them to the head. Sew the eyes to either side of the middle of the head over R5-14 approx. for each eye.
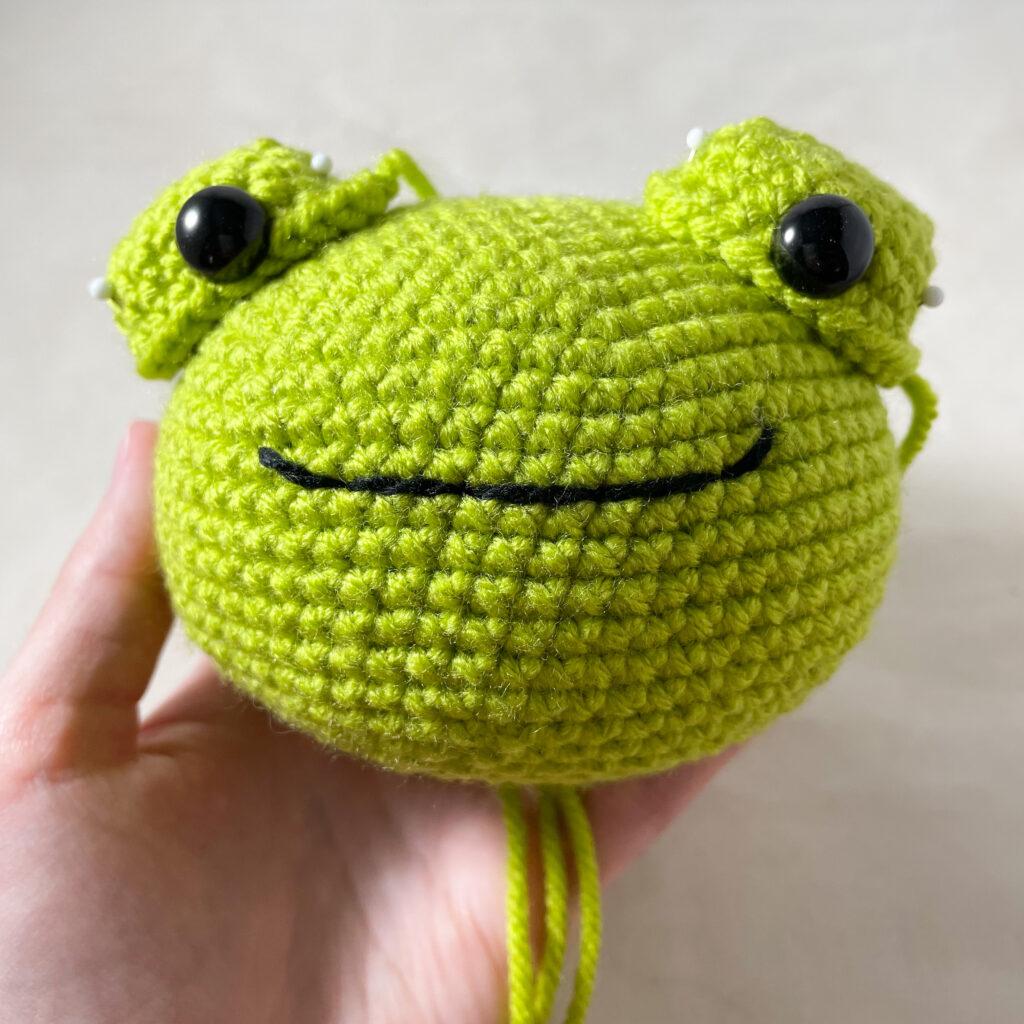
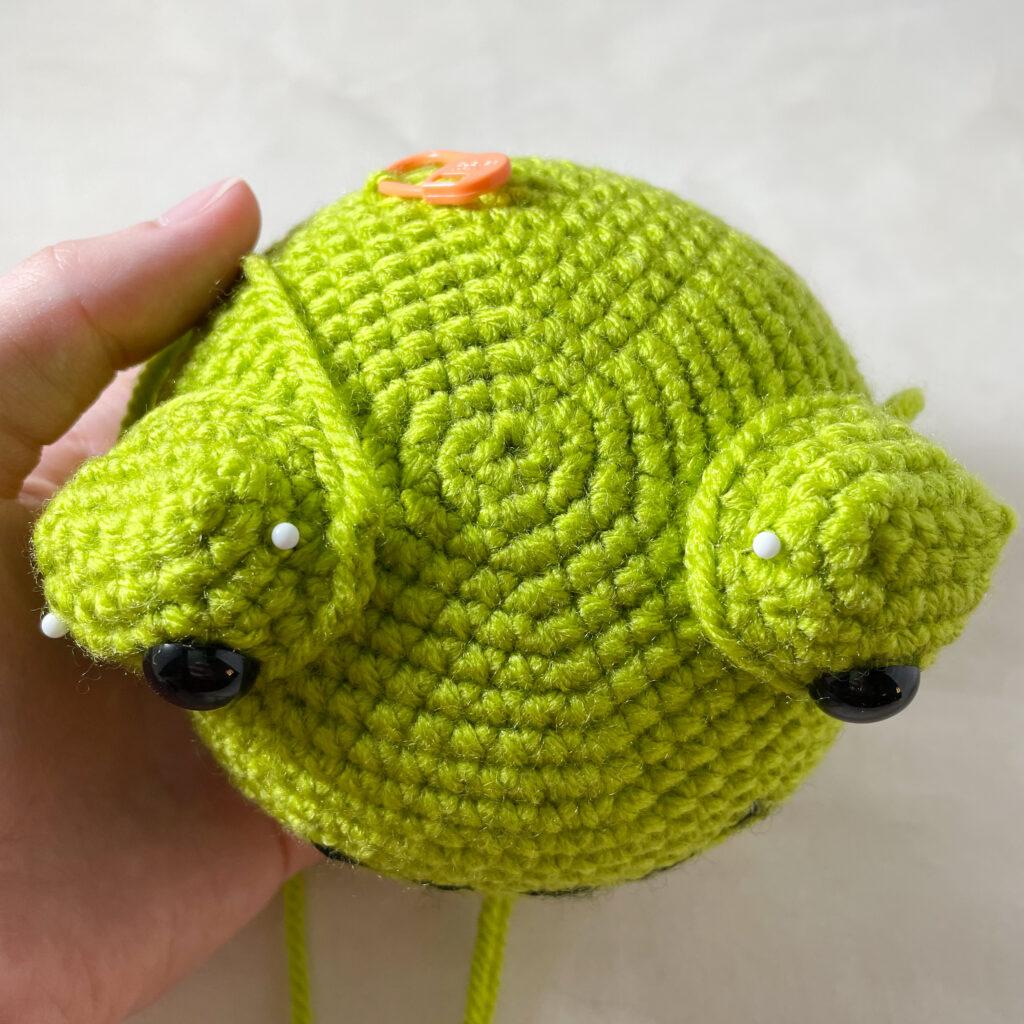
- Now take some black yarn and embroider a wide smile between R14 & 15 of the head using the straight stitch. My smile is about 13 sts wide. The last st on either side of the smile should turn up over R15 to create a slight curve.
Body (using green yarn)
- R1: Ch 2, 6 sc in 2nd ch from hook
- R2: *Inc* rep 6 times (12 sts)
- R3: *Sc 1, inc* rep 6 times (18 sts)
- R4: *Sc 2, inc* rep 6 times (24 sts)
- R5: *Sc 3, inc* rep 6 times (30 sts)
- R6: *Sc 4, inc* rep 6 times (36 sts)
- R7-11: Sc in all 36 sts (5 rounds total—36 sts)
- R12: *Sc 4, dec* rep 6 times (30 sts)
- R13-16: Sc in all 30 sts (4 rounds total—30 sts)
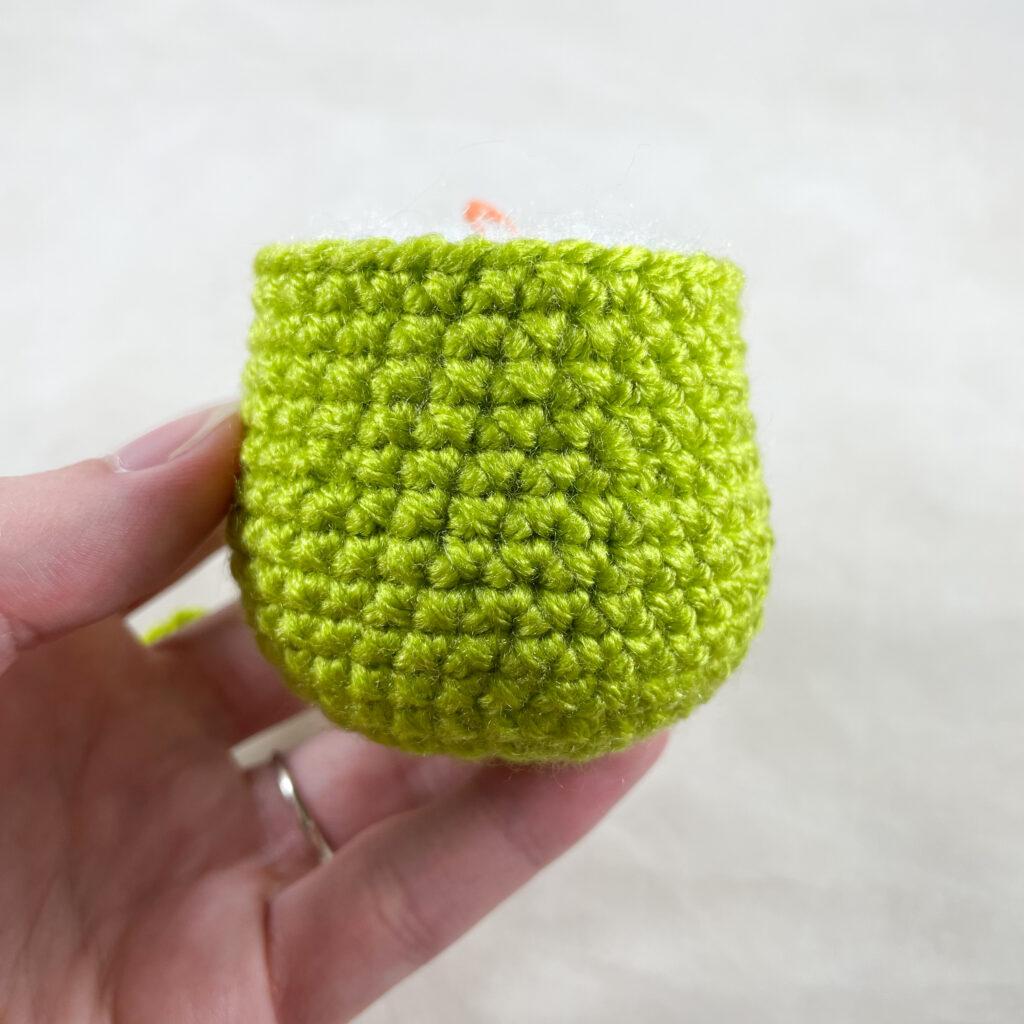
- Finish off leaving long tail for sewing.

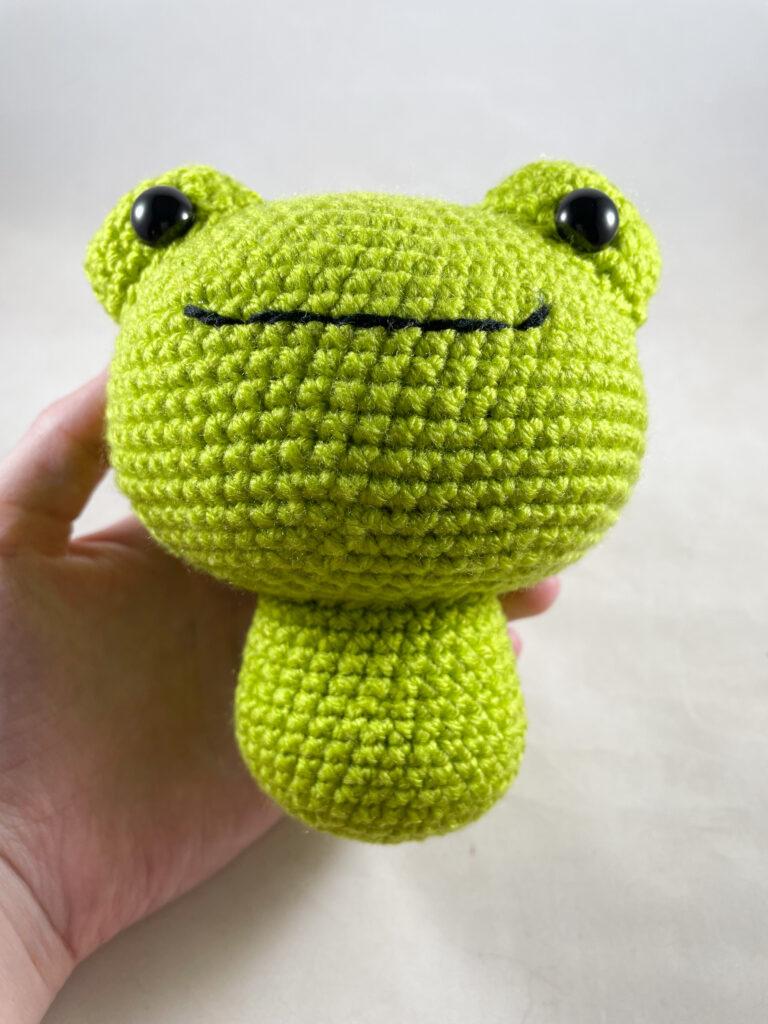
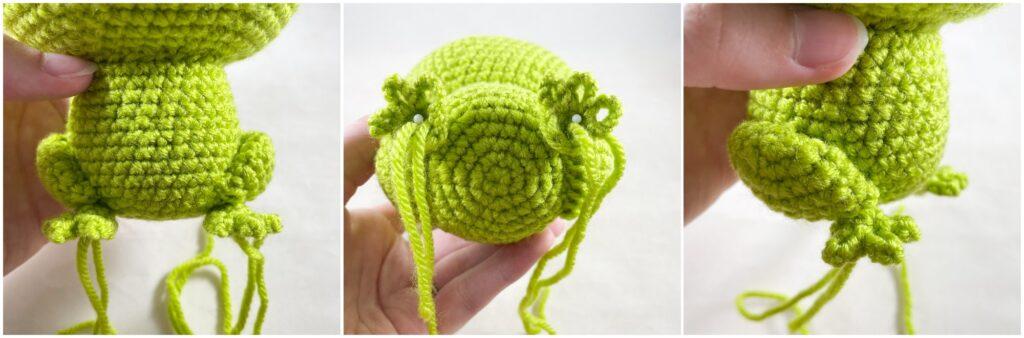
- Stuff firmly and sew to the bottom centre of the crochet frog’s head.
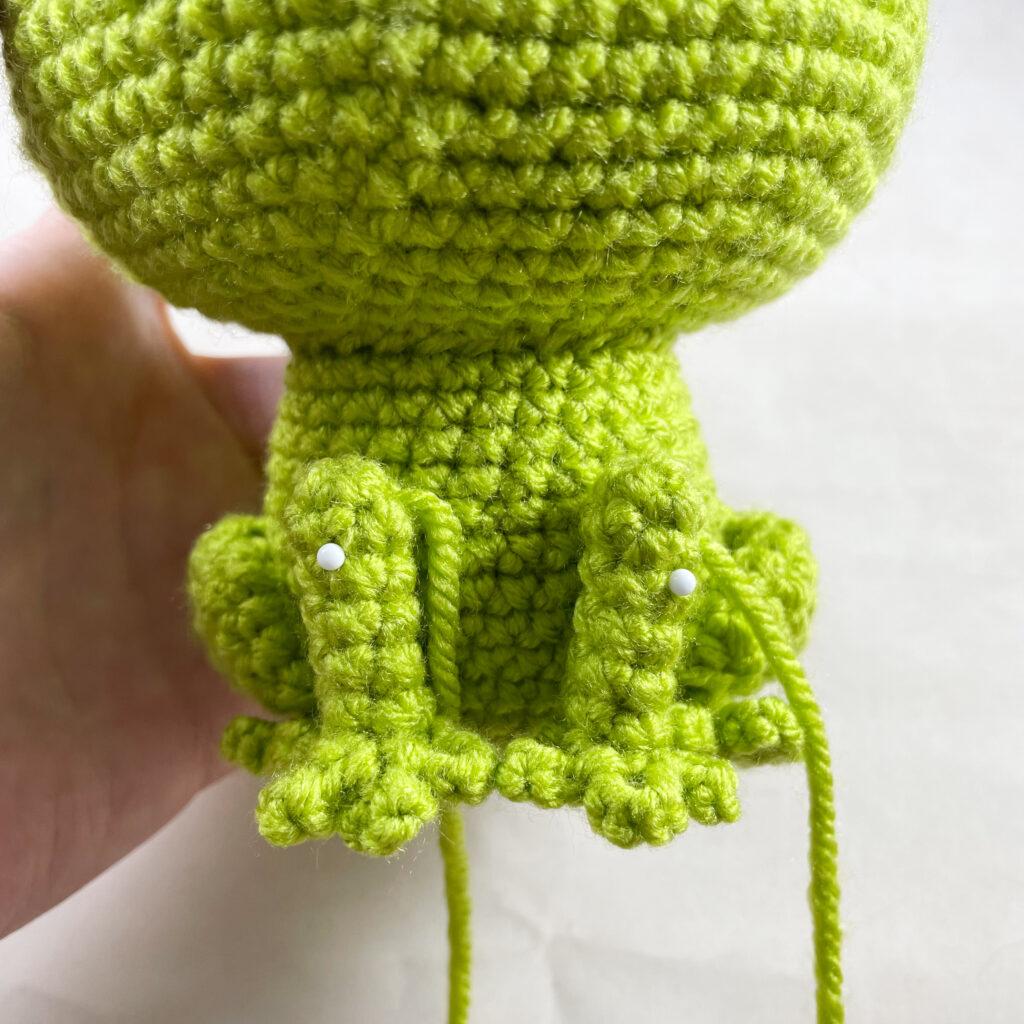
Thighs (make 2 using green yarn)
- R1: Ch 2, 6 sc in 2nd ch from hook
- R2: *Inc* rep 6 times (12 sts)
- R3: *Sc 1, inc* rep 6 times (18 sts)
- R4-6: Sc in all 18 sts (3 rounds total—18 sts)
- Finish off leaving long tail for sewing however do not stuff.
- Fold the thighs in half and sew the open ends closed.
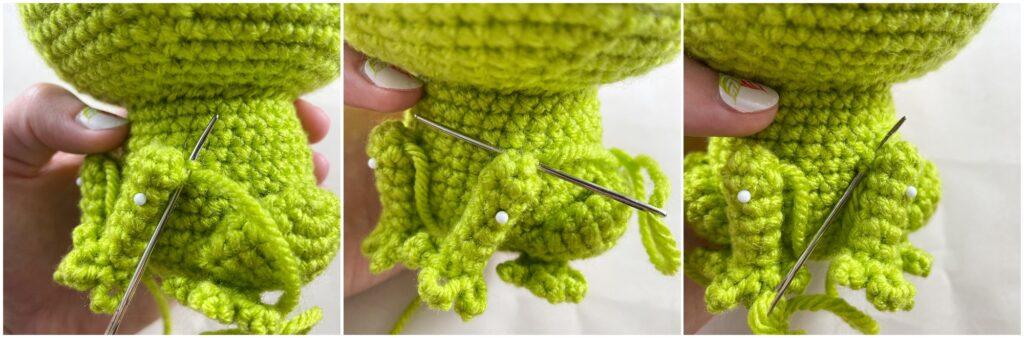
- Pin the thighs in place to ensure you are happy with the placement before sewing them onto the body.
- Please note: Because the thighs are slightly curved when placed on the body, you’ll sew the corners/sides of the thighs to R7 & 8 of the body and the very bottom edge of the thigh to R6.
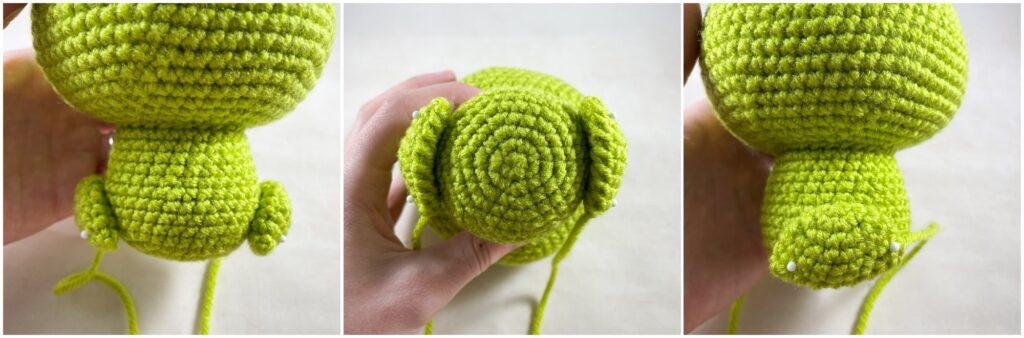
- When you finish sewing the bottom (straight edge) of the thigh to the body weave your needle to the top of the thigh and grab a stitch or two and sew those to the side of the body. This will firmly secure it to the body without having to sew all the way around the thigh and lose its puffy shape.
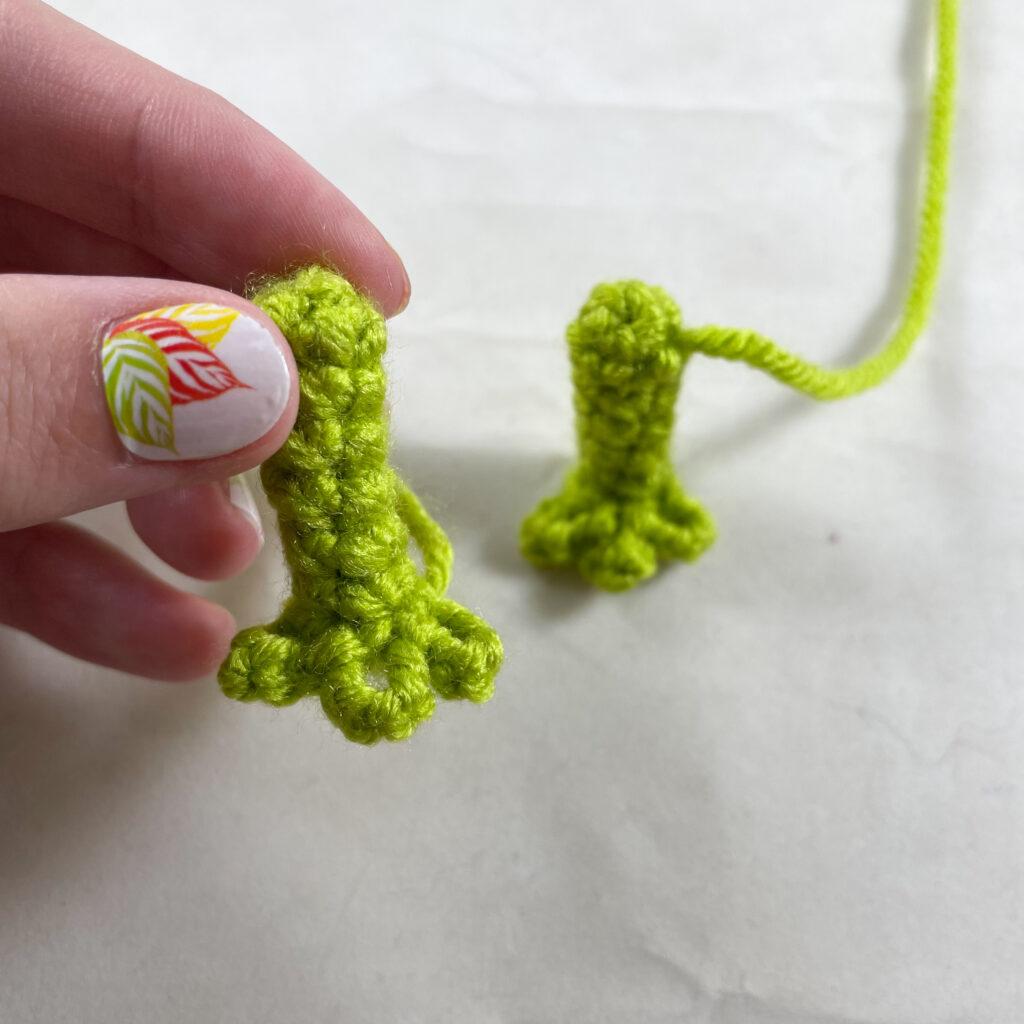
Feet (make 2 using green yarn)
- R1: Ch 2, 6 sc in 2nd ch from hook
- R2: Sc in all 6 sts (6 sts)
Toes
- R3: *Sl st, ch 6, sl st in next sc* rep 3 times. We will NOT be working into any of the ch sts we make. All sl sts are worked into the sc sts on R2. The toes will look like little loops when completed.
- Time to finish off leaving tail for sewing. Pin feet to the bottom front of the thighs.
- Sew the feet onto the thighs going all the way around the top round of the feet. Weave in all ends.

Arms (make 2 using green yarn)
- R1: Ch 2, 6 sc in 2nd ch from hook
- R2-7: Sc in all 6 sts (6 rounds total—6 sts)
We will now make the toes just like we did on the feet. (Refer to “feet” section for pics.)
- R3: *Sl st, ch 6, sl st in next sc* rep 3 times. We will NOT be working into any of the 6 ch sts we make. All sl sts are worked into the sts on R2. The toes will look like little loops when completed.
- Fasten off leaving long tail for sewing.
No need to stuff. Weave the tail we left from the bottom of the arms to the top of the arms.

Sew arms to the front of the crochet frog body over R13-14 of the body. The arms should be about 3 sts apart from each other at the top. The toes should then touch at the bottom.
Lastly, fasten off and weave in all the ends and there you have you very own crochet frog!
I always love to see your makes so if you try any of my patterns or follow my stitch tutorials please tag me @bellacococrochet or use the #bellacococrochet
sarah-jayne
Thank you so much for this pattern. It worked up super fast and was perfect for my little one who is home sick today. The toes are so cute!!!
Is a pdf available for this pattern?
Hi Nora as this was a guest post you will have to contact the designer directly and they will be able to help you 🙂
This pattern is so cute! I made a huge plushie and it turned out amazing! The head is bigger than mine thank you!!
You’re welcome, the designer will be happy to hear that 🙂
I’ve been using this pattern and have found it so helpful. Unfortunately came in today to finish of the body, to find content is blocked unless I sign in or sign up to newsletters. Already signed up to Bella Coco so can’t understand why it’s not letting me in without creating a new account
Hi Kerry, you just need to enter your e-mail address to unlock the pattern 🙂
thank you so much for the pattern! i’m making a mini frog (for a keychain!), so i had to reduce de full pattern hahaha it’s super cute <3
I literally cried over this website. I clicked on it because i needed a frog head for a rattle toy im making and nothing was looking right and i seen the accessibility settings and there is a setting for dyslexia. This is the first time ive ever been able to read a website let alone a pattern this easily. Thank you for that ability.