This post is sponsored by CWOC.
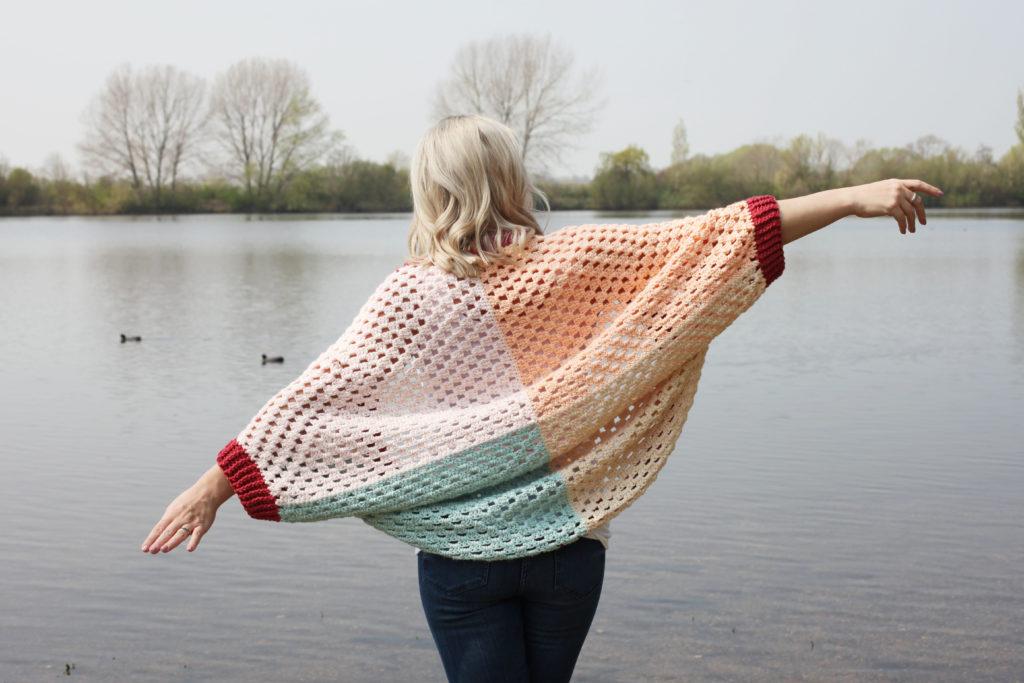
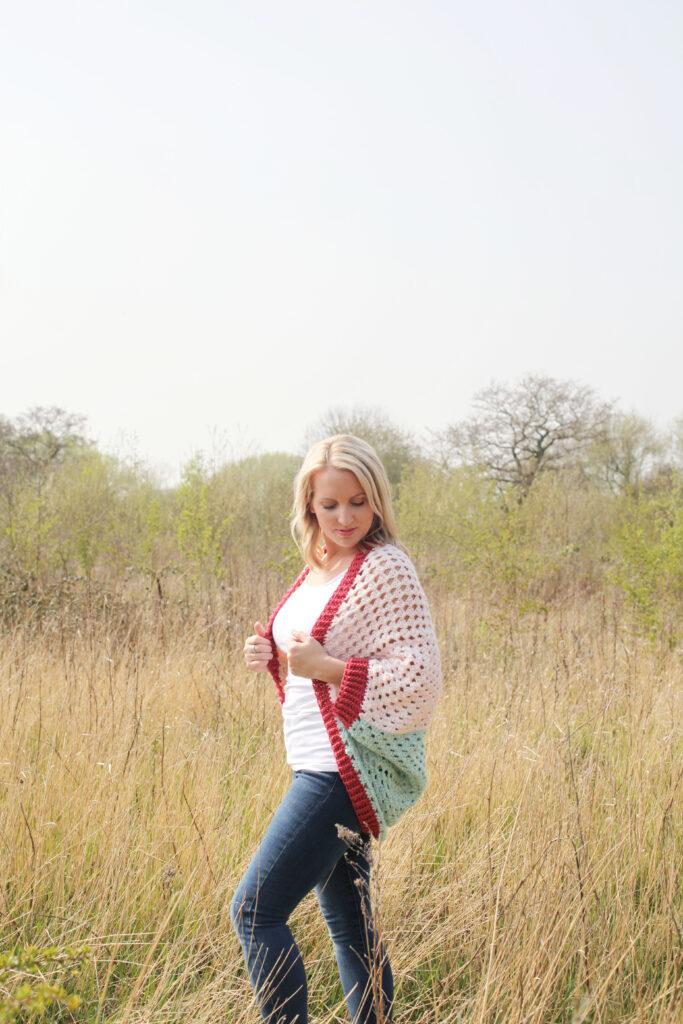
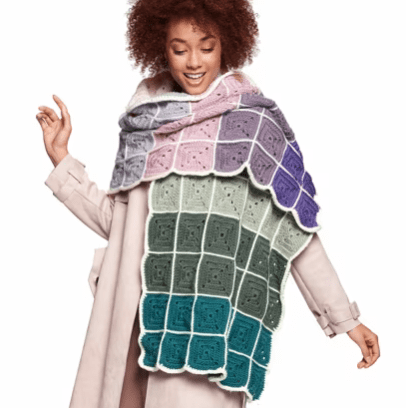
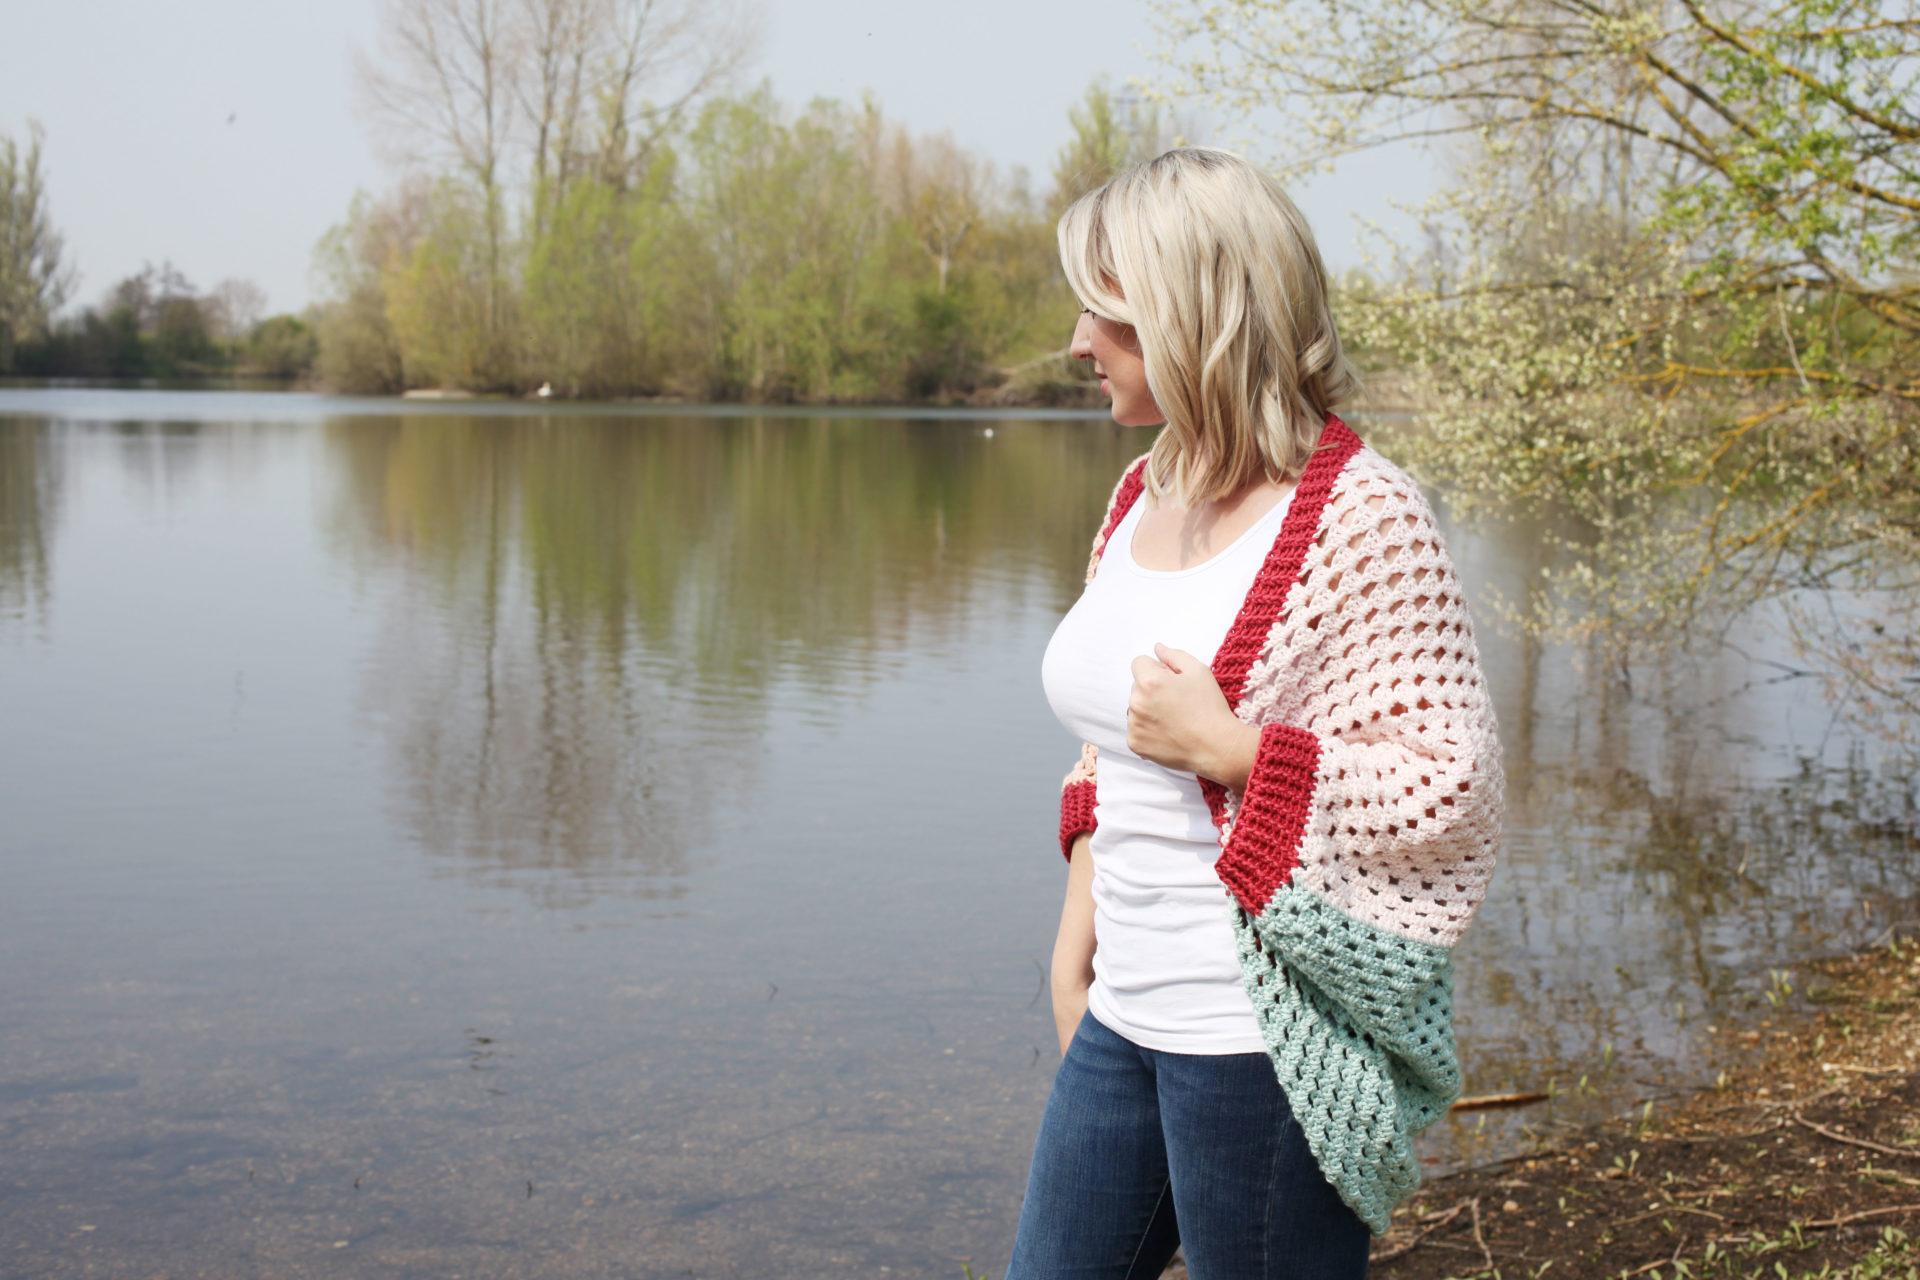
Fancy creating your own Crochet Cocoon? I have had SO many requests since starting my tutorials for wearable items. So in this post I bring you this stunning coverup which is SUPER easy to make! I’ll walk you through the pattern step by step so that you can create your own. I have used the stunning new yarn by Caron X Pantone. If you want to improve your pattern reading skills, then this is perfect for you. Simply download the FREE PDF print it out and follow along step-by-step with the tutorial.

Did you know there are LOADS of free patterns available designed with Caron x Pantone.
CLICK HERE to check them out.
The Yarn: Caron x Pantone
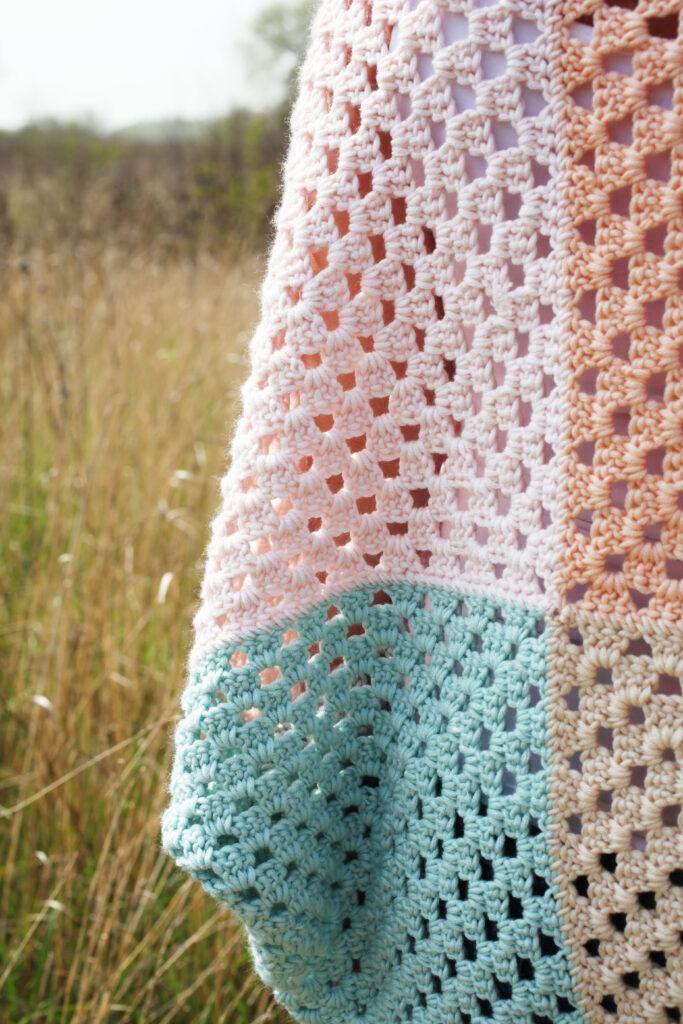
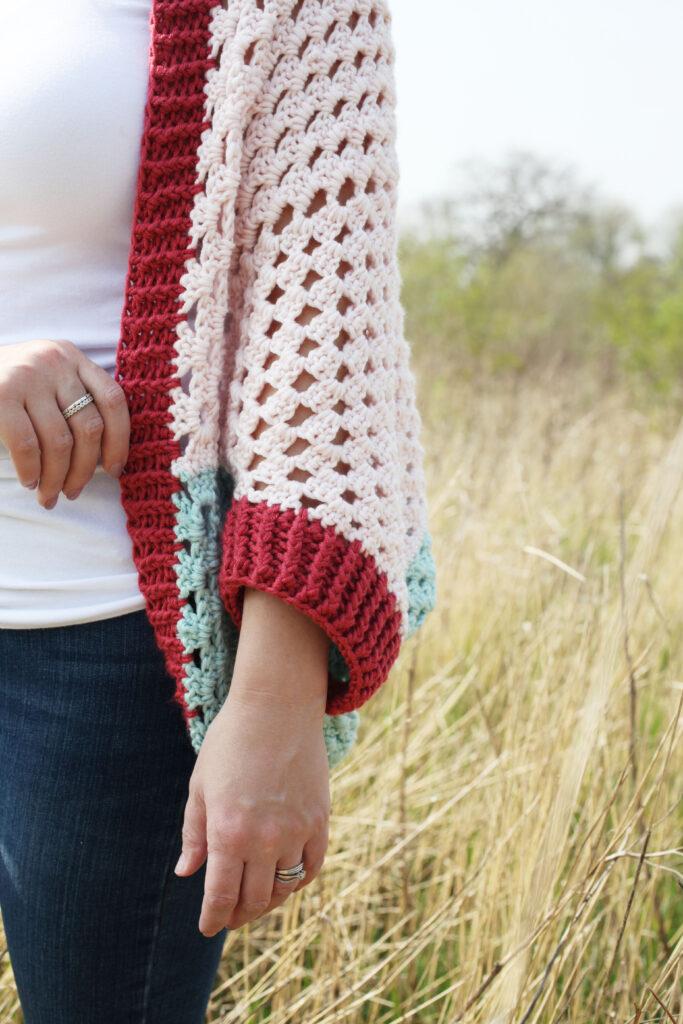
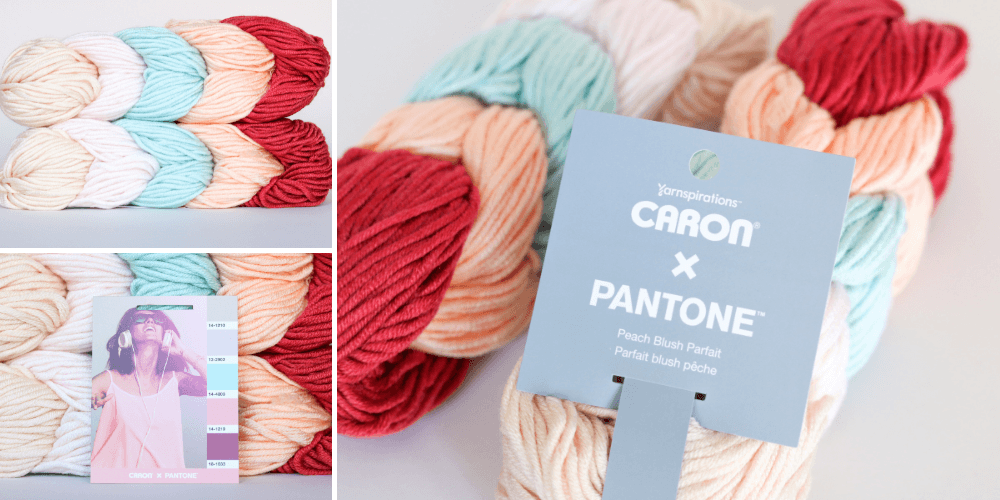
The Crochet Cocoon is made using Caron x Pantone which is a chunky weight blend of acrylic, nylon and merino wool that’s easy to work up and machine-washable. Perfect for wearable items and accessories alike.
I have created mine using Peach Blush Parfait, but I also think this would look great in Ultra Violet Minerals, Elephant Grey and Morning Blues. It can be completely customised to you! What’s your favourite colourway?

Materials & tools
- Yarn: Caron X Pantone- XS/S/M (8 braids) L/XL/2XL (11 braids) 3/4/5/XL (14 braids) *ALTERNATIVE: This would also work up beautifully with Caron Simply Soft which has a brilliant range of colours.
- Hook: 6mm (K) or whatever hook is needed to obtain gauge
- Darning needle
- Scissors
- Stitch Markers
- Tape Measure

pin for later

Unsure of the differences between UK and US terms? Need a refresher on how to do your crochet stitches? In my ‘How to crochet: A handy reference guide’ EBook I help you with all of these terms and you can always have them to hand! You will also get exclusive access to free video instructions. You can find my EBook HERE.
pattern notes
The FREE pattern for the Crochet Cocoon can be found HERE and can be made in various sizes, from XS to 5XL. I would highly recommend that you download and print out the pattern in order to follow along with the tutorial. The pattern is written in US terms and I will be working in UK terms. Please don’t let this put you off! It’s really handy to get to grips with both set of terminology as it can help you out a lot in the future. I would suggest that you highlight any changes in terminology to help you through. I will also be pointing out the differences throughout the tutorial.
Gauge
It’s crucial with this project that you get your gauge correct due to the amount of yarn needed for the cocoon and the suggested braid amounts. Please make sure that you are doing a gauge swatch to get your measurements correct. You can adapt your hook size if you need to by sizing up or down to get the right gauge.
crochet terms and abbreviations
US Dc = Double crochet | UK Tc = Treble crochet
US Hdc = Half double crochet | UK Htr = Half Treble crochet
US Hdcbp = Half double crochet back post | UK Htcbp = Half treble crochet back post
US Hdcfp = Half double crochet front post | UK Htrbp = Half treble crochet front post
assisting tutorials
See below for some helpful assisting tutorials to help you throughout this pattern.
Joining the same colours
As you will be using multiple Caron X Pantone braids, you will have to join your mini balls of yarn that you have made (instructions on how to deconstruct the braids can be found in the Crochet Cocoon video at the base of the post) I would highly recommend that you use the Magic Knot method. See the video below to learn the technique.

Sewing in your ends
You can sew in your ends using the rule of three to ensure your ends don’t come undone.

video tutorials
You can find the videos tutorial below in both RIGHT AND LEFT HANDED versions. If you found the tutorial helpful, I would love it if you subscribed to my channel and supported my work by liking, commenting and sharing!
Time Stamps
PREPARING YOUR YARN: 1:00 | PREPARING THE PATTERN: 4.48
FOUNDATION: 09:15 | ROUND 1: 09:52 | ROUND 2: 16:58 | Round 3: 20:12
SEWING YOUR SQUARES: 24:40 | CREATING THE ARMHOLES: 30:36
WORKING THE CUFFS: 33:28 | CUFF ROUND 2: 36:48 | CUFF ROUND 3: 39:33
RIBBING: 41:46 | RIBBING ROUND 2: 44:37
right handed video tutorial

left handed video tutorial

I always love to see your makes so if you try any of my patterns or follow my stitch tutorials please tag me @bellacococrochet or use the #bellacococrochet
Sarah-Jayne the link still doesn’t let me download the free pattern and I’m in the US. I’d love to download it. Can we try to get it to allow US crocheters the ability to download the pattern.
Love the tutorial!
Try this link http://bit.ly/2mdv6J5 and search ‘Caron Cocoon’ in the top right x
I too cannot find the free pattern for this cocoon. Any other options?
Hi Kd
If you are in the US the link won’t work, however if you try this one it will take you to a different site which should work :-
http://bit.ly/cocoonUS
Please let me know either way, Thanks 🙂
I agree. I tried yarn web site everything I can think of. Still no pattern. Please help
If you are in the US the link won’t work, however if you try this one it will take you to a different site which should work :-
http://bit.ly/cocoonUS
Please let me know either way, Thanks 🙂
Neither link to the free pattern loads for me. I get an “oops” page the same as in your Instagram story. I’ve tried both links multiple times. Is there any other way to get it besides the video?
Try this link http://bit.ly/2mdv6J5 and search ‘Caron Cocoon’ in the top right x
That link brings us to the same place, and the search box doesn’t bring up the garment
If you are in the US the link won’t work, however if you try this one it will take you to a different site which should work :-
http://bit.ly/cocoonUS
Please let me know either way, Thanks 🙂
The pAttern is not there when I click the link, it takes me to the love crochet webpage but just says opps the page can’t be found. Also if I was to substitute a different yarn bc I cannot afford to buy enough of the Pantone what would be the best gauge to use for a number 4 weight yarn?
Try this link http://bit.ly/2mdv6J5 and search ‘Caron Cocoon’ in the top right x
It does not come up in the search. Other items, but not that one.
I’d love to make this for the beach!
If you are in the US the link won’t work, however if you try this one it will take you to a different site which should work :-
http://bit.ly/cocoonUS
Please let me know either way, Thanks 🙂
Hello everyone! Just a note for those of us in the U.S. the link will not work and when you search for it, it will not pop up. You have to scroll to the very bottom of the love crochet website and click visit UK site. Once there you can search Caron Cocoon and it will pop right up! Just make sure you are in the UK site. Have a great day everyone!
Thank you for letting me know it works this way, i know this will be helpful to some people. 🙂
I can’t get the links to pull up the pattern.
If you are in the US the link won’t work, however if you try this one it will take you to a different site which should work :-
http://bit.ly/cocoonUS
Please let me know either way, Thanks 🙂
I got it now, thank you very much.
I’ve used the link above, but when I search I still can’t find it.
If you are in the US the link won’t work, however if you try this one it will take you to a different site which should work :-
http://bit.ly/cocoonUS
Please let me know either way, Thanks 🙂
I also tried to download and got nowhere no matter which link I followed.
If you are in the US the link won’t work, however if you try this one it will take you to a different site which should work :-
http://bit.ly/cocoonUS
Please let me know either way, Thanks 🙂
Thank you Sarah-Jane great pattern I cannot wait to get started X
You’re very welcome 🙂
Hi Sarah-Jayne, what a lovely pattern. Just a seizing question: on the border between the small and the medium one, which one would you go for? I’m leaning towards smaller because that’s more accurate in numbers, and expecting the medium to be supersize then. But not sure if they end up on the rather smaller or larger size?
Thanks for your feedback!
Hi Tanne, i’m a UK size 10, if you have a look at the website photos it may give you some idea 🙂
Thanks Sarah-Jayne
Sarah-Jayne: Unfortunately the link you have given above still doesn’t bring you to the pattern. When I search for Caron Cocoon, it brings me to a page with patterns, but this one isn’t there. I really want to try to make this item. Hoping you can get the link working. Thanks.
Hi Terry
If you are in the US the link won’t work, however if you try this one it will take you to a different site which should work :-
http://bit.ly/cocoonUS
Please let me know either way, Thanks 🙂
Hi Sarah, The link “http://bit.ly/2mdv6J5 and search ‘Caron Cocoon’ in the top right” is not working for me either. 🙁
Hi April
If you are in the US the link won’t work, however if you try this one it will take you to a different site which should work :-
http://bit.ly/cocoonUS
Please let me know either way, Thanks 🙂
Hi Sarah, Searching ‘caron cocoon’ isn’t working for me either. ☹
Hi April
Unfortunately we have an issue regarding downloads for the US.
Please try this link and hopefully it will work :-
http://bit.ly/cocoonUS
Thanks 🙂
hello I am having trouble downloading the pattern.
Hi Yadira
If you are in the US the link won’t work, however if you try this one it will take you to a different site which should work :-
http://bit.ly/cocoonUS
Please let me know either way, Thanks 🙂
Hi sarah, can you tell me what to do if i want to substitute the yarn for caron simply soft? I noticed that the yarn weight is different caron x pantone is chunky ehile caron simply soft is aran. How much yarn do i need? Thank you!
Hi Carol
Because the pattern requires you to work to a particular size you can just follow those instructions. You may need to add additional stitches around the cuff and the ribbing but it should generally work up the same. I would estimate that you would only need one ball of each colour:)
Thanks Sarah-Jayne
Sarah-Jayne, I finally got the pattern to download and want to understand the amount of yarn needed better. With the Caron Pantone you’re using in the video, the largest pattern calls for 14 braids. Is that a total of 14 braids or 14 sets of braids? thanks!
A braid is the whole thing that I showed in the video not the individual colours on the braid. So you will need 14 whole braids. x
How much yarn do you need to make this. Caron Pantone is expensive is there any cheaper alternatives?
Hi Popply unfortunately I cannot advise you on this as it would depend on your hook size and your tension, maybe you could do a swatch test piece and work it out from there 🙂
Gorgeous design, can I ask if you go for the caron simply soft how much yarn will it need?
Hi Katherine Unfortunately I cannot advise you on this as it would depend on the size of your hook and your tension maybe you could do a swatch test piece and work it out from there? 🙂
Mine turned out huge but it’s nice and cozy!
Hi,
Please help! Absolutely love this pattern and have bought my yarn so am good to go, but I’m relatively new to crochet and have fallen at the first hurdle! I don’t understand from the pattern how to make my gauge swatch. It says 12 sts and 7 rows ‘in pat’, but I don’t know how to interpret this, given that the pattern itself is done in rounds. Any advice apprecitated!!
Hi Abi
Sorry to hear you’re having problems; it can all seem very confusing when you are just starting out If you follow the pattern and have a look at my video https://www.youtube.com/watch?v=CISXzNP2LGI you can see that we’re starting off by making a granny square. So although the pattern talks about ’rounds’ what we are producing is still a flat piece of crochet. Once you have crocheted a big enough piece you would just need to measure a section and count how many stitches you have within 10cm to check whether you are meeting the gauge or not.
Hope this helps!
Best wishes
Sarah-Jayne
———-
Hi Sarah!
My square is still itsy beetsy tini wini but the edges are curvy? what am i doing wrong? Thanks!
Hi Ann I would try adjusting your hook up a size to see if that helps but you many find that as the square gets bigger, it naturally straightens out due to the weight of the yarn stretching it into shape
Could I use the same amount of yarn in Paintbox yarns simply Aran as the weight is the same please?
As long as you use the same yarn weight you can substitute for another brand no problem
Hi! I am making this in a different yarn, to use up some of my stash. One of the colours I would like to use, I have slightly less of than the others. Can you tell me whether I will need more or less of the yarn colour used for the ribbing and cuffs compared to the squares?
Hi Fiona Thanks for bringing this to my attention – it looks like there is an error with the stitch count in the written pattern. Just to clarify, you should have 14 stitches left after round 13. In round 14, you work a total of 3 decreases, leaving 11 stitches. However, in the following round you work 1 further decrease which leaves you with 10 stitches in total. I’m sorry for any confusion, and hope this clears things up for you