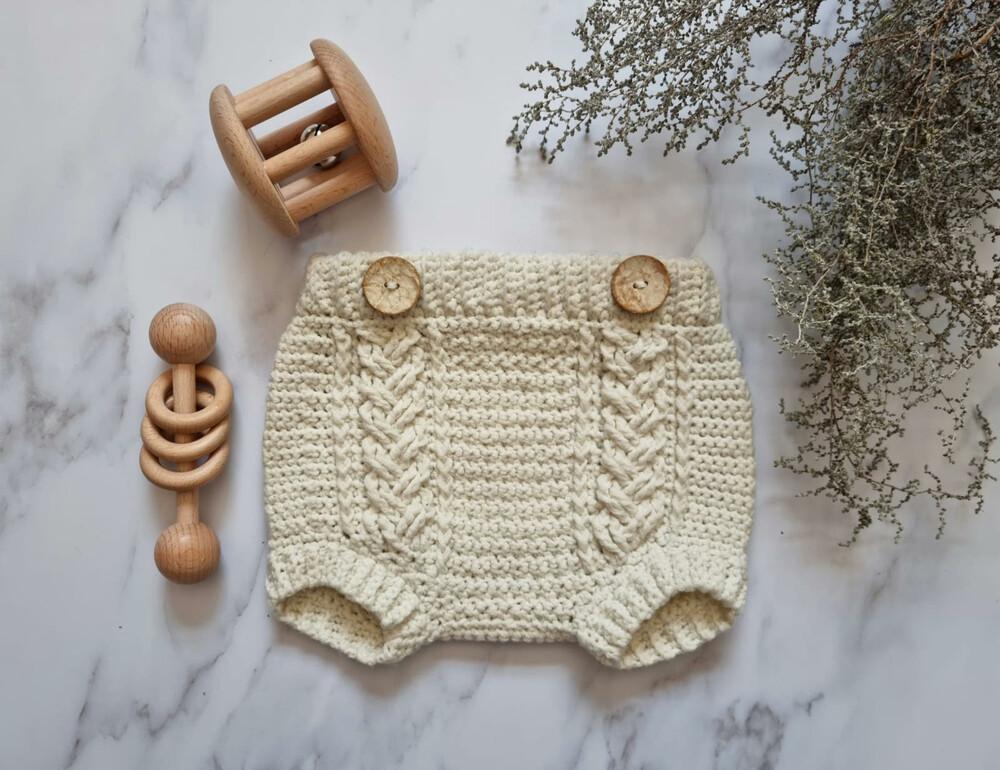
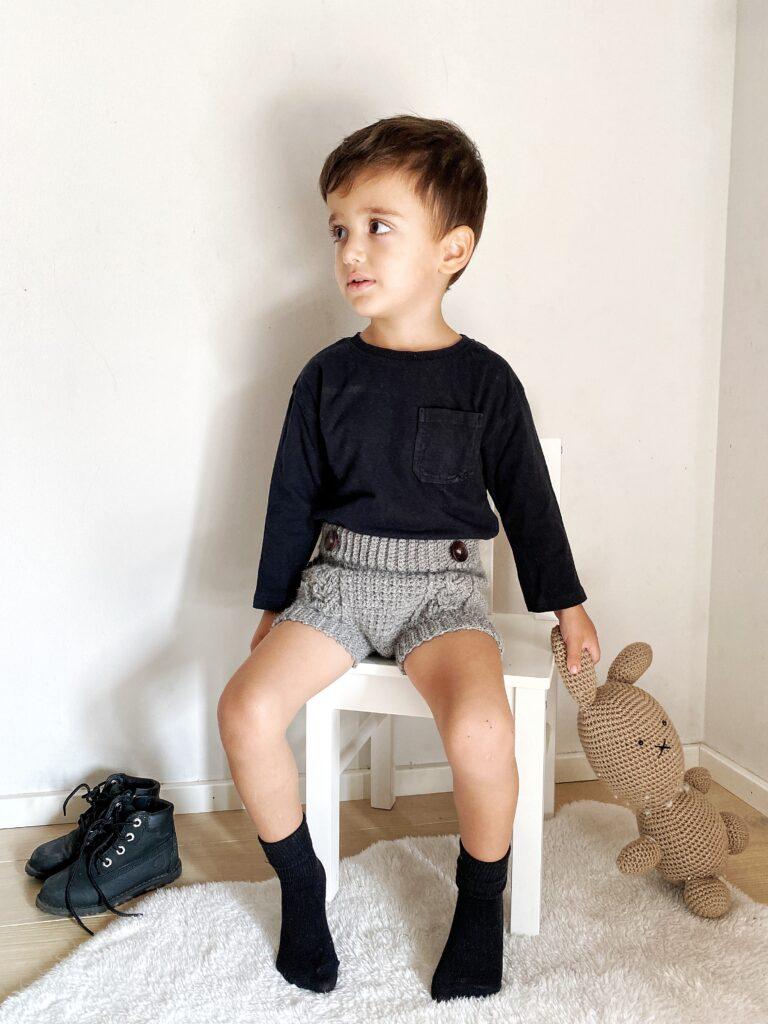
These lovely crochet bloomers have been designed by guest designer JJ from Peach&Paige. This adorable pattern includes sizing from birth to 2 years. In this post, you’ll find the FREE pattern for these beautiful bloomers plus more FREE patterns from some of the talented guest designers featured on the blog.
A Note From Designer Paige
JJ says this pattern is from sizes NB to 2Y. The crochet bloomers have a high waisted design and a generous fit around the bottom. The encased elastic waistband ensures a comfy fit without uncomfortable and unreliable ties. It’s a great pattern for playing with new textures and crochet techniques.
As this is a guest post, Bella Coco Crochet is unable to answer any queries. If you have a question, please contact the designer directly and they will be happy to help you.
Materials & Tools
- Yarn: 8Ply, DK, Number 3 Acrylic Yarn. I used Stylecraft Special DK or Paintbox DK Acrylic. Need approx. 150grams for NB-6m sizes. 200grams for 12m to 2y.
- Hook: 4mm, or hook to obtain gauge. (If you are a looser crocheter you will likely need to go down to a 3.5mm).
- Darning Needle
- Scissors
- Optional – Elastic 2cm wide, up to 50cm long depending on pattern size, sewing needle and thread.

Size Chart
- NB – A; 14cm, B; 17cm, C; 20cm
- 0-3m – A; 16cm, B; 18cm, C; 24cm
- 3- 6m – A; 17cm, B; 20cm, C; 25cm
- 6 -12m – A; 18cm, B; 21.5, C; 26.5cm
- 1y – A; 19cm, B; 23cm, C; 27.5cm
- 2y – A; 20cm, B; 24cm, C; 29cm
pattern Notes
- Written in US terms, CLICK HERE for a free conversion chart.
- Worked with the ribbing worked flat, joined in the round then folded in half (around elastic if required).
- Bloomers are then worked top down in back and forward rows, joining in the round as you go with a slip stitch until the leg holes.
- Back and front sections are then worked flat and joined at the crotch. Finishing with the leg hole ribbing and buttons.
- Chain stitches at the end of the row are not included in the stitch count. A number in front of a stitch – e.g 2Hdc – means you work 2 Hdc stitches in the one stitch. A number following a stitch – e.g Hdc 2 – means work a Hdc in each of the next 2 stitches.
- Stitches in brackets are worked into the same stitch. E.g (Dc, Ch 2, Dc). Sequences between asterisks are repeated the number of times shown – e.g *2Sc, Sc* x5. Stitch count is included in brackets after the row instructions.
Gauge
- Sc swatch 4mm hook
- 10cm x 10cm = 19 Stitches across and 23 rows.
Terms & Abbreviations
- Sc – Single Crochet
- Ch – Chain
- Dc – Double Crochet
- SlSt – Slip Stitch
- YO – Yarn Over
- BLO – Back Loop Only
- FLO – Front Loop Only
- Sk – Skip
- Sc2tog – Single Crochet 2 Stitches Together
- FpDc – Front Post Double Crochet – YO, insert hook under stitch, pull up loop, *YO, pull through 2 stitches* 2x
- FpTr – Front Post Treble Crochet – YOx2, insert hook, pull up loop, *YO, pull through 2 stitches* 3x

Unsure of the differences between UK and US terms? Need a refresher on how to do your stitches? In my ‘How to crochet: A handy reference guide’ EBook I help you with all of these terms and you can always have them to hand! You will also get exclusive access to free video instructions. Learn more about the eBook here.
Pin For Later

Childrens Crochet Bloomers: Free Pattern
Waist Ribbing of Crochet Bloomers
NB, (0-3m, 3-6m,6-12m,1T,2T)
Pattern is written for NB size with the other sizes in brackets.
Fits waist 38cm (45cm, 47cm, 48cm, 50cm, 52cm)
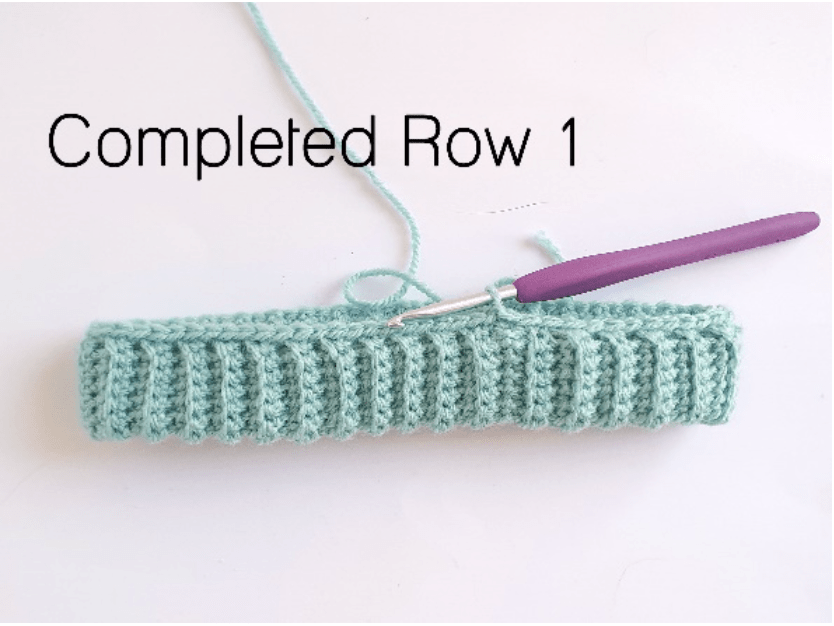
Chain 14(14, 16, 16, 18, 18)
Row 1 – Starting from the second chain from the hook, Sc 13(13, 15, 15, 17, 17), Ch 1, turn. [13(13, 15, 15, 17, 17)]
Row 2 – 62(76, 84, 88, 92, 96)– In the BLO; Sc 13(13, 15, 15, 17, 17), Ch 1, Turn. [13(13, 15, 15, 17, 17)]
Do not chain 1 before turning on final row.
Without removing hook, bring the other end of the strip in front of your work and fold in half, lining up the ends. Slip Stitch ends together through the starting chain and BLO of the last row worked.
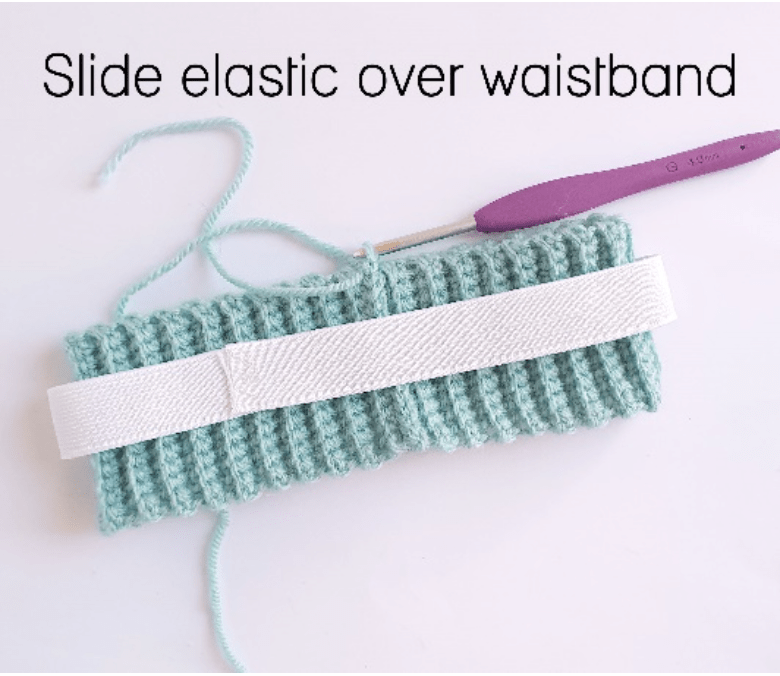
If inserting elastic – Take your length of elastic and cut to size to fit. You will want the elastic to be approx. 3cm shorter than the waist measurement. This pattern is based on a waist measurement of approx. 38cm(45cm, 47cm, 48cm, 50cm, 52cm) so you will want your elastic to be 36cm(43cm, 45cm, 46cm, 48cm, 50cm) long. Overlap the ends by approx. 1cm and sew together.
Turn work horizontal, leaving the seam facing out. Slide your ring of elastic over the waistband ribbing.
Fold waistband ribbing in half over the elastic, lining up both ends of the seam.
Upper Body of Crochet Bloomers
NB, (0-3m, 3-6m,6-12m,1T,2T)
Pattern is written for NB size with the other sizes in brackets.
Round 1 – Working along the edge of the ribbing, Chain 1, Sc 62(76, 84, 88, 92, 96)through both layers to encase the elastic. Join to first stitch in row with a SlSt, Ch 1. Turn. This is 1 Sc for every row of ribbing. [62(76, 84, 88, 92, 96)]
If you do not want to use elastic, complete the same above steps without the elastic.
The remaining rounds in the Upper Body section are all worked in back and forward rows joined with a SlSt in the round before turning over. The first stitch of each row is worked into the last stitch of the previous row.
Round 2 (W/S) –
NB *2Sc, Sc* x16,
0-3m *2Sc, Sc* x9, Sc 2, *2Sc, Sc* x9,
3-6m *2Sc, Sc* x4, Sc 3, *2Sc, Sc* x4, Sc 4, *2Sc, Sc* x4, Sc 3, *2Sc, Sc* x4,
6-12m *2Sc, Sc* x4, Sc 3, *2Sc, Sc* x5, Sc 2, *2Sc, Sc* x5, Sc 3, *2Sc, Sc* x4,
1T *2Sc, Sc* x7, Sc 3, *2Sc, Sc* x6, Sc 3, *2Sc, Sc* x7,
2T *2Sc, Sc* x5, Sc 3, *2Sc, Sc* x5, Sc 2, *2Sc, Sc* x5, Sc 3, *2Sc, Sc* x5,
Round 2-3
Round 2 continued – All Sizes; Sc 11(12, 12, 14, 15, 15), *Sc in FLO, Sc in BLO* x4(7,9, 8, 8, 9), Sc 11(12, 12, 14, 15, 15), Join to first stitch with a Slst, Ch 1, Turn over and work back the otherway. [78(94,100, 106, 112,116)]
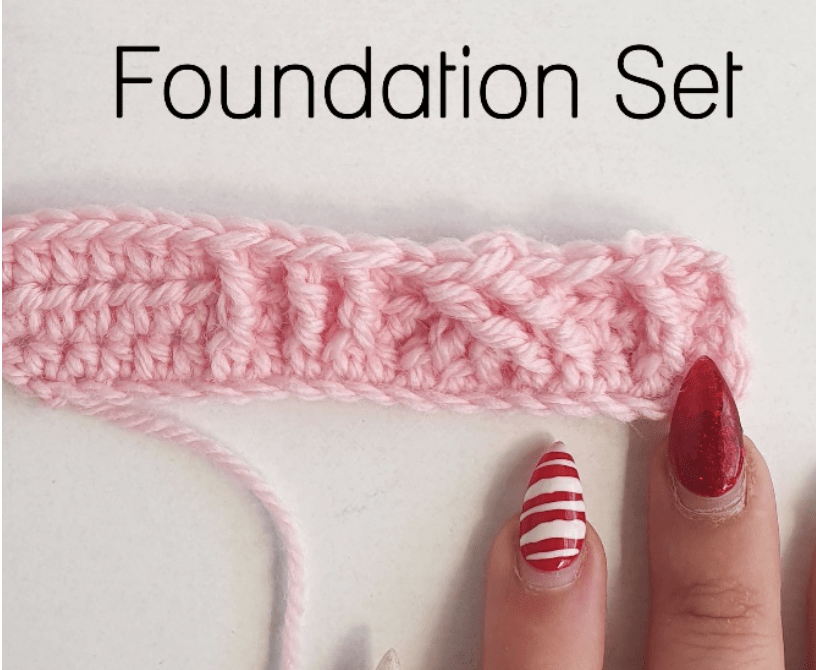
Round 3 (R/S) – Sk SlSt, Sc 1(2, 2, 2, 3, 3), (Work the Foundation Set), *Sc in BLO, Sc in FLO* x4(7,9, 8, 8, 9), (Work another Foundation Set), Sc 49(58, 60, 64, 69, 71), Join with SlSt, Ch 1, Turn. [78(94,100, 106, 112,116)]
Newborn – 6 Months
Foundation Set; NB, 0-3m and 3-6m; FpDc into the Sc St directly below in Row 1 (2 rows below), Sc 1, FpTr into Row 1, into the 4th and 5th St to the left of the first Sc worked into. FpTr into the 2nd and 3rd stitch to the left of the first Sc worked in Row 1, crossing over the front of the last 2 FpTr, FpDc into the 6th and 7th stitches to the left of the first St worked in Row 1, Sc 1, FpDc into Sc directly below in Row 1. (10 Stitches worked.
6 Months – 2 Years
Foundation Set; 6-12m, 1T, 2T; FpDc into the Sc St directly below in Row 1 (2 rows below), Sc 1, FpTr into Row 1, into the 5th and 6th St to the left of the first FpDc. Sc 1, FpTr into the 2nd and 3rd stitch to the left of the first FpDc, crossing over the front of the last 2 FpTr, Sc 1, FpDc into the 8th and 9th stitches to the left of the first St worked in Row 1, Sc 1, FpDc into Sc directly below from Row 1. (12 Stitches worked)


4-5
Row 4 (W/S) – Sk SlSt, Sc 59(68, 70, 76, 79, 83), *Sc in FLO, Sc in BLO* x4(7,9, 8, 8, 9). Sc 11(12, 12, 14, 15, 15), Join with SlSt, Ch 1, Turn. [78(94,100, 106, 112,116)]
Note; Make sure when working the w/s rows, you are working into the top of the Front Post Stitches and not the unworked stitches from the previous row.
Row 5 (R/S) – Sk SlSt, Sc 1(2, 2, 2, 3, 3), (Work Cable Set A), *Sc in BLO, Sc in FLO* x4(7,9, 8, 8, 9), (Work another Cable Set A), Sc 49(58, 60, 64, 69, 71) Join with SlSt, Ch 1, Turn. [78(94,100, 106, 112,116)]
Cable Set A; NB, 0-3m and 3-6m; FpDc into single FpDc below, Sc 1, Work a FpDc into each of the first 2 FpTr from the last set, FpTr into the pair of FpDc from the last set, go back and work a FpTr into each of the FpTr you just skipped over, going underneath the last 2 FpTr you created, Sc 1, FpDc into the single FpDc below (10 Stitches worked)
Cable Set A; 6-12m, 1T, 2T; FpDc into single FpDc below, Sc 1, Work a FpDc into each of the first 2 FpTr from the last set, Sc 1, FpTr into the pair of FpDc from the last set, Sc 1, go back and work a FpTr into each of the FpTr you just skipped over, going underneath the last 2 FpTr you created, Sc 1, FpDc into the single FpDc below (12 Stitches worked)


6-7
Row 6 (W/S) – Repeat Row 4
Row 7 (R/S) – Sk SlSt, Sc 1(2, 2, 2, 3, 3), (Work Cable Set B), *Sc in BLO, Sc in FLO* x4(7,9, 8, 8, 9), (Work another Cable Set B), Sc 49(58, 60, 64, 69, 71), Join with SlSt, Ch 1, Turn. [78(94,100, 106, 112,116)]
Cable Set B; NB, 0-3m and 3-6m; FpDc into single FpDc below, Sc 1, Work a FpTr into each of the first 2 FpTr from the last set, skipping over the FpDc, crossing back over in front, work a FpTr into each of the FpDc you skipped, work a FpDc into the final pair of FpTr, Sc 1, FpDc into the single FpDc below (10 Stitches worked)
Cable Set B; 6-12m, 1T, 2T; FpDc into single FpDc below, Sc 1, Work a FpTr into each of the first 2 FpTr from the last set, skipping over the FpDc, Sc 1, Crossing back over in front, work a FpTr into each of the FpDc you skipped, Sc 1, Work a FpDc into the final pair of FpTr, Sc 1, FpDc into the single FpDc below (12 Stitches worked)


Repeat Rows
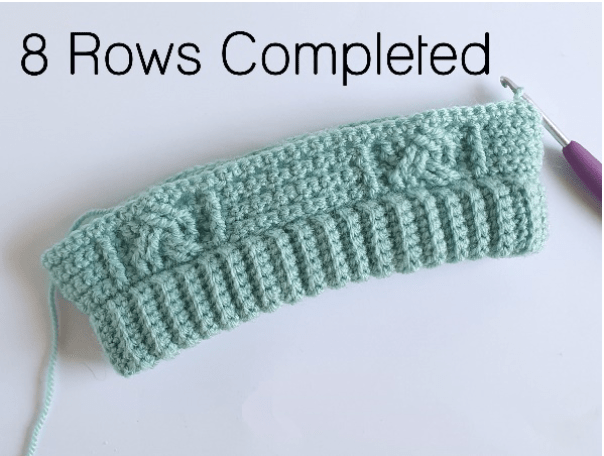
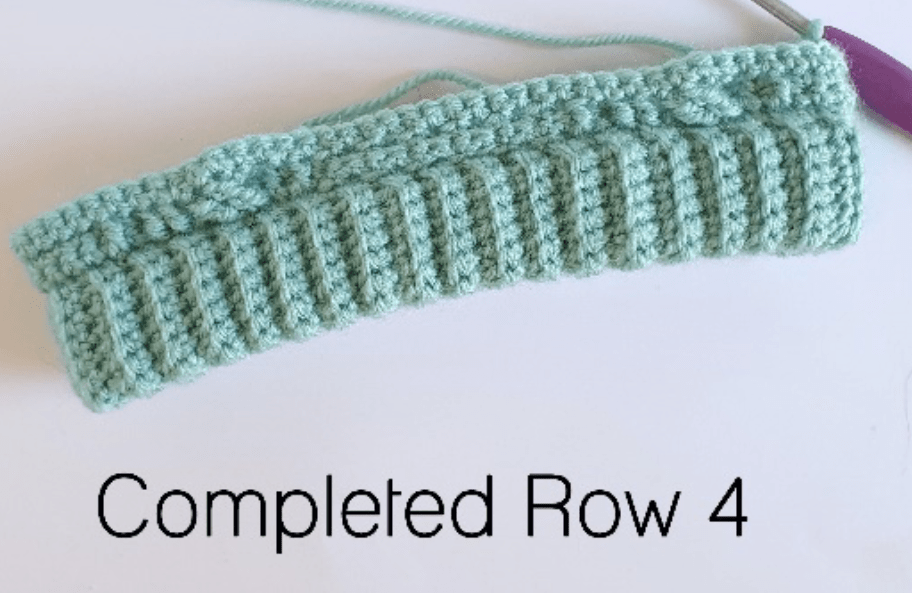
Repeats Rows 4-7 until you have a total of 23 (25, 27, 29, 31, 33) rows, ending with Row 7 (5, 7, 5, 7, 5)
Upper body section (excluding ribbing) should measure approx. 10cm (11, 11.5, 12, 13, 14). Tie off and weave in ends. Last row worked is on the RIGHT side.
Back Panel of Crochet Bloomers
Working on the wrong side of the fabric, join yarn in 4th (5th, 5th,5th,6th,7th) stitch left of the join. Ch 1.
Row 1 – Sc in join, Sc 41 (47,49, 53, 55, 57), Ch 1, Turn. [42(48,50, 54, 56, 58)] Place a stitch marker in the last stitch worked in this row.
Row 2 – 6 (7, 11, 10, 13, 13) Sc2tog, Sc until last 2 stitches in row, Sc2tog, Ch 1, Turn.
Row 7(8, 12, 11, 14, 14) – 11 (13, 15, 15, 17, 17) – Sc2tog, Sc2tog, Sc until last 4 Stitches in Row, Sc2tog, Sc2tog, Ch 1, Turn.
Sizes; NB (0-3m, 6-12m,2T)
Row 12(14, 16,18) – Sc2tog,Sc 8(10, 12, 14), Sc2tog, Tie off. [10(12, 14, 16)]
Sizes; 3-6m (1T)
Row 16 (18) – Sc 6(7), Sc2tog, Sc 6(7), Tie off. [13 (15)]


Front Panel of Crochet Bloomers
This can be a bit tricky, you will be continuing to work the cable pattern as before, however you will be decreasing into them so you will only be able to complete part of the cables. ‘Work in Pattern’ means to continue working your cable sets and FLO and BLO Stitches in between the decreases to keep the pattern going. For example; Size 1T;
Complete the Sc2tog, Sc2tog. You can see there is still 7 Stitches left of the cable set.


I will work just the last 7 stitches of the cable set before working the FLO and BLO section. I will repeat the same of the other side.
Working on the wrong side of the fabric, find the stitch marker you placed earlier.
Join yarn in the 5th (7th,8th ,9th,9th ,10th) stitch to the left of the stitch marker. Ch 1.
1- 13
Row 1 –Starting with joining stitch, Sc2tog, Sc 8(8, 7, 8, 10, 9), *Sc in FLO, Sc in BLO* x4(7,9, 8, 8, 9), Sc 8(8, 7, 8, 10, 9), Sc2tog, Ch 1, Turn. [26 (32, 34, 34, 38, 38)]
Row 2 – 3(4, 4, 3, 4, 4) – Sc2tog, Sc2tog, ‘Work in Pattern’ until last 4 Stitches, Sc2tog, Sc2tog, Ch 1, Turn. [18(20, 22, 26, 26, 26)]
Row 4 (5, 5, 4, 5, 5) – 7(8, 8, 9, 9, 9) – Sc2tog, ‘Work in Pattern’ until last 2 stitches, Sc2tog, Ch 1, Turn. [10(12, 14, 14, 16, 16)]
Row 8 (9, 9, 10, 10, 10) – 11(12, 12, 14, 14, 16) – Sc 1, ‘Work in Pattern’ till last stitch, Sc 1, Ch 1, Turn. [10(12, 14, 14, 16, 16)]
Sizes; NB (0-3m, 6-12m, 2T)
Tie off, leave a 30cm tail
Sizes; 3-6m (1T)
Row 13 (15) – Sc 6(7), Sc2tog, Sc 6(7). Tie off, leave a 30cm tail. [13(15)]
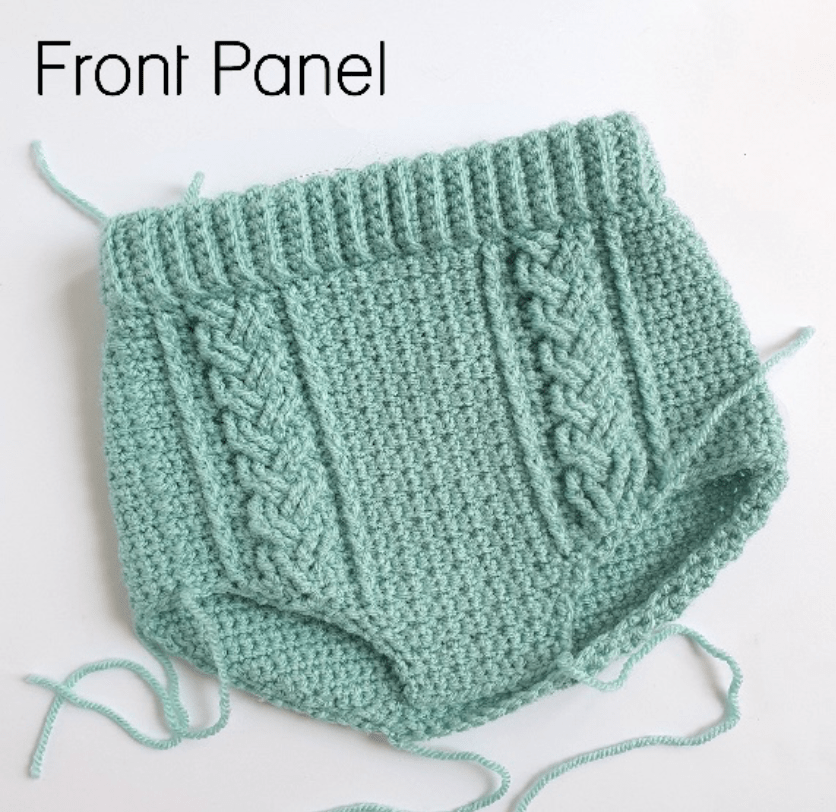
Turn the bloomers inside out and line up the crotch seams. Sew together using the tail. Remove stitch marker.
Flip bloomer back right side out. Sew in your ends.
Leg Holes
Join yarn at one end of the crotch seam and Sc 33 (39, 43, 47, 49, 51) around the leg hole.
Note; You will need to try and evenly space your stitches out as there is no clear place to put each stitch. You don’t need to have exactly the above number, just make sure both leg holes are the same.
Join to first Sc with a SlSt. Ch 5 (5, 6, 6, 7, 7).
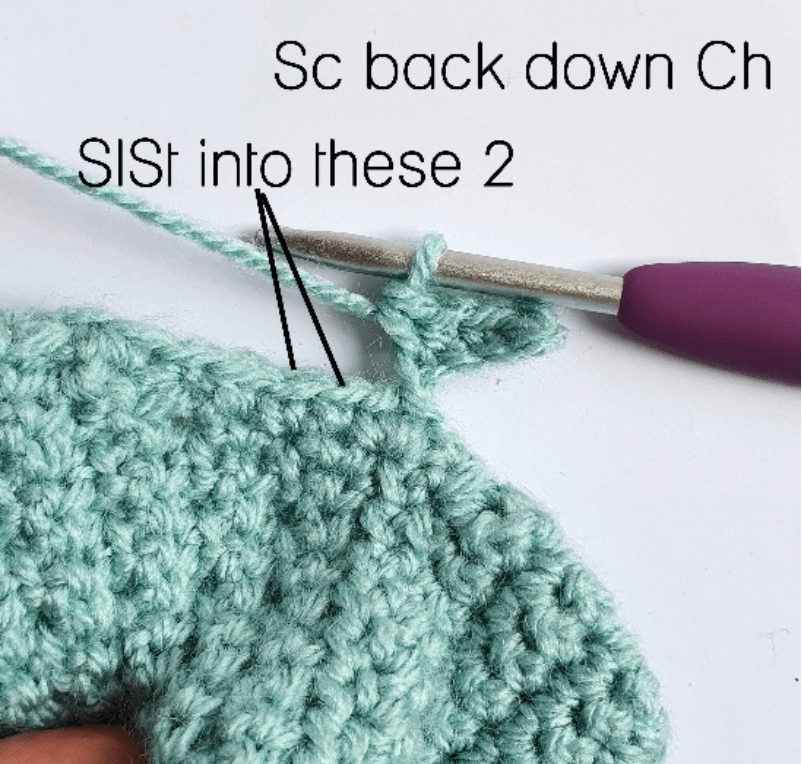
Row 1; Starting in second chain from hook, Sc 4 (4, 5, 5, 6, 6) down the Ch. SlSt into the leg hole edge, in both the 1st and 2nd stitch to the left of the join as shown. Turn. [4(4, 5, 5, 6, 6)]
Row 2; Skip the 2 SlSt you just did and Sc 4 (4, 5, 5, 6, 6) back up the ribbing in the BLO. Ch 1, Turn. [4(4, 5, 5, 6, 6)]
Row 3; Sc 4 (4, 5, 5, 6, 6) in BLO, SlSt into the next 2 Sc edge stitches like you did in Row 1, Turn. [4(4, 5, 5, 6, 6)]
Repeat Rows 2 and 3 all the way around the leg hole. SlSt into the first stitch again and with right sides together, SlSt or sew the ribbing ends together. Tie off and sew in tails. Repeat for second leg hole.


Sew 2x buttons into the waistband lining up with the cables. And you’re finished!
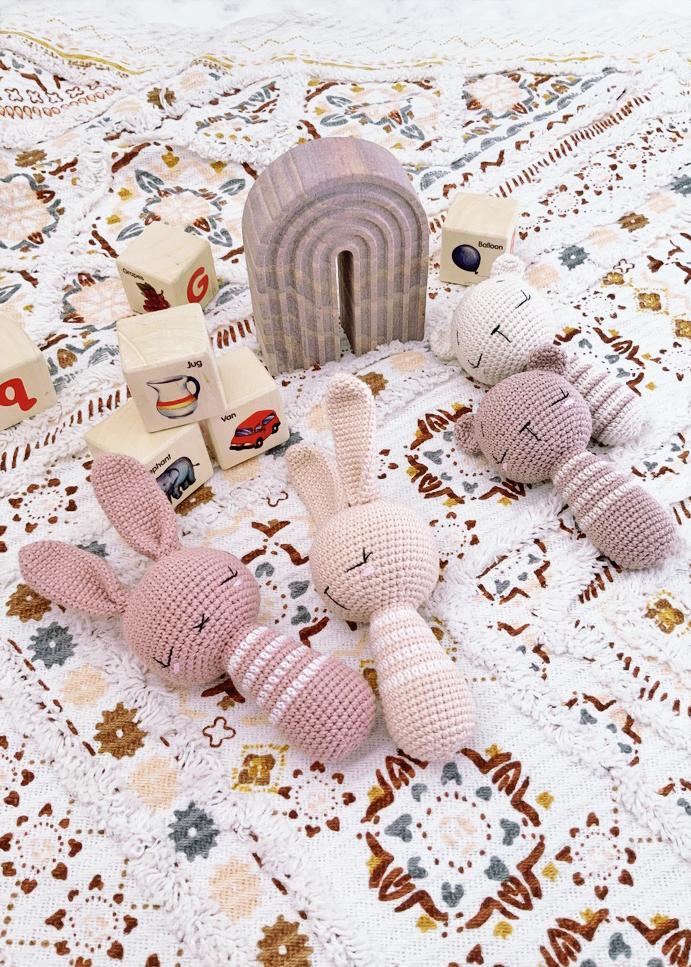
Guest Designers
Check out these amazing patterns by some of ther guest designers featured on the blog:
I always love to see your makes so if you try any of my patterns or follow my stitch tutorials please tag me @bellacococrochet or use the #bellacococrochet
sarah-jayne
I am a little confused about the back panel for the 0-3 month size. If I follow the directions on row 13 I have 12 stitches left but it’s telling me on row 14 after I Sc2tog twice I will have 12 stitches left. Do I end a row early? Will that mess up lining up the front panel?
Hi Kate as this is a guest post you will have to contact the designer directly and she will be able to help you 🙂