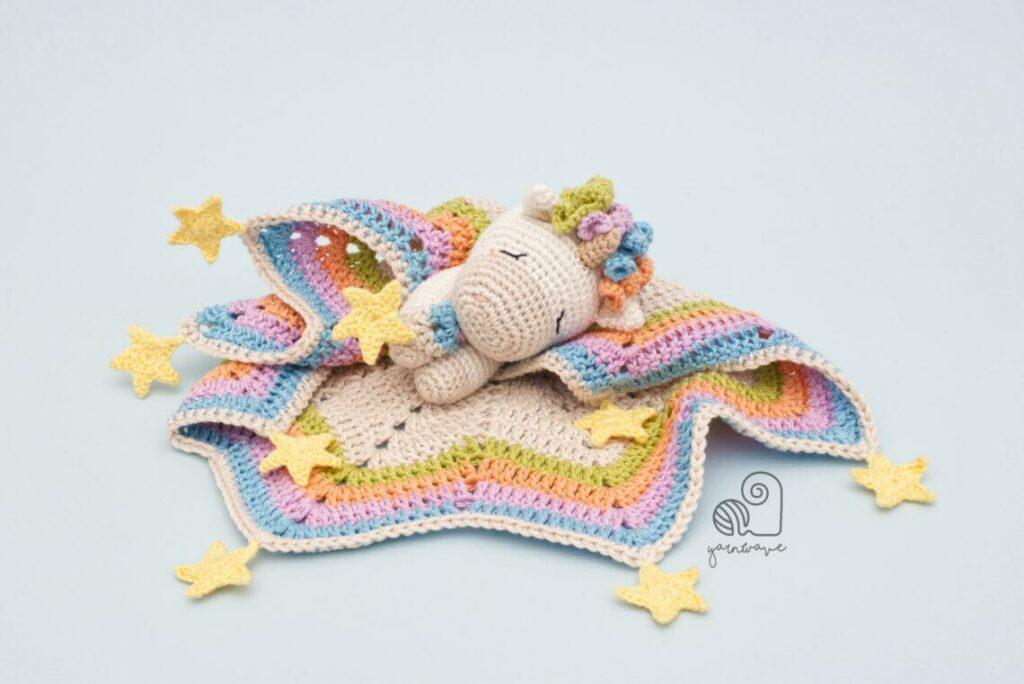
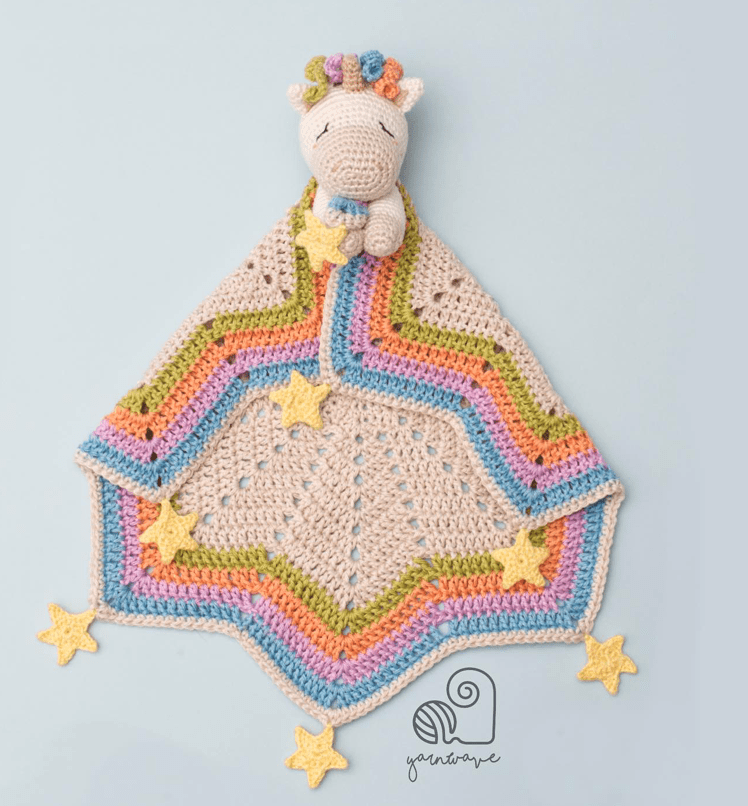
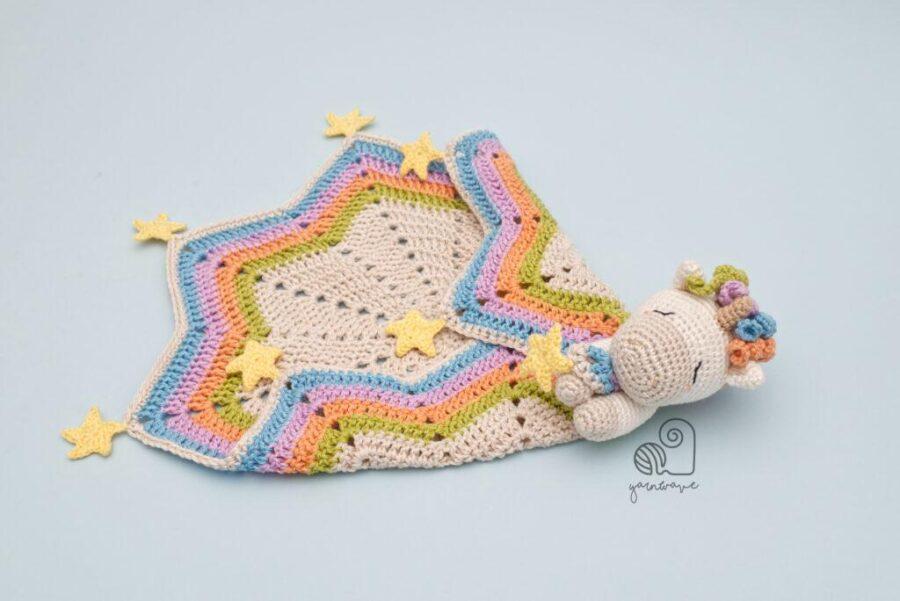
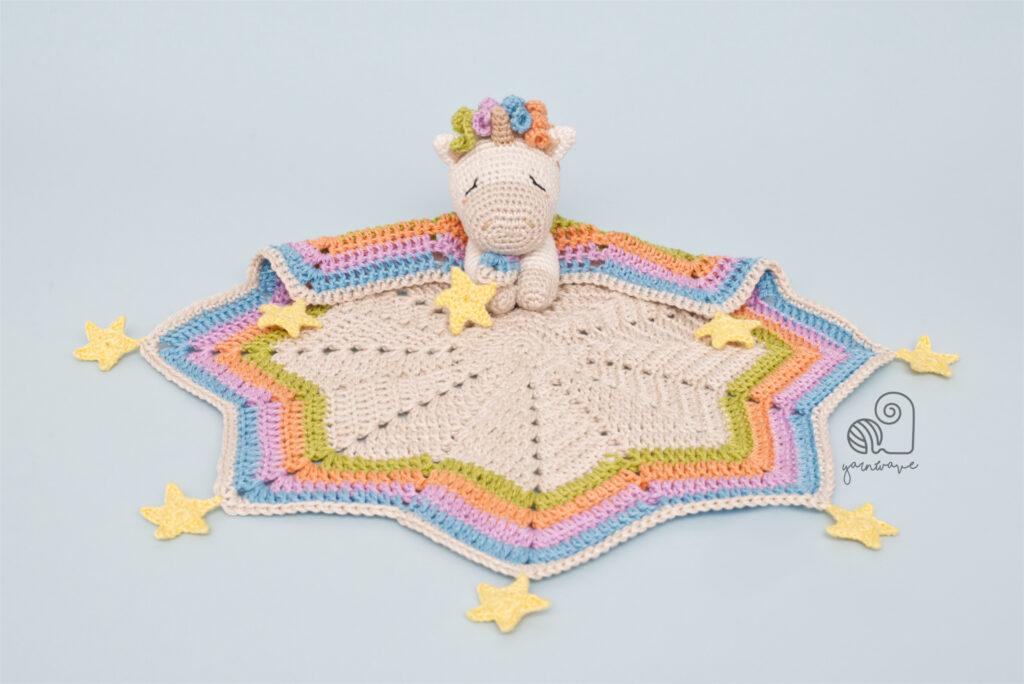
Learn how to crochet this beautiful unicorn lovey with this free step-by-step pattern by guest designer Banga of YarnWave. I absolutely ADORE this beautiful Celeste the Unicorn Lovey by the exceptionally talented crocheter Banga. As soon as I saw her collection of baby goodies, I fell in love with her playful and modern designs and I hope you do too!
In this post, you will find everything you need to make this unicorn lovely plus more inspiring crochet designs.
Guest Designer: Banga
Banga is a young mother from Lithuania who loves to create hand made toys for her baby girl. Turning to crochet as a way to relax after busy days, she takes inspiration from her daughter to create her bright, beautiful and joyful crochet designs. She says, “My journey as an amigurumi designer began when I became a mom. I wanted to make some toys for my baby girl but this time I wanted something special, something from my heart. So instead of following somebody else’s pattern, I created my first design of an elephant rattle. I loved how it turned and what was the most important I really loved the creative process!“
Materials & Tools
Yarn: DK weight yarn in colours white, beige, dark beige, green, purple, blue, peach and yellow. The yarn Banga designed Celeste the Unicorn Lovey with was 260 meters per 100g and 1 ball of each was used. I would recommend a silky-soft baby yarn such as Paintbox Baby DK or Rico Baby Classic.
Hook: 3.5mm and a 2mm or or size needed to obtain gauge
Stitch markers (to mark the first stitch when working in continuous rounds)

Pattern Notes
Written in US terms. CLICK HERE for a FREE Conversion Chart.
Skill level: adventurous beginners or intermediate crocheters.
If you intend to sell your finished unicorn lovey, as the maker of these items, you are responsible for marketing a safe toy.
Please make sure they comply with the legal requirements of the respective country in which the toy is going to be sold.
You may sell any items made by following this pattern as long as it is not a mass production. Please credit Banga of YarnWave as the pattern author of Celeste the Unicorn Lovey.
As this is a guest post, Bella Coco Crochet is unable to answer any queries. If you have a question, please contact the designer directly and they will be happy to help you.
Terms & Abbreviations
Chain(s): ch(s):Yarn over, pull through
Slip Stitch (ss): Insert hook, yarn over, pull through all loops.
Single Crochet(s): sc(s): Insert hook into stitch, yarn over, pull up a loop, you will have two loops on the hook. Yarn over, pull through remaining two loops.
Half Double Crochet (hdc): Yarn over and insert your hook into the chain or stitch, yarn over and pull through (you will have three loops on the hook) yarn over and pull through all three loops on the hook
Double Crochet (dc): Yarn over, insert into chain space, yarn over, pull through, you will have three loops on the hook. Yarn over, pull through two loops, yarn over, pull through remaining two loops.

Unsure of the differences between UK and US terms? Need a refresher on how to do your stitches? In my ‘How to crochet: A handy reference guide’ EBook I help you with all of these terms and you can always have them to hand! You will also get exclusive access to free video instructions. Learn more about the eBook here.
About Crochet Loveys
Do you know what a lovey is? The simplest way to define it is as a safe object that a baby or toddler can sleep with and use to self comfort and soothe. In crochet terms, they tend to be a fusion of a blanket and a stuffed toy.
If you’ve ever spent time around a baby, you’ll know that getting a young one to sleep can be a tricky task. A lovey is designed to ease that struggle. It gives babies and toddlers a physical object to use for self soothing and comfort. The great bit? It’s not just for bedtime. Over time, your little one will get used to using the lovey to comfort themselves, so it can be used to soothe during any physical or developmental changes too!
Celeste the Unicorn Lovey is the perfect little keepsake to make mum AND baby happy.
Pin For Later
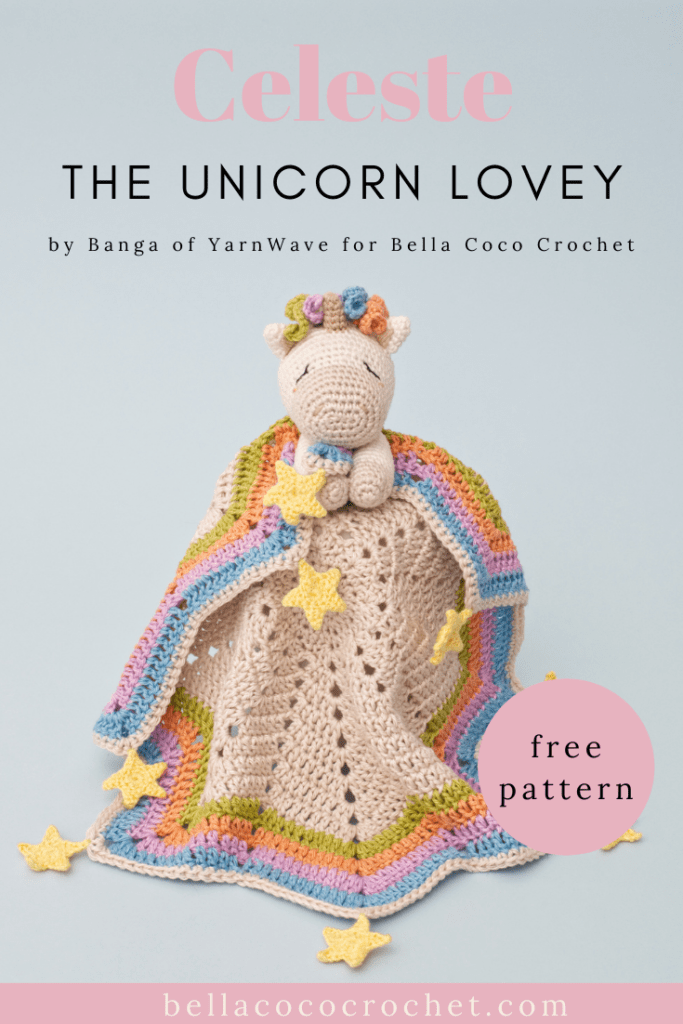
Free Pattern: Celeste the Unicorn Lovey
Head
- Start around the foundation chain and work in continuous rounds
- Use 2 mm crochet hook and start with beige colour yarn
- Leave a tail at the beginning (before the first chain)
- Rnd 1: ch 5 [5]
- Rnd 2: Start in the second ch from the hook: inc, sc 2, make 4 sc in next st, now continue working on the opposite side of the foundation chain: sc 2, inc [12]
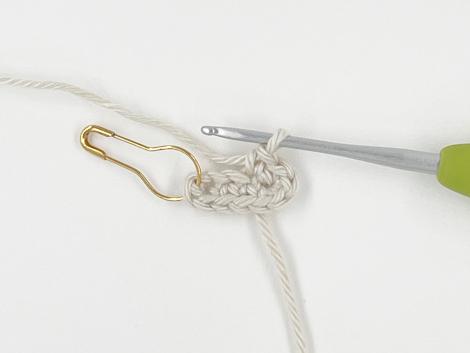
- Rnd 3: (inc) repeat 2 times, sc 2, (inc) repeat 4 times, sc 2, (inc) repeat 2 times [20]
- Take a yarn needle and weave the starting tail through the foundation chain to hide the stitch gaps.
- Rnd 4: (sc 1, inc) repeat 2 times, sc 2, (sc 1, inc) repeat 4 times, sc 2, (sc 1, inc) repeat 2 times [28]
- Rnd 5: (sc 1, inc, sc 1) repeat 2 times, sc 2, (sc 1, inc, sc 1) repeat 4 times, sc 2, (sc 1, inc, sc 1) repeat 2 times [36]
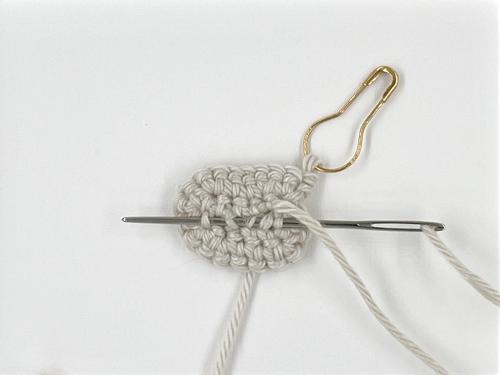
- Rnd 6-8: sc 36 [36]
- Crochet sc 11 and change the yarn colour to white before starting the next round.
9-26
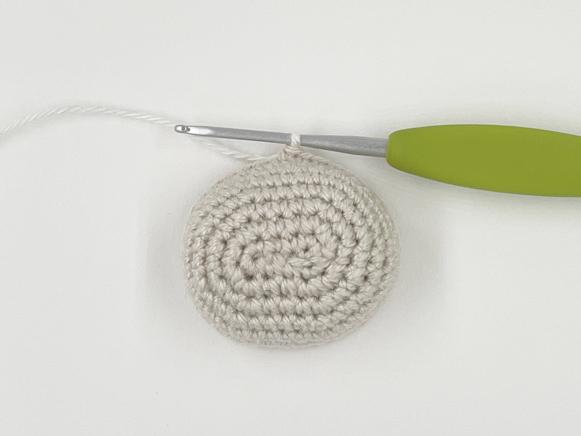
- Rnd 9: sc 36 [36]
- Rnd 10: sc 6, (sc 3, inc) repeat 6 times, sc 6 [42]
- Rnd 11: sc 6, (sc 2, inc, sc 2) repeat 6 times, sc 6 [48]
- Rnd 12: sc 6, (sc 5, inc) repeat 6 times, sc 6 [54]
- Rnd 13-18: sc 54 [54]
- Rnd 19: (sc 7, dec) repeat 6 times [48]
- Rnd 20: (sc 3, dec, sc 3) repeat 6 times [42]
- Rnd 21: (sc 5, dec) repeat 6 times [36]
- Rnd 22: (sc 2, dec, sc 2) repeat 6 times [30]
- Rnd 23: (sc 3, dec) repeat 6 times [24]
- Rnd 24: (sc 1, dec, sc 1) repeat 6 times [18]
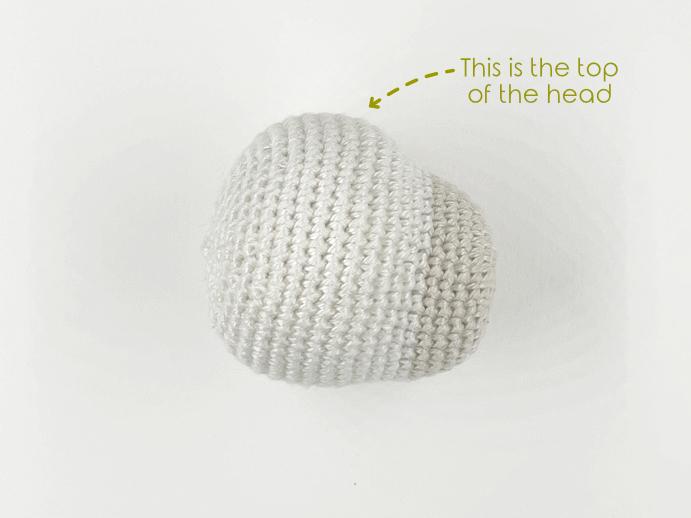
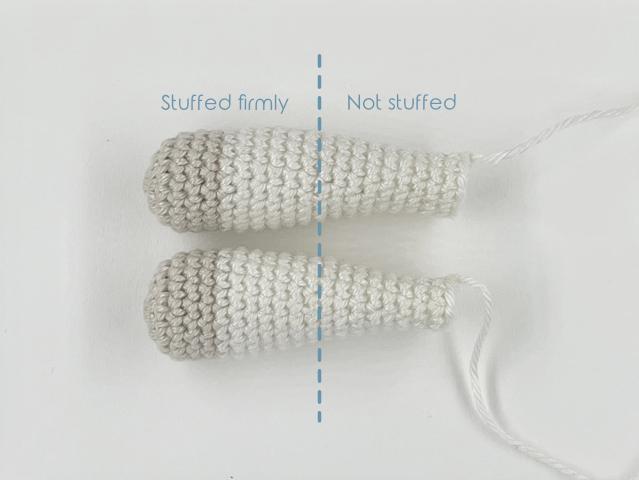
- Stuff the head firmly with fiberfill.
- Rnd 25: (sc 1, dec) repeat 6 times [12]
- Rnd 26: (dec) repeat 6 times [6]
Fasten off and leave a tail of yarn. Weave the remaining tail through the front loops of round 26 and pull it tight to close the head completely. Hide the remaining end of yarn inside the head.
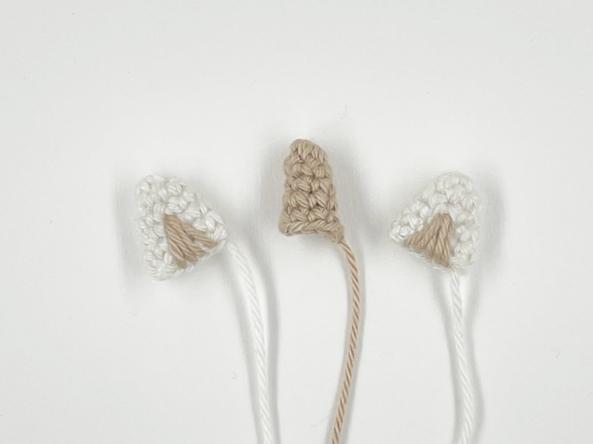
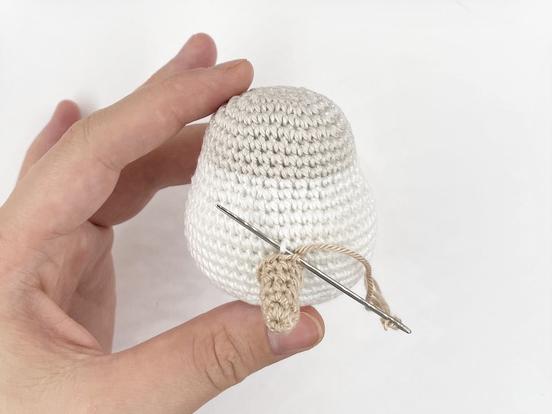
Horn: Use 2 mm crochet hook and dark beige colour yarn, work in continuous rounds
- Rnd 1: sc 6 in a magic ring [6]
- Rnd 2: sc 6 [6]
- Rnd 3: sc 5, inc [7]
- Rnd 4: sc 3, inc, sc 3 [8]
- Rnd 5: (sc 3, inc) repeat 2 times [10]
- Fasten off and leave a tail for sewing.
- Stuff the horn firmly with fiberfill.
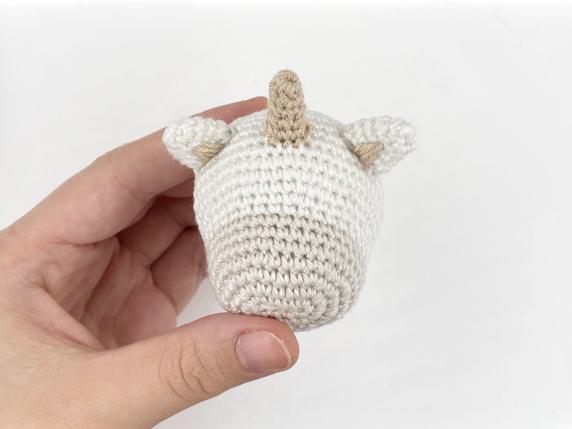
Ears (make 2 using a 2 mm crochet hook and white colour yarn. Work in continuous rounds)
- Rnd 1: sc 6 in a magic ring [6]
- Rnd 2: (sc 1, inc, sc 1) repeat 2 times [8]
- Rnd 3: sc 7, inc [9]
- Rnd 4: sc 4, inc, sc 4 [10]
- Rnd 5: (sc 2, inc, sc 2) repeat 2 times [12]
Fasten off and leave a tail of yarn. Take a yarn needle and close the opening of the ears with a stitch. Leave the remaining yarn for sewing.
Take a strand of dark beige yarn and embroider the triangle shadows on the ears.
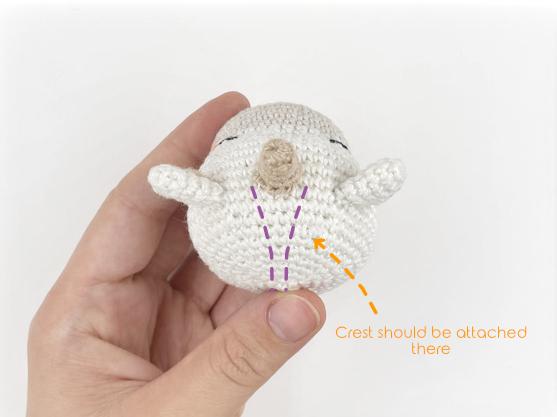
Crest
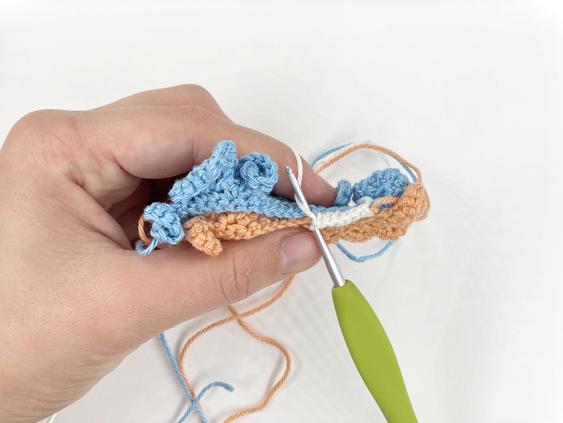
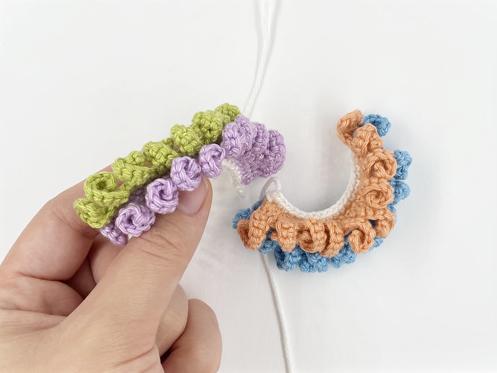
- Curls (make 4 in different colours)
- Work in rows using a 2 mm crochet hook and colours green, peach, purple and blue
- Rnd 1: ch 21 [21]
- Rnd 2: Start in the second ch from the hook: sc 20 [20]
- Rnd 3: ch 6, turn, now work in the opposite side of the chain and start in the second ch from the hook: (inc) repeat 5 times, sc 2 in row 2, (ch 6, start in the second ch from hook: (inc) repeat 5 times, sc 2 in row 2) repeat 9 times [10 curls]
- Fasten off and weave in the ends.
- Combine the curls: Use 2 mm crochet hook and white colour yarn
- Combine peach with blue and purple with green curls
- Take two pieces of curls, place one on the other so that the stitches are aligned and work in the opposite side of the foundation chains. Insert your hook in the first ch of one piece, then insert your hook in the first ch of the other piece and crochet through both layers: sc 20 [20]
- Fasten off and leave a tail for sewing.
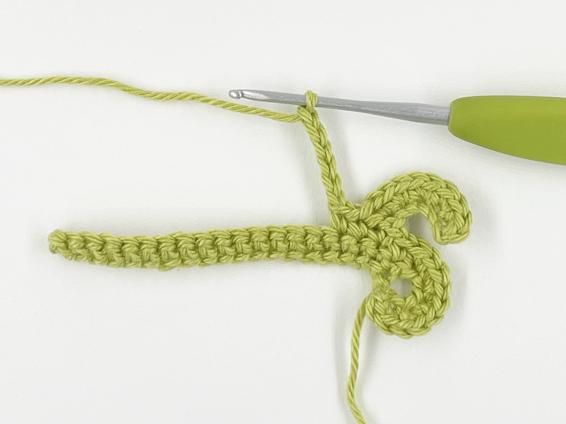
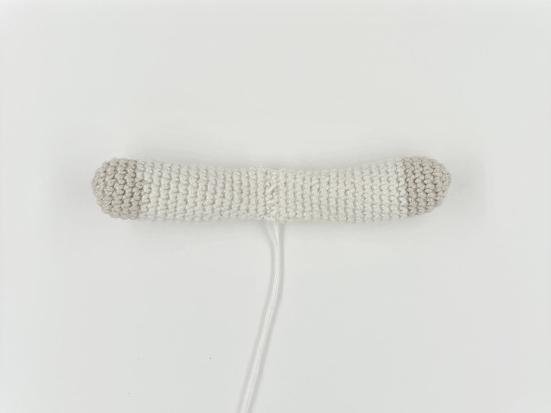
Arms (make 2)
- Work in rounds use 2 mm crochet hook and start with beige colour yarn
- Rnd 1: sc 6 in a magic ring [6]
- Rnd 2: (inc) repeat 6 times [12]
- Rnd 3: (sc 1, inc) repeat 6 times [18]
- Rnd 4 – 6: sc 18 [18]
- Change the yarn colour to white.
- Rnd 7 – 12: sc 18 [18]
- Rnd 13: sc 8, dec, sc 8 [17]
- Rnd 14: sc 15, dec [16]
- Rnd 15: sc 7, dec, sc 7 [15]
- Rnd 16: sc 13, dec [14]
- Rnd 17: sc 6, dec, sc 6 [13]
- Rnd 18: sc 11, dec [12]
- Rnd 19 – 21: sc 12 [12]
- Fasten off and leave a tail for sewing.
- Stuff the first half of each arm.
Star Blanket
- Start working in continuous rounds using a 3.5 mm crochet hook and start with beige colour yarn
- Do not count ch stitches at the beginning and sl stitches at the end of the rounds as stitches.
- Rnd 1: sc 8 in a magic ring [8]
- Rnd 2: (inc) repeat 8 times, sl in the first sc of this round [16]
- Work in joined rounds from this point.
- Rnd 3: ch 2, hdc in same st, 2 hdc in next st, (hdc 1, 2 hdc in next st) repeat 7 times, sl in the first hdc of this round [24]
- Rnd 4: ch 2, hdc in same st, hdc 1, 2 hdc in next st, (hdc 2, 2 hdc in next st) repeat 7 times, sl in the first hdc of this round [32]
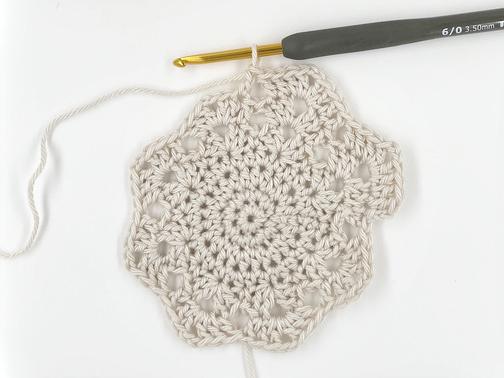
- Rnd 5: ch 1, sc in same st, skip 1 st, 2 dc + ch 2 + 2 dc in next st, (skip 1 st, sc 1, skip 1 st, 2 dc + ch 2 + 2 dc in next st) repeat 7 times, sl in the first sc of this round, sl 2 in following dc stitches [8 points with 4 dc + ch 2 in each]

6-7
- Rnd 6: ch 2, dc in same st, 2 dc + ch 2 + 2 dc in space, dc 1 (skip 3 st, dc 1, 2 dc + ch 2 + 2 dc in space, dc 1) repeat 7 times, skip 3 st, sl in the first dc of this round, sl in the next st [8 points with 6 dc + ch 2 in each]
- Rnd 7: ch 2, dc in same st, dc 1, 2 dc + ch 2 + 2 dc in space, dc 2, (skip 2 st, dc 2, 2 dc + ch 2 + 2 dc in space, dc 2) repeat 7 times, skip 2 st, sl in the first dc of this round, sl in the next st [8 points with 8 dc + ch 2 in each]
8-10
- Rnd 8: ch 2, dc in same st, dc 2, 2 dc + ch 2 + 2 dc in space, dc 3, (skip 2 st, dc 3, 2 dc + ch 2 + 2 dc in space, dc 3) repeat 7 times, skip 2 st, sl in the first dc of this round, sl in the next st [8 points with 10 dc + ch 2 in each]
- Rnd 9: ch 2, dc in same st, dc 3, 2 dc + ch 2 + 2 dc in space, dc 4, (skip 2 st, dc 4, 2 dc + ch 2 + 2 dc in space, dc 4) repeat 7 times, skip 2 st, sl in the first dc of this round, sl in the next st [8 points with 12 dc + ch 2 in each]
- Rnd 10: ch 2, dc in same st, dc 4, 2 dc + ch 2 + 2 dc in space, dc 5, (skip 2 st, dc 5, 2 dc + ch 2 + 2 dc in space, dc 5) repeat 7 times, skip 2 st, sl in the first dc of this round, sl in the next st [8 points with 14 dc + ch 2 in each]
11-12
- Rnd 11: ch 2, dc in same st, dc 5, 2 dc + ch 2 + 2 dc in space, dc 6, (skip 2 st, dc 6, 2 dc + ch 2 + 2 dc in space, dc 6) repeat 7 times, skip 2 st, sl in the first dc of this round, sl in the next st [8 points with 16 dc + ch 2 in each]
- Rnd 12: ch 2, dc in same st, dc 6, 2 dc + ch 2 + 2 dc in space, dc 7, (skip 2 st, dc 7, 2 dc + ch 2 + 2 dc in space, dc 7) repeat 7 times, skip 2 st, sl in the first dc of this round, sl in the next st and change the yarn colour to green [8 points with 18 dc + ch 2 in each]
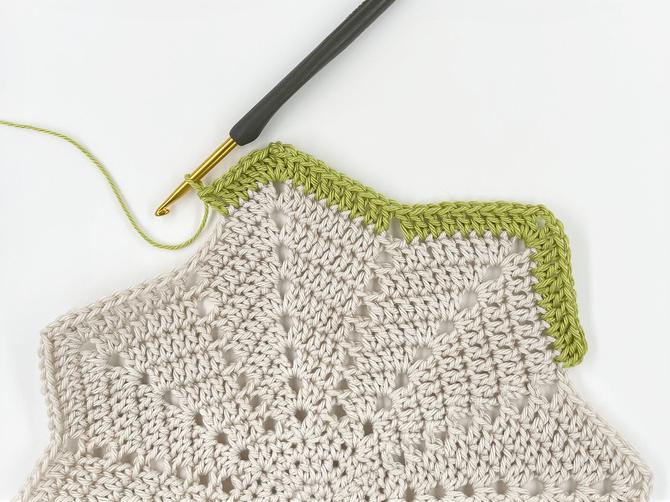
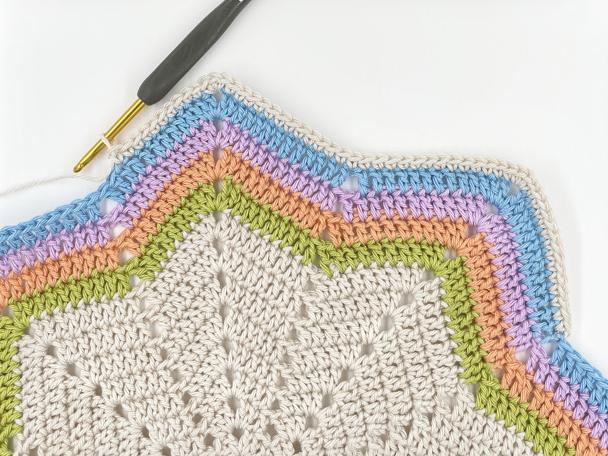
13-15
- Rnd 13: ch 2, dc in same st, dc 7, 2 dc + ch 2 + 2 dc in space, dc 8, (skip 2 st, dc 8, 2 dc + ch 2 + 2 dc in space, dc 8) repeat 7 times, skip 2 st, sl in the first dc of this round, sl in the next st and change the yarn colour to peach [8 points with 20 dc + ch 2 in each]
- Rnd 14: ch 2, dc in same st, dc 8, 2 dc + ch 2 + 2 dc in space, dc 9, (skip 2 st, dc 9, 2 dc + ch 2 + 2 dc in space, dc 9) repeat 7 times, skip 2 st, sl in the first dc of this round, sl in the next st and change the yarn colour to purple [8 points with 22 dc + ch 2 in each]
- Rnd 15: ch 2, dc in same st, dc 9, 2 dc + ch 2 + 2 dc in space, dc 10, (skip 2 st, dc 10, 2 dc + ch 2 + 2 dc in space, dc 10) repeat 7 times, skip 2 st, sl in the first dc of this round, sl in the next st and change the yarn colour to blue [8 points with 24 dc + ch 2 in each]
16-17
- Rnd 16: ch 2, dc in same st, dc 10, 2 dc + ch 2 + 2 dc in space, dc 11, (skip 2 st, dc 11, 2 dc + ch 2 + 2 dc in space, dc 11) repeat 7 times, skip 2 st, sl in the first dc of this round and change the yarn colour to beige [8 points with 26 dc + ch 2 in each]
- Rnd 17: ch 1, sc in same st, sc 12, make 3 sc in space, sc 13, (sc 13, 3 sc in space, sc 13) repeat 7 times, sl in the first sc of this round [232]
- Fasten off and weave in the remaining ends.
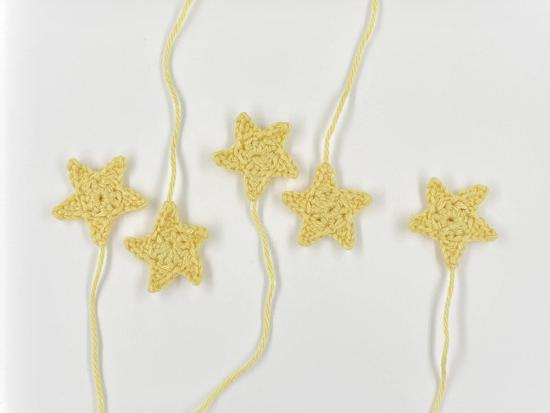
Stars (make 8)
- Work in joined rounds. Use 2 mm crochet hook and yellow colour yarn
- Rnd 1: Start a magic ring, ch 2 (it doesn’t count as a stitch), hdc 10, close the ring and sl in the first hdc of this round [10]
- Rnd 2: (ch 4, start in the second ch from the hook: sl 1, sc 1, hdc 1, skip 1 st and sl in next st) repeat 5 times [5 points]

- Fasten off and leave a tail for sewing. Weave the remaining yarn through the star to one of the points and leave it there.
Assembly
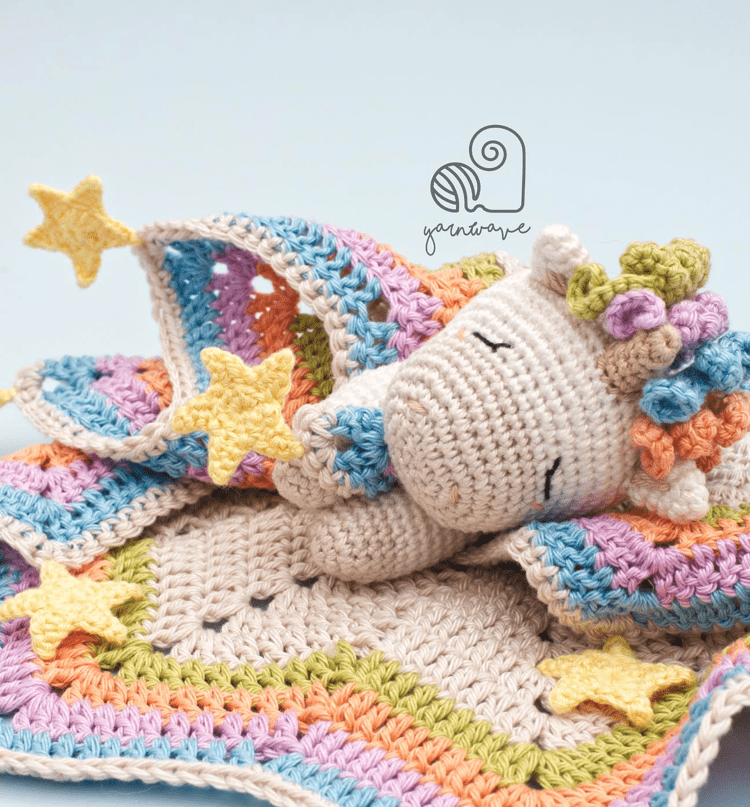
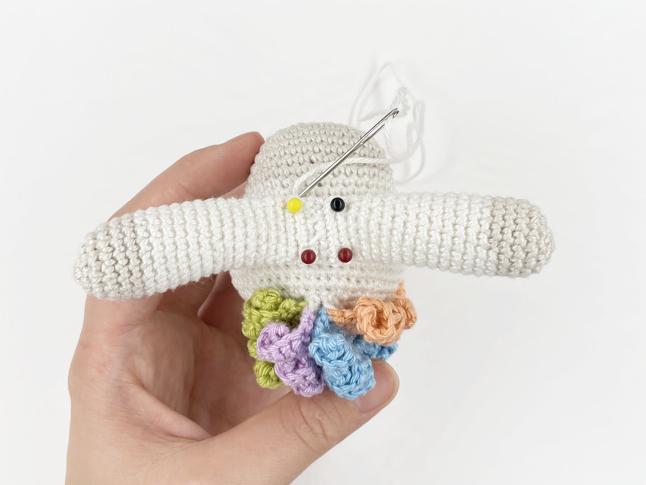
- Step 1: Place the horn on top of the head starting by round 15. Pin it in place and sew around using the remaining yarn tail.
- Step 2: Place the ears on top of the head. They should appear on the rounds 15 – 16, three stitches away from the horn. Pin them in place and attach using the remaining yarn tail.
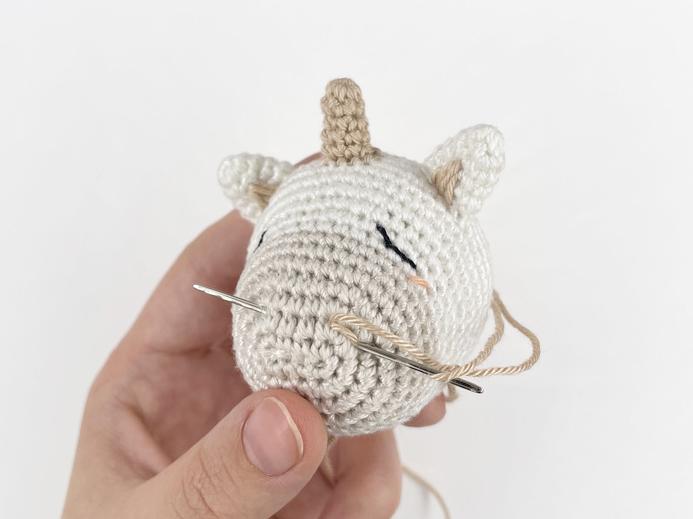
Face Details
- Step 3: Add some face details:
- Take a strand of black embroidery thread and embroider the sleepy eyes on round 10 with an interspace of 8 stitches. They should be 3 stitches wide.
- Then take a strand of peach colour yarn and embroider the blush right below the eyes.
- Lastly, take a strand of dark beige colour yarn and embroider the nostrils between the rounds 2 and 3 of the head. There should be 5 stitches between the nostrils.
4-5
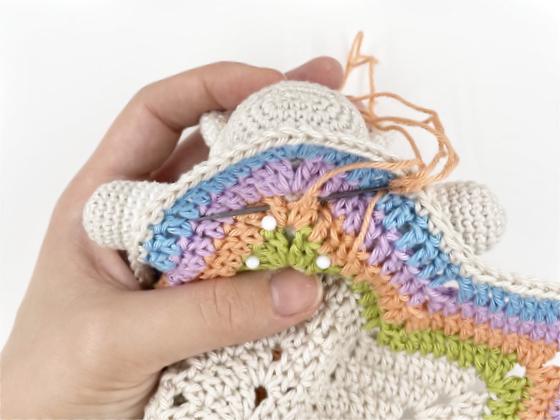
- Step 4: Place the crest pieces on the back side of the head. They should start next to the horn. Refer to the pictures to place them correctly. Use pins to secure the position and sew using the remaining yarn tails.

- Step 5: Sew the arms together using one of the remaining yarn tail.
Attaching the Arms
- Step 6: Attach the arms on the bottom side of the head. They should be placed on the rounds 11 – 16. Pin them in place and sew using the remaining yarn tails.
- Step 7: Place the unicorn on the back side of the blanket. It should appear on the green stripe of the blanket, facing towards the point of the blanket. Pin it in place and sew around using peach and beige colour yarn.
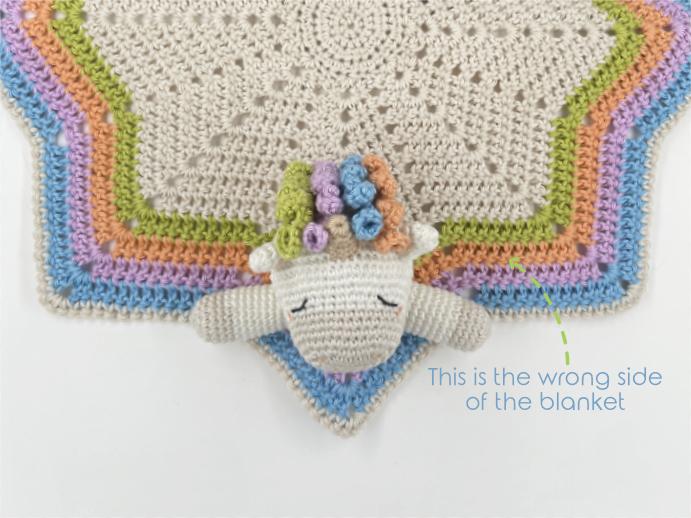
- Step 8: Pin the arms of the unicorn together and sew using beige colour yarn.

- Step 9: Attach the stars to the points of the blanket using the remaining yarn tails.
- You’re all finished! I hope you LOVE your unicorn lovey.

Crochet Patterns
Check out these adorable baby patterns available on the blog:
Want to keep on top of the latest Bella Coco news? The best way is to subscribe to my newsletter…you get a weekly inbox packed full of news, patterns and tips!
This is incredibly beautiful
Absolutely gorgeous! Thank you for sharing for free.
You are very welcome 🙂
I need some help with the Celesté unicorn mane or as it is called in the pattern the Crest Curls. Is there a tutorial video I can watch to help me get it right?
Hi Chantel as this was a guest post you will need to contact the designer directly 🙂
Is beautiful
The colors are so lovely
Thank you for your wonderful work
I cannot figure out the inc parts
Hi Linda as this is not my pattern you will have to contact the designer directly 🙂
Hi Linda,
Did you ever figured it out? I am struggling too!
Beautiful. May I be able to sell the lovey when I make it. I will give you credit. I won’t be selling it online, but at a store or craft fair instead.
Olá muito obrigado por ter disponibilizado essa receita..me ajudou muito…minha filha ficou encantada com essa naninha de unicórnio..e me fez uma encomenda para presenteia uma amiga…muito obrigado mesmo..pela receita..que papai do céu lhe abençoe 100 vezes mais…um grande abraço…
Você é muito bem-vindo 🙂
The inc is 2 sc in one stitch.