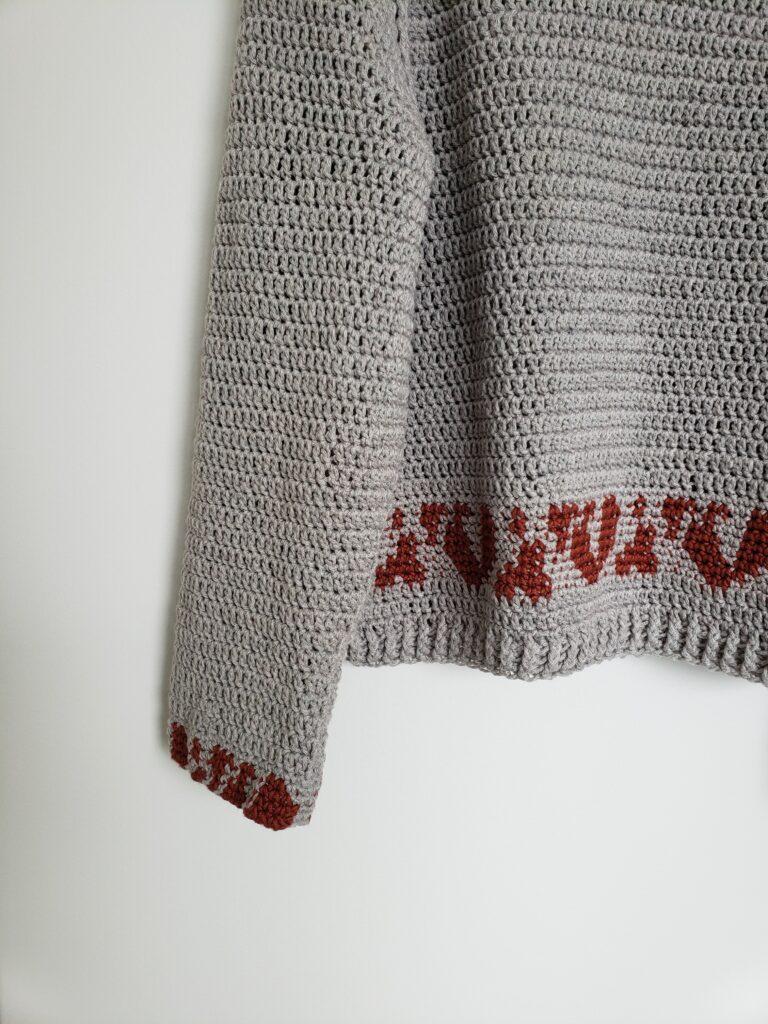
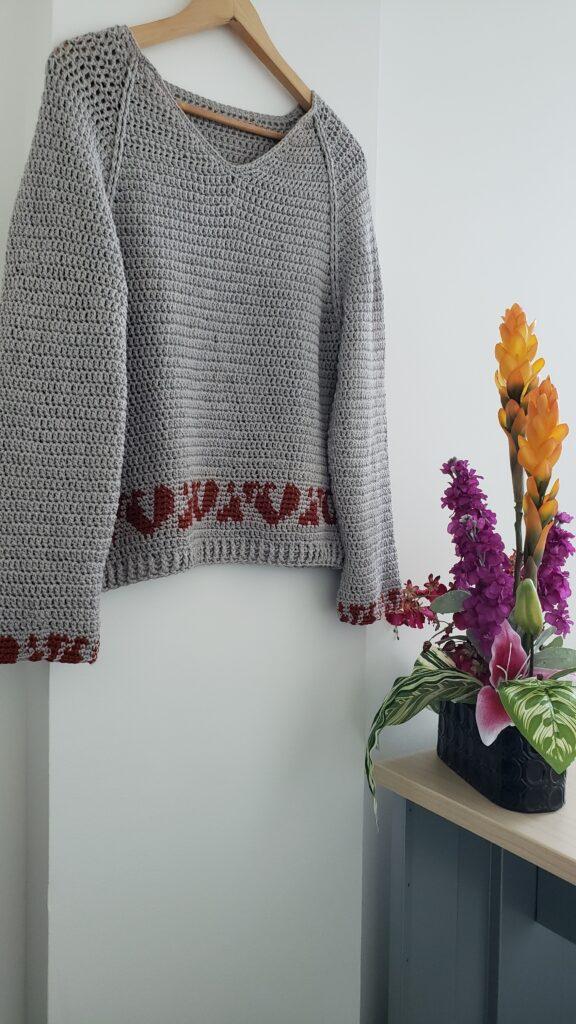
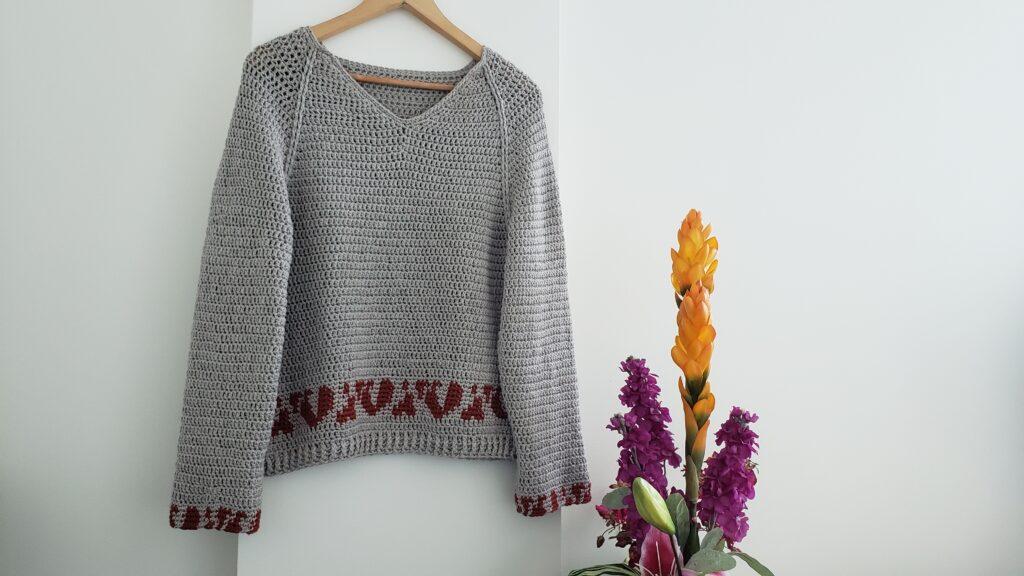
If you’re looking for the perfect cosy sweater to carry you through Autumn and Winter…let me introduce the beautiful Bandia crochet sweater. Designed by the lovely Ami from Hook of Love, this crochet jumper is a deceptively simple make. Not only that, it’s seamless so there’s no tricky sewing afterwards! Inspired by a national park in Senegal, there’s a playful splash of animal print on the bottom of this sporty-shaped sweater. I can’t wait to make a pastel-coloured version!
Ami herself says, “The sweater is named after Bandia reserve in my home country of Senegal. Here’s what I love about it:
- Making it seamless was important to me (I dislike sewing crochet pieces!)
- The raglan construction with v-neck opening and the fpdc between sleeves and body of sweater give the sweater a sporty vibe.
- The animal print on hem and cuff”
As this is a guest post, Bella Coco Crochet is unable to answer any queries. If you have a question, please contact the designer directly and they will be happy to help you.
Materials & Tools
Yarn: Any worsted weight yarn. If you’re struggling to find worsted, you can use Aran and a smaller hook size – be sure to swatch! I love Caron Simply Soft.
Colour 1: 1100 to 1250 yards
Colour 2: 20 yards
Hook: 5.5mm
Gauge
8 Rows of 14 dc = 4” x 4”
Gauge swatch
Ch 16
Row 1: 1 dc in 4th ch from hook, 1 dc in each ch, ch 2 turn (ch 2 turn does not count as a stitch) (14 dc)
Row 2: 1 dc in each st, ch 2 turn
Row 3 – 8: As row 2. Fasten off
Sizing
Size: S (M, L , XL)
Finished bust measurement: 36.5 (38, 42, 46) inches
Pin For Later

Pattern Notes
The pattern is written in US terminology
Construction of Bandia Crochet Sweater
- Work the sweater top down, back and forth, making increases where indicated until the v-neck is formed.
- Switch to working in the round with increases where indicated
- Separate for sleeves and continue working the body of the sweater to the print design section
- Use tapestry technique to work the print design
- Finish the hem with ribbing
- Work 1 sc round around the neckline
- Work the sleeves in the round making decreases where indicated
- End sleeves with the print design
Crochet Terms
Chain (ch): Yarn over, pull through one loop on hook.
Single Crochet (s): sc(s): Insert into stitch, yarn over, pull up a loop, you will have two loops on the hook. Yarn over, pull through two loops.
Double Crochet (s): dc(s): Yarn over, insert into stitch, yarn over, pull up a loop, you will have three loops on the hook. Yarn over, pull through two loops, yarn over, pull through remaining two loops.
Front Post Double Crochet (fpdc): Yarn over, insert hook behind the post of the indicated stitch (from front to back, then back to front, so the post is in front of the hook), yarn over, pull up a loop around the post of the stitch, *yarn over, pull through two loops* twice.
Back Post Double Crochet (bpdc): Yarn over, working from the back of the fabric, insert hook in front of the post of the stitch from the row below (from back to front, then front to back, so the post is at the back of the hook), yarn over, pull up a loop around the post of the stitch, *yarn over, pull through two loops* twice.
Sp: Space
Sk: Skip
RS: Right side
WS: Wrong side
st(s) Stitch(s)

Unsure of the differences between UK and US terms? Need a refresher on how to do your stitches? In my ‘How to crochet: A handy reference guide’ EBook I help you with all of these terms and you can always have them to hand! You will also get exclusive access to free video instructions. Learn more about the eBook here.
To unlock this FREE crochet pattern all you need to do is enter your email and the grow app will appear, please enter your email and create a password. Now you’ve created a grow account you’ll be able to access all of the free patterns on the blog and bookmark your favourites so you can have them all in one place for easy access.
If you forget your password, click the “forgot password” link and follow the prompts. Please note that the team are unable to assist with resetting Grow passwords or accessing your Grow account, so please make sure you save your login information in a safe place.
Your grow account is separate from your Bella Coco account which you use to access your purchased patterns.
BANDIA CROCHET SWEATER PATTERN
Yoke Section
Ch 56
Tip: before the ch 3 at the beg of a round, sl.st. around the ch3 of the previous round then ch 3. This will make it look like a fpdc instead of a ch 3
Size Small: work Round 2-19 as round 1 (214 sts at end of round 10)
Size Medium: work Round 2-20 as round 1 (222 sts at end of round 11)
Size Large: work round 2-21 as round 1 (230 sts at end of round 12)
Size XL: work round 2-22 as round 1 (238 sts at end of round 13)
Separate for sleeves and work body of sweater
Round 1: ch 3, 1 fpdc, ch 0 (0, 6, 10), sk 45 (47, 49, 51) dc, 2 fpdc, 2 dc in next st, 56 (58,60,62) dc, 2 dc, 2 fpdc, ch 0 (0,6,10), sk 45 (47,49,51) dc, 2 fpdc, 2 dc in next st, 56 (58, 60,62) dc, 2 dc in last st, sl st to 3rd ch – [128 (132,136,140) sts]; 0 (0, 6, 10 ) ch
Round 2: ch 3, 1 dc in each st and in each ch, 128 (132, 148, 160) sts
Round 3-16: as round 1
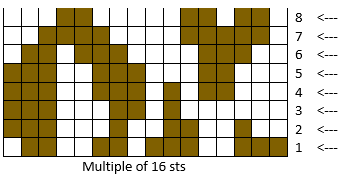
Sweater Hem (shaded squares = color B)
Tip: use 2 stitch markers one at the beg and one at the end of the 16 sts repeat
The print design calls for a multiple of 16 sts
Setting up for the print design
Size Small and XL: ch 1, 1 sc in each st all around, sl.st to the 1st sc (128, 160 )sts
Size Medium and Large (decrease 4 sts to get to a multiple of 16 sts): ch 1, 1 sc in each st, decrease 1 st by the middle front, 1 st on each side of the sweater, 1st by the middle of the sweater (decrease by making sc2tog) (128,144) sts
Print design
This section is worked using the tapestry technique. The color not in use is carried in the back of the work. And when changing color finish the last stitch with the new color to be used
Round 1 to round 8: follow the chart
Example of how to read the chart.
Round 1 (attach color B)
*With Color B: 3 sc
With Color A: 2 sc
With Color B: 3 sc
With Color A: 1 sc
With Color B: 2 sc
With Color A: 2 sc
With Color B: 2sc
With Color A: 1 sc
Repeat from * 8 (8, 9, 10) times, slst. to beg sc, then continue to Row 2 with color A
Work all 8 rows of the chart
Finishing Hem
With color A
Round 1: Ch 3 (count as a stitch), 1 dc in each st all around, sl.st. to 3rd ch 128(128, 144, 160) dc
Round 2-3: as round 1
Round 4-6: ch 3, 1 bpdc, *1 fpdc, 1 bpdc, repeat from * all around, sl.st. to 3rd ch
Fasten off
Neckline finishing
Print Design
Size Small & Medium
Work row 1-4 of the chart. Fasten off
Make 2nd sleeve as first.
Weave in all ends
Size Large only
Print design on sleeve
Work row 1-4 of the chart.
Work 2nd sleeve as first
Fasten off
Print design on sleeve
Work row 1-4 of the chart. Work 2nd sleeve as first. Fasten off.
Want to keep up with what’s new on Bella Coco Crochet? The best way is to sign up to my newsletter, you get a weekly inbox that’s packed full of patterns, crochet chat and more!
Looking to stay warm this Autumn? I have the perfect collection of Fall-friendly patterns to keep you cosy and chic. Why not try one of these?


I would like to get the Bandia v neck sweater pattern as a pdf so I can print it and would be willing to purchase it. Is this a possibility ?
TIA, Donna Bloch
Hi Donna, as this was a Guest Post you will need to contact the designer directly and she will be able to help you 🙂