This project was sponsored by Love Crochet
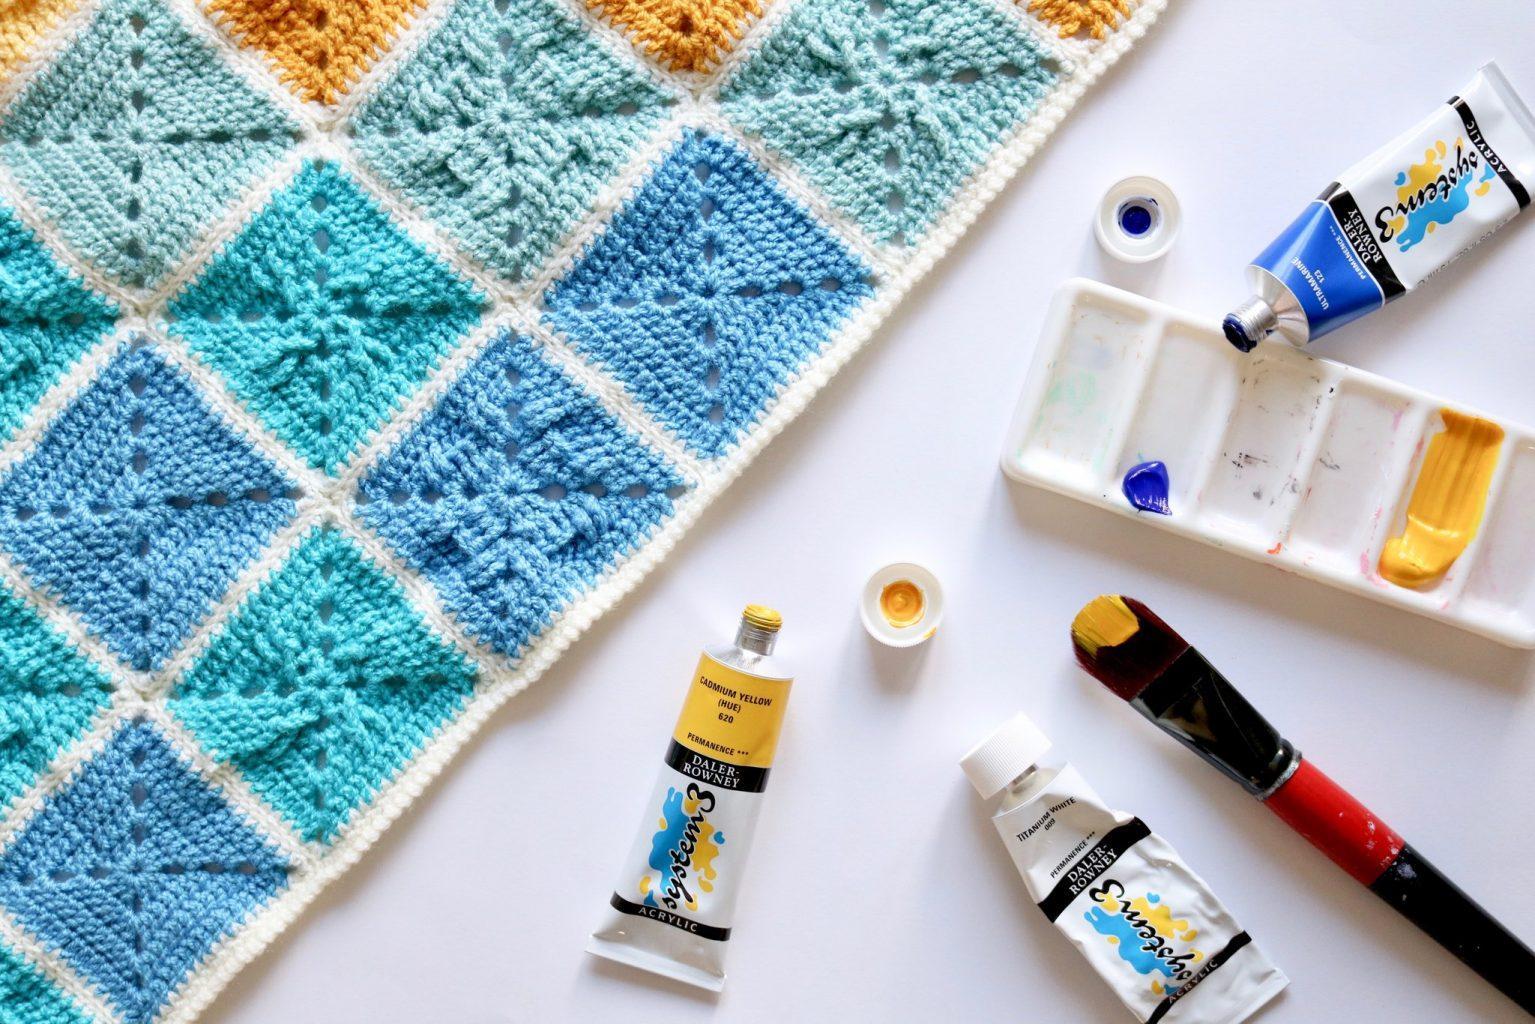
I’m so excited to be introducing you to the Abstract Blanket CAL! This CAL was inspired by a water colour backdrop I saw on pinterest. When I saw the squares, I immediately thought it would make a really cute granny square blanket. As it’s based on a painting, what better yarn to use than Paintbox Simply DK?! I designed the CAL in the hope that it would appeal to all skills levels and I think it’s certainly one for colour lovers.

Crochet Along Details
You can find the colour pack exclusively on lovecrochet.com. It consists of 10 colours and 11 x 100g balls in total. (PLEASE NOTE: This colour pack is now sold out! BUT you can still purchase your colours individually)
The CAL will be broken up into 4 sections and you will be given details of the various parts of the blanket one step at a time.
Through each step, there will be a downloadable PDF which you can print if you require PLUS a video tutorial to help you if you need it. You can also join the Abstract blanket CAL group on Facebook to get help and support as well as chat to others doing the CAL.
Abstract Blanket Event Page here
To make things simple, I will update this page with the next steps of the project.
See Also: LoveCrochet
Materials & Tools
- Paintbox Simply DK in colours Dusty Lilac (146), Dusty Rose (141), Bubblegum Pink (150), Ballet Pink (152), Mustard Yellow (123), Daffodil Yellow (121), Washed Teal (132), Marine Blue (133), Sky Blue (138), Champagne White (102)
- 4mm Crochet Hook
- Scissors
- Darning Needle
Pattern Notes
Pattern is written in UK terms but switchable to US terms below.
NOTE: you can either chain 2 or chain 3 in the corners. The choice is down to the individual. Please make sure that this remains consistent with square 1, 2 and 3.
Convert Pattern Terms
Here you can quickly switch between UK and US crochet terms. This will make following the pattern easier as all terms will be converted to your preferred version.
Terms & Abbreviations
- Space (sp)
- Stitch(es) (st/s)
- Chain (ch): Yarn over, pull through.
- Slip stitch (ss): Insert hook, yarn over, pull through both stitch and loop on hook.
- Double Crochet (dc): Insert hook into stitch, yarn over, pull up a loop, you will have two loops on the hook. Yarn over, pull through remaining two loops.
- Treble Crochet(s): tr(s): Yarn over, insert into stitch, yarn over, pull up a loop, you will have three loops on the hook. Yarn over, pull through two loops, yarn over, pull through remaining two loops.
- Double Treble(s): dtr(s): Yarn over hook twice, insert into stitch, yarn over, pull up a loop, you will have four loops on the hook. Yarn over, pull through two loops, you will have three loops on the hook. Yarn over, pull through two loops, yarn over, pull through remaining two loops.
- Front Post Double Treble(s): fpdtr(s): Yarn over hook twice, insert hook around post of stitch from front to back to front, yarn over, pull up a loop, you will have four loops on the hook. Yarn over, pull through two loops, you will have three loops on the hook. Yarn over, pull through two loops, yarn over, pull through remaining two loops.
- Back Post Double Treble(s): bpdtr(s): Yarn over hook twice, insert hook around post of stitch from back to front to back, yarn over, pull up a loop, you will have four loops on the hook. Yarn over, pull through two loops, you will have three loops on the hook. Yarn over, pull through two loops, yarn over, pull through remaining two loops.
- Reverse Double Crochet(s): rdc(s): Insert hook into previous stitch, yarn over, pull up a loop, you will have two loops on the hook. Yarn over, pull through remaining two loops.
Week 1
Week 1 of the CAL starts with creating square 1 in multiple colours. If you would prefer to print your instructions you can find the PDF here.
You can also find the video tutorial below.


Written Instructions
Week 1 | Square 1 (32 Squares to Complete)
Round 5 (Champagne White): dc between each stitch of round 4 with 4 stitches in the corners. Tie off
Week 2
Week 2 of the CAL is all about adding some texture to the blanket, as well as adding another technique. If you would prefer to print your instructions you can find the PDF here.
You can also find the video tutorial below.


Written Instructions
Week 2 | Square 2 (32 Squares to Complete)
Please use the chart found on the PDF to see how many of each colour need to be made this week. Round 5 of each square will be in Champagne White.
Gauge: The complete square (5 rounds) measures 11cm. Please adjust your hook size if necessary.
You are viewing this pattern in UK terms.
Foundation chain: chain 4 and ss in 4th chain from the hook
Round 1: ch3, 2 tr in the centre circle, ch3, 3 tr, ch3, 3 tr, ch3, 3 tr, ch3, ss in 3rd chain from the bottom.
Round 2: ss around the front post of the tr, ch 3, fpdtr around each of the next 2 stitches, 2 tr into the corner space, *ch 3, 2 tr into the same corner space, fpdtr around the each of the next 3 stitches, 2 tr into the corner space* (3 times) ch 3, 2 tr into the same corner space. ss into in 3rd chain from the bottom.
Round 3: ss around the back post of the tr, ch 3, bpdtr around each of the next 2 stitches, fpdtr around each of the next 2 stitches, 2 tr into the corner space, *ch 3, 2 tr into the same corner space, fpdtr around the each of the next 2 stitches, bpdtr around each of the next 3 stitches, fpdtr around the each of the next 2 stitches, 2 tr into the corner space* (3 times) ch 3, 2 tr into the same corner space, fpdtr around the each of the next 2 stitches, ss into in 3rd chain from the bottom.
Round 4: ch3, tr into the top of each of the next 6 stitches, 2 tr into the corner space, *ch 3, 2 tr into the same corner space, tr into the top of each of the next 11 stitches, 2 tr into the corner space* (3 times) ch 3, 2 tr into the same corner space, tr into the top of each of the next 4 stitches, ss into in 3rd chain from the bottom. Tie off
Round 5 (Champagne White): dc between each stitch of round 4 with 4 stitches in the corners. Tie off

Week 3
This week we are continuing to add some texture to the blanket, as well as adding additional skills. If you would prefer to print your instructions you can find the PDF here.
You can also find the video tutorial below.


Written Instructions
Week 3 | Square 3 (32 Squares to Complete)
Please use the chart found on the PDF to see how many of each colour need to be made this week. Round 5 of each square will be in Champagne White.
Gauge: The complete square (5 rounds) measures 11cm. Please adjust your hook size if necessary.
You are viewing this pattern in UK terms.
Foundation chain: chain 4 and ss in 4th chain from the hook
Round 1: ch3, 2 tr in the centre circle, ch3, 3 tr, ch3, 3 tr, ch3, 3 tr, ch3, ss in 3rd chain from the bottom.
Round 2: ch 3, dtr around the front post of the 3rd tr from the previous row, tr into the top of the next stitch (allowing this stitch to sit behind the dtr), dtr around the front post of the 1st tr from the previous row, 2 tr into the corner space, *ch 3, 2 tr into the same corner space, dtr around the front post of the 3rd tr from the previous row, tr into the top of the next stitch (allowing this stitch to sit behind the dtr), dtr around the front post of the 1st tr from the previous row, 2 tr into the corner space,* (3 times) ch 3, tr into the same corner space. ss into in 3rd chain from the bottom.
Round 3: ch3, fpdtr, tr into the top of the next stitch, fpdtr, 1 tr into the top of the next 2 stitches, 2 tr into the corner space. *ch3, 2 tr into the corner space, 1 tr into the top of the next 2 stitches, fpdtr, tr into the top of the next stitch, fpdtr, 1 tr into the top of the next 2 stitches, 2 tr into the corner space.* (3 times) ch3, 2 tr into the corner space, tr into the top of the next stitch, ss into in 3rd chain from the bottom.
Round 4: ch3, tr into the top of each of the next 7 stitches, 2 tr into the corner space, *ch 3, 2 tr into the same corner space, tr into the top of each of the next 11 stitches, 2 tr into the corner space* (3 times) ch 3, 2 tr into the same corner space, tr into the top of each of the next 3 stitches, ss into in 3rd chain from the bottom. Tie off
Round 5 (Champagne White): dc between each stitch of round 4 with 4 stitches in the corners. Tie off
Week 4
Welcome to Week 4 and final week of the Abstract Blanket Cal. We you have the exciting task of connecting your squares that you have been building up over the last 3 weeks and adding a border to complete your Abstract paining inspired Blanket.
You can also find the video tutorial below. *Opening title suggests this is week 1, however this IS week 4 🙂


Written Instructions
Week 4 | Joining & Border
Squares are to be sewn together with a whip stitch using champagne white. Please see the diagram on the PDF which will indicate where to place your colours and which square to use. You can build this however you choose, whether it be in strips and one by one. If you haven’t sewn in your sends already, please do this as you go along.
Border (Using Champagne White)
You are viewing this pattern in UK terms.
Round 1: With right sides facing, double crochet into each stitch (NOTE: ensure you are working 2 double crochet in the corner spaces when working into the joined corners along the edge) Connect first stitch and last stitch with a slip stitch.
Round 2: chain 2, reverse double crochet (crab stitch) into each stitch from the previous row. Connect with a slip stitch and tie off.
Once you have sewn in your ends, give yourself permission to do a little happy dance because you are all done

I’d like to say a HUGE thank you to everyone who joined in on this CAL. I have loved seeing your work build throughout the last few weeks and I’m looking forward to seeing your finished projects. Whether you have done the CAL when it was first released or if you have joined the CAL at a later date I would LOVE to see you finished projects.
#abstractblanketCAL
#abstractblanket
Find me on Twitter: @bellacocrochet
Find me on Instgram: @bellacococrochet
Find me on Facebook: Bella Coco Crochet
Crochet Pattern by Bella Coco Crochet Copyright 2017
The completed project created with this pattern may be sold, however, the pattern itself or this content must not be recreated or distributed in any form including written, printed and digital. If shared, pleased link directly to this page.
Hi!
I’m just curious if there will be another crochet along? I absolutely loved this one and would love to participate another one.
Greetings from Denmark
Hopefully this year yes xx
Fabulous! Will look out for it and whilst I’m waiting will follow this gorgeous pattern. Thanks Sarah for including the left handed instructions, makes my life so much easier! I love your videos, you have literally taught me how to crochet!!
Absolutely gorgeous! I just want to let you know I love all your patterns, and I just finished this one today!!
Thank you 🙂
What a wonderful presentation this is! Thank you! Thank you! Thank you! You have made sense of a project that I have wanted to do for so long, but I couldn’t understand the pattern. Looking forward to more!
Thank you and you are very welcome 🙂
I am just beginning crochet and you have made learning so easy with your tutorials. My First project is crocheting this blanket however I am using all neutral colours and I may make it slightly bigger (depends how long it takes me to do though ) but I love the different styles in squares. I do have one question… Is there possibly a different way I could join the squares with a stitch using a crotchet needle to make the colour between the squares slightly wider?
Thank you from Australia
Hi Glenys
Thanks for getting in touch, I’m so happy you’re finding my tutorials helpful. There are actually a few different ways of joining squares together in a blanket, but one of the easiest would be to use double crochet stitches (UK terms). Simply hold the squares together that you want to join and using a crochet hook, make double crochets through the stitches on both squares. You could also try a half treble crochet stitch, and experiment with how the different stitches look. Hope this helps 🙂
Thank you so much for your reply. I will have a play with both types and see what I like the most.
Stumbled upon Bella Coco two weeks ago and am SO pleased I did! Followed your absolutely beginner tutorials for some practice stitches, browsed for a project, and landed here! It’s ambitious for a first project if you look at the whole thing, but it’s actually perfect for a beginner, I think!
I sometimes talk to myself as I’m crocheting, and my boyfriend is enjoying the laugh of my “yarn over pull through” in a (poor) British accent (we’re in the US)! I hear your voice as I’m going!
Thank you SO much for this site. Reading the crochet patterns is still Greek to me, but once I see the video I totally get it!
You are very welcome and good luck with your project, let me know how you get on 🙂
Very pleased with how it turned out! Learned a lot and for my very first project, I think it’s a success! The trickiest bit was the joining of the corners of the squares as that’s not shown in the video… what I did definitely worked but if I were to do it again I think I would do differently, ha! Regardless, for a first project ever I’m quite content and it will undoubtedly be a great donation to the hospital. Already have started on the new one – going over to the Bobble Stripe Blanket CAL this time! 🙂
Hi Stephanie my tutorial on how to join granny squares maybe of help to you, here is the link :- https://youtu.be/NUGb9pIcsXE I do have other tutorials on how to join granny squares using different methods so they may also be of help to you. If you go to youtube and type in bella coco how to join granny squares they will all come up and you can have a look to see if they are what you are looking for. Good luck 🙂