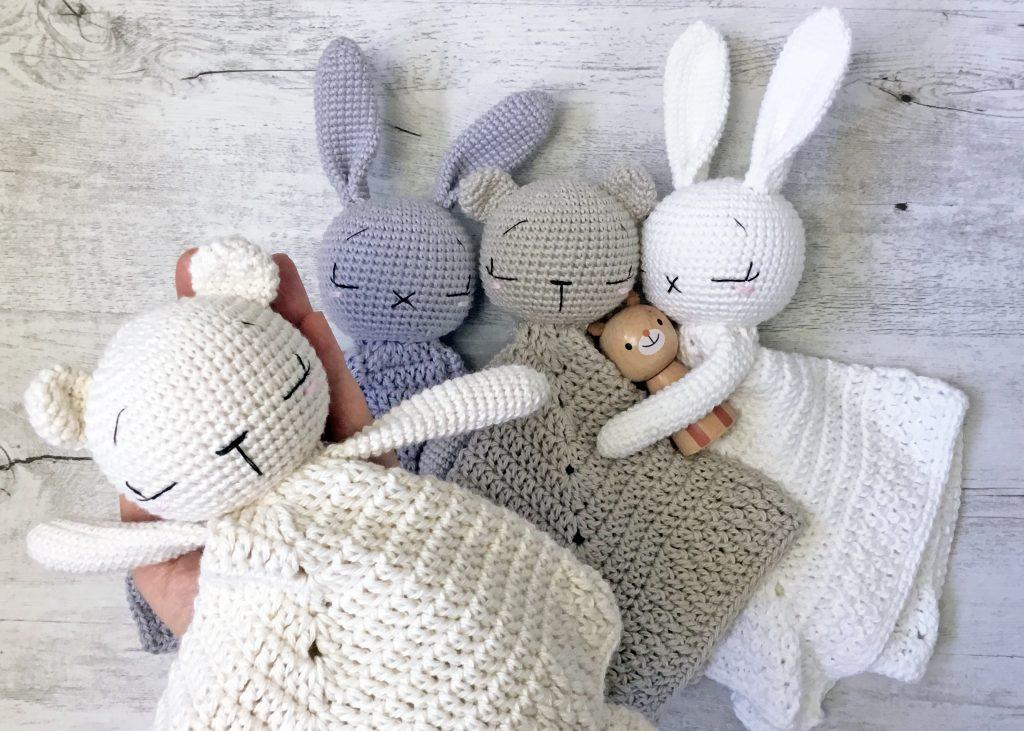
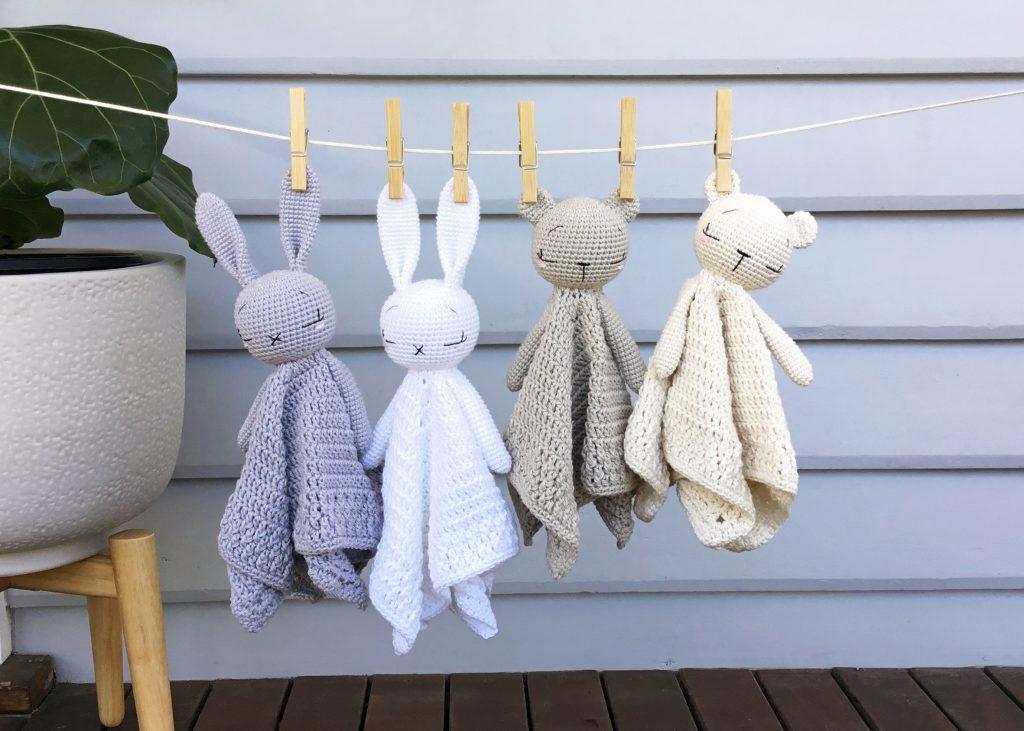
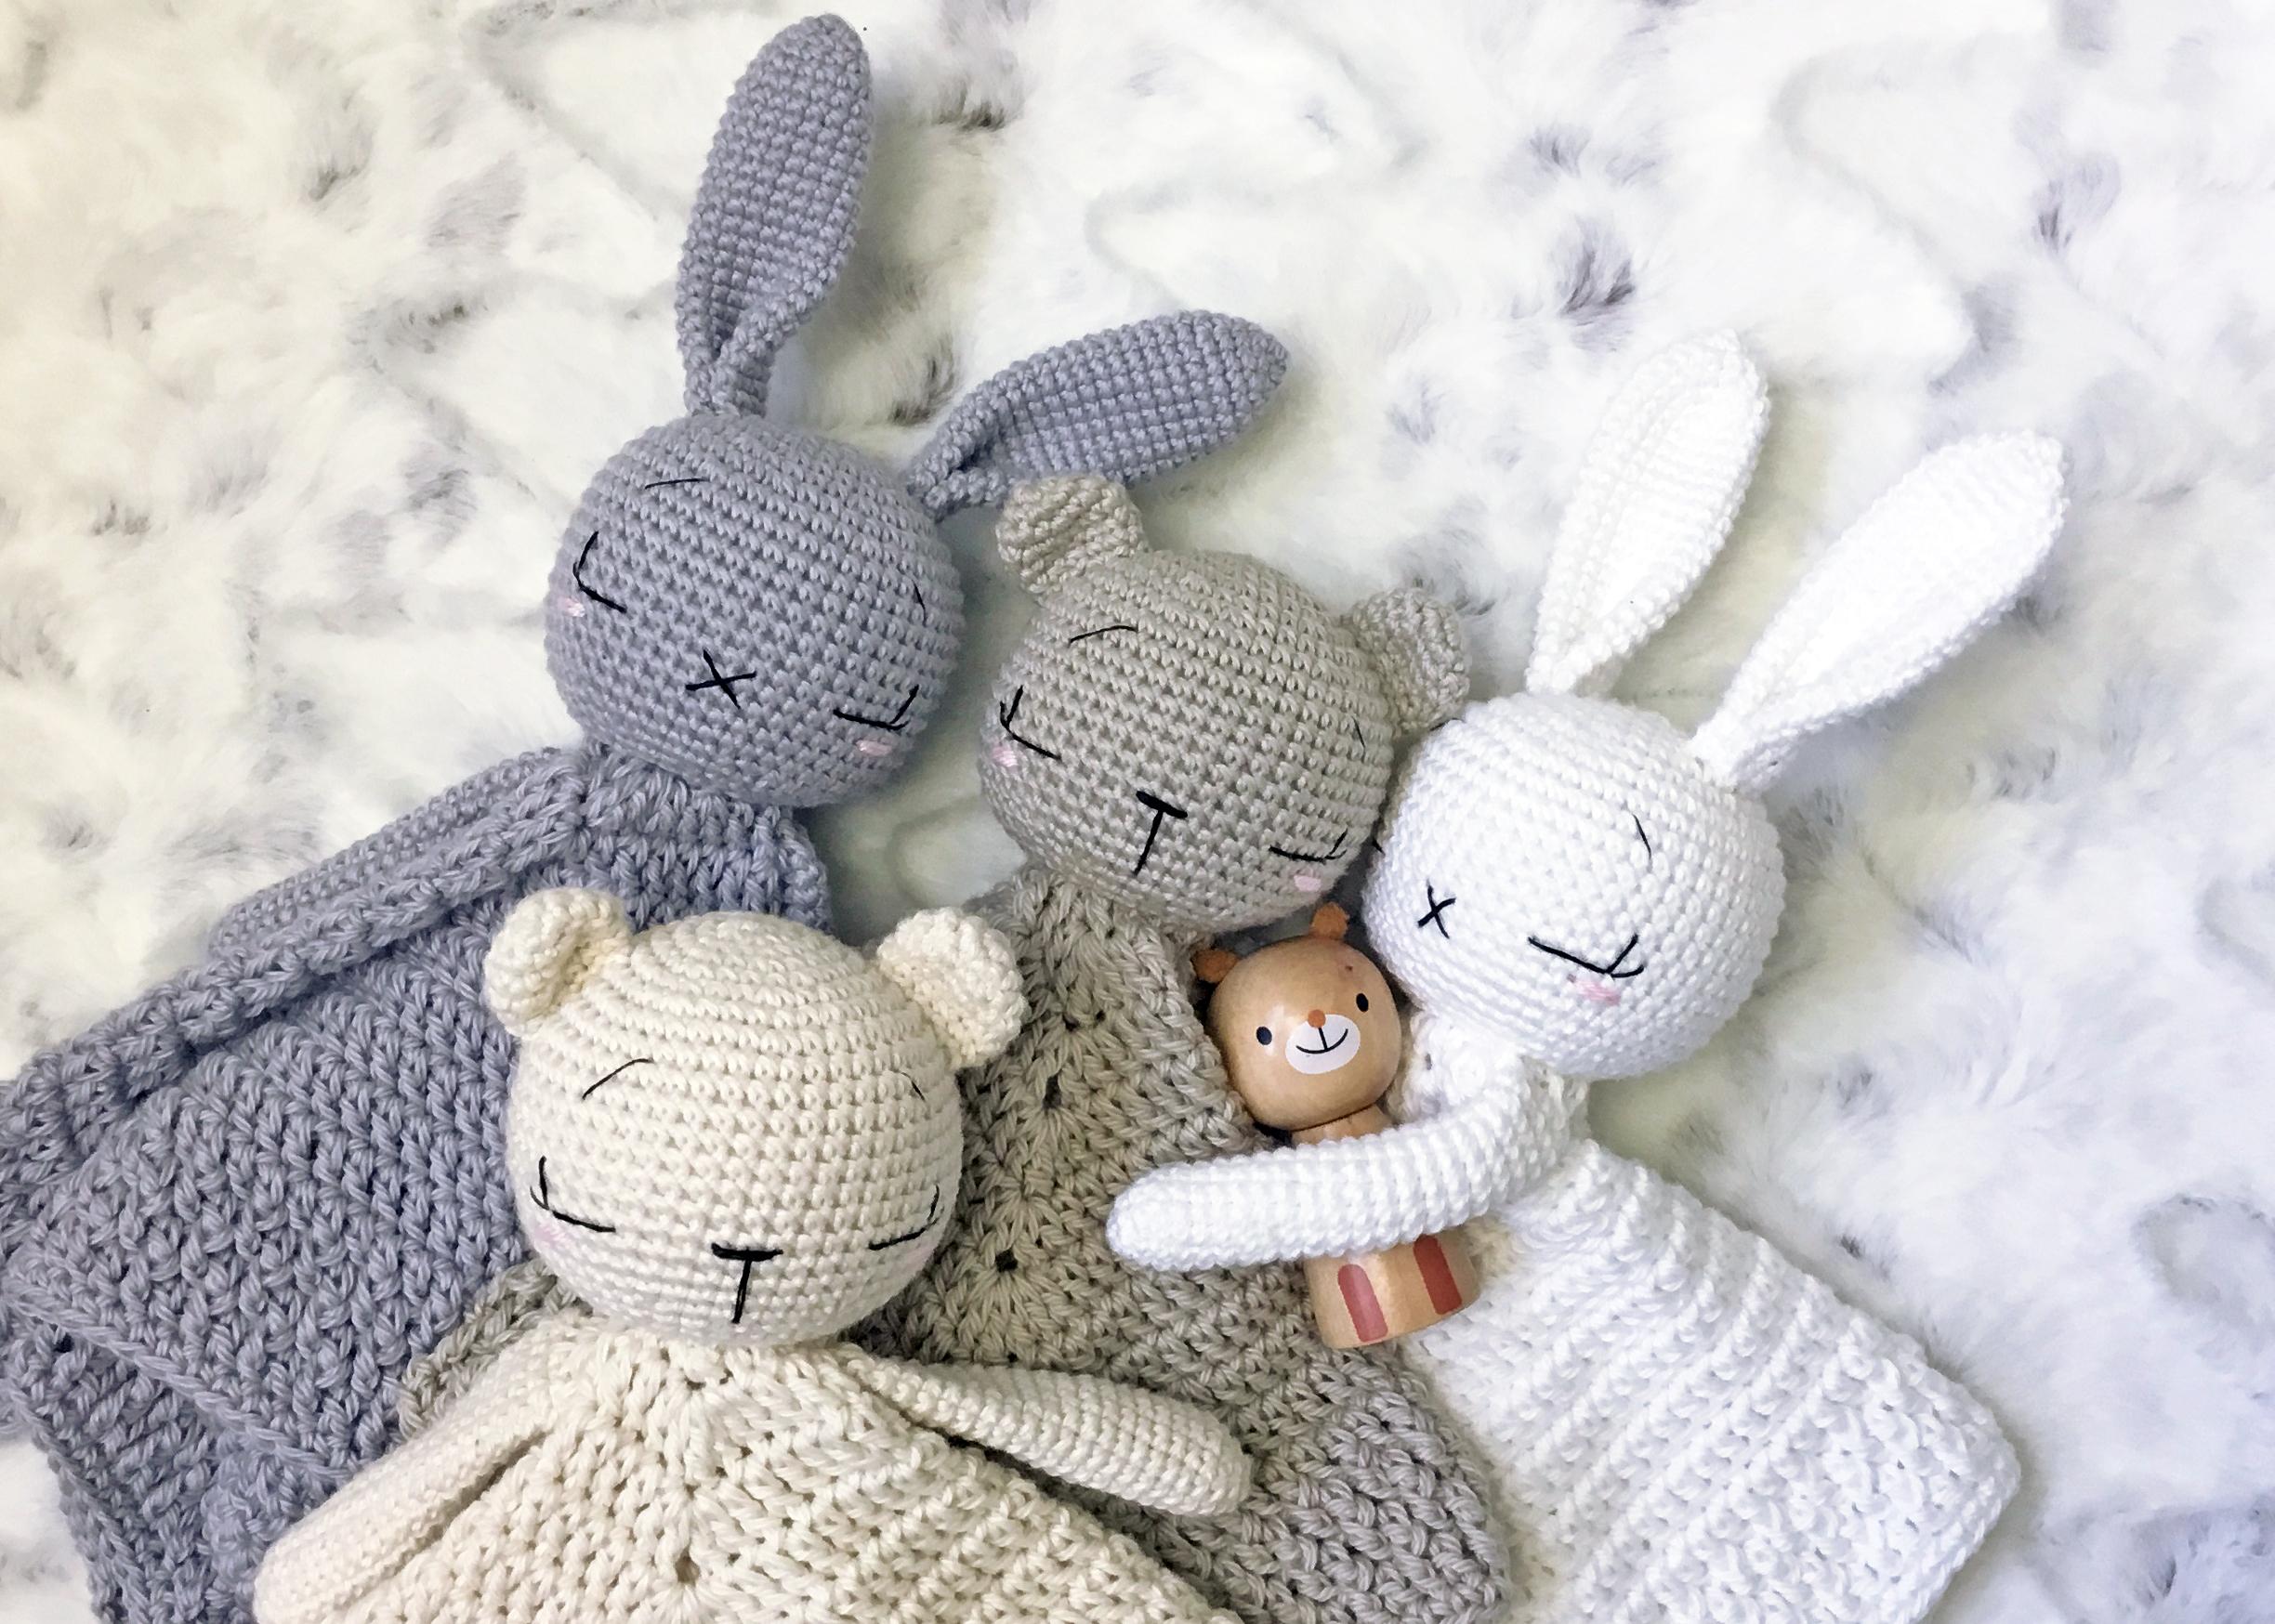
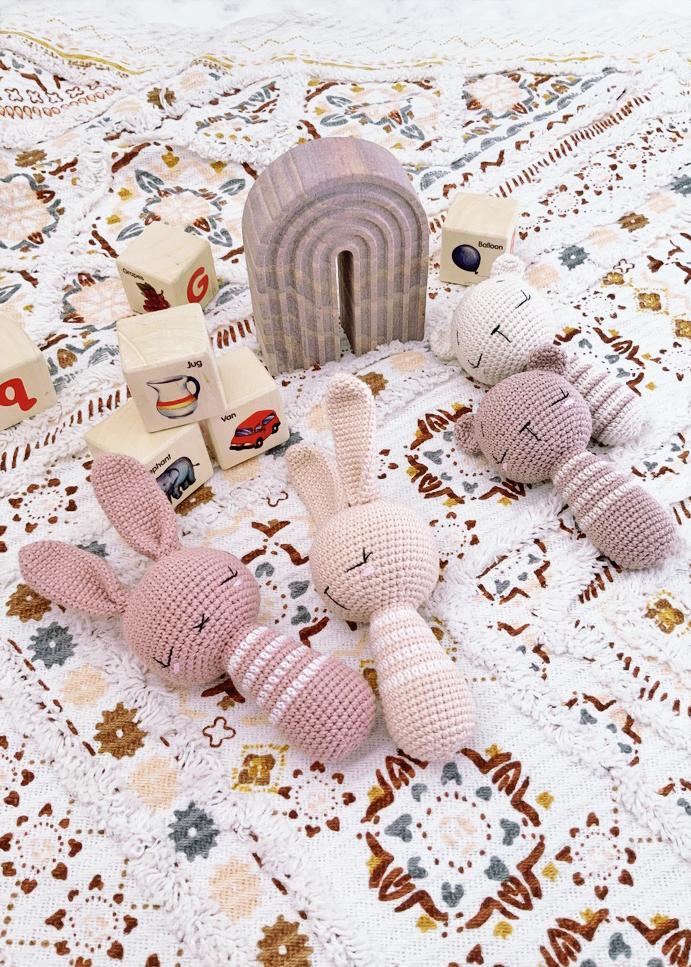
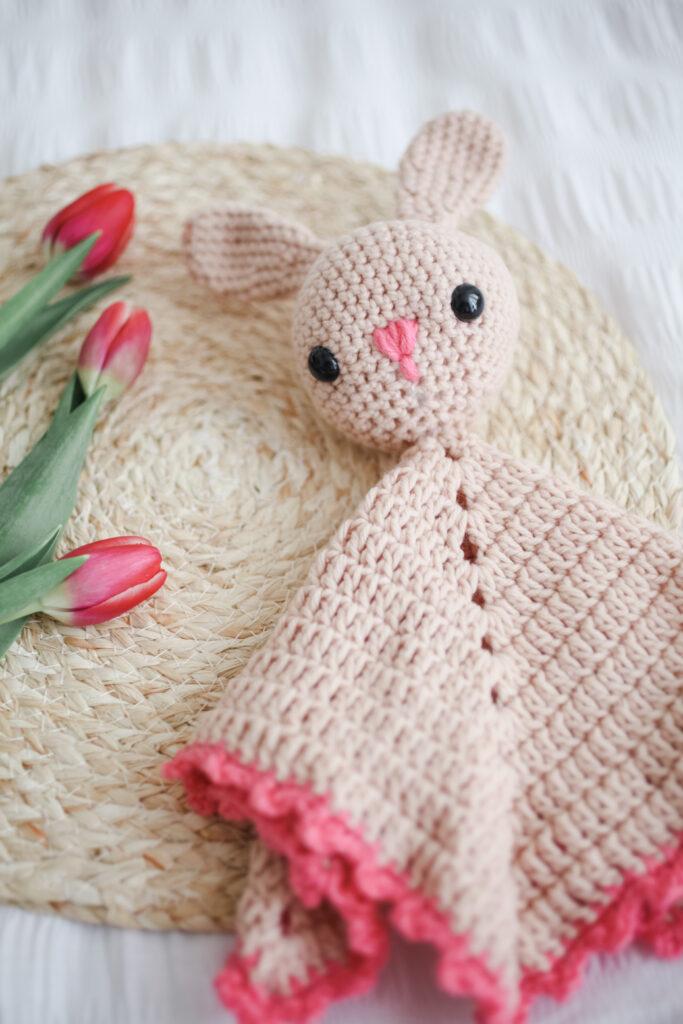
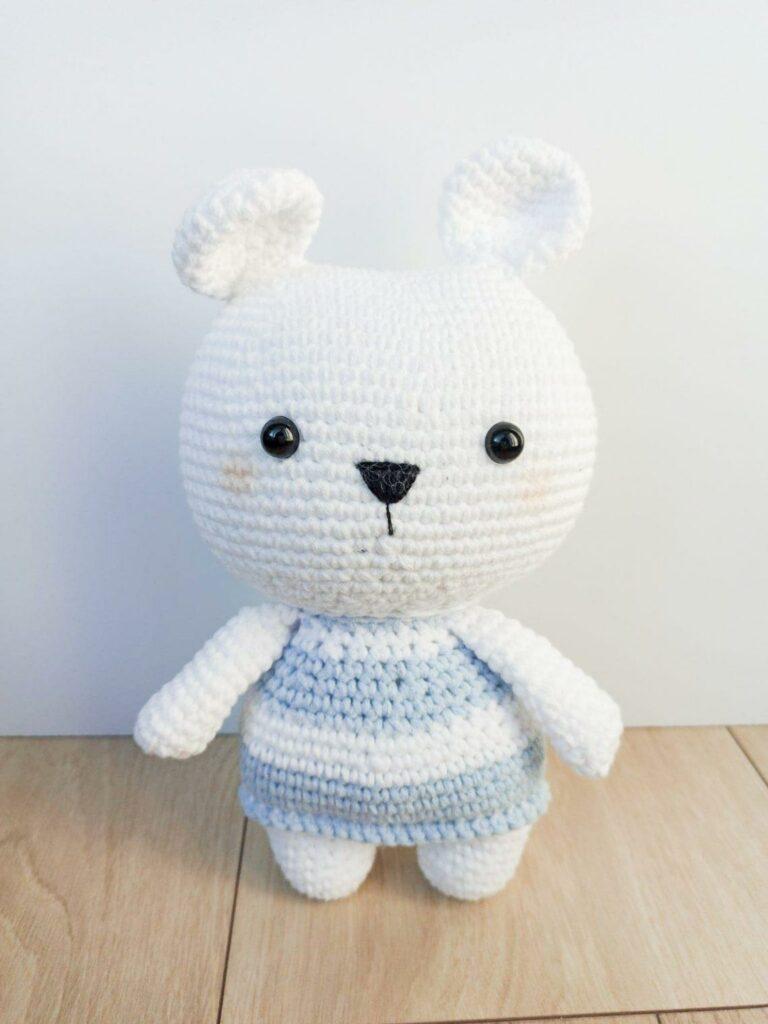
Learn how to crochet an interchangeable lovely blanket with this FREE step-by-step pattern designed by guest designer Alanna O’Dea from @theodoreandrose. Alanna has created these adorable patterns, perfect for beginners or any budding Amigurumi crocheters.
As this is a guest post, Bella Coco Crochet is unable to answer any queries. If you have a question, please contact the designer directly and they will be happy to help you.
Materials & Tools
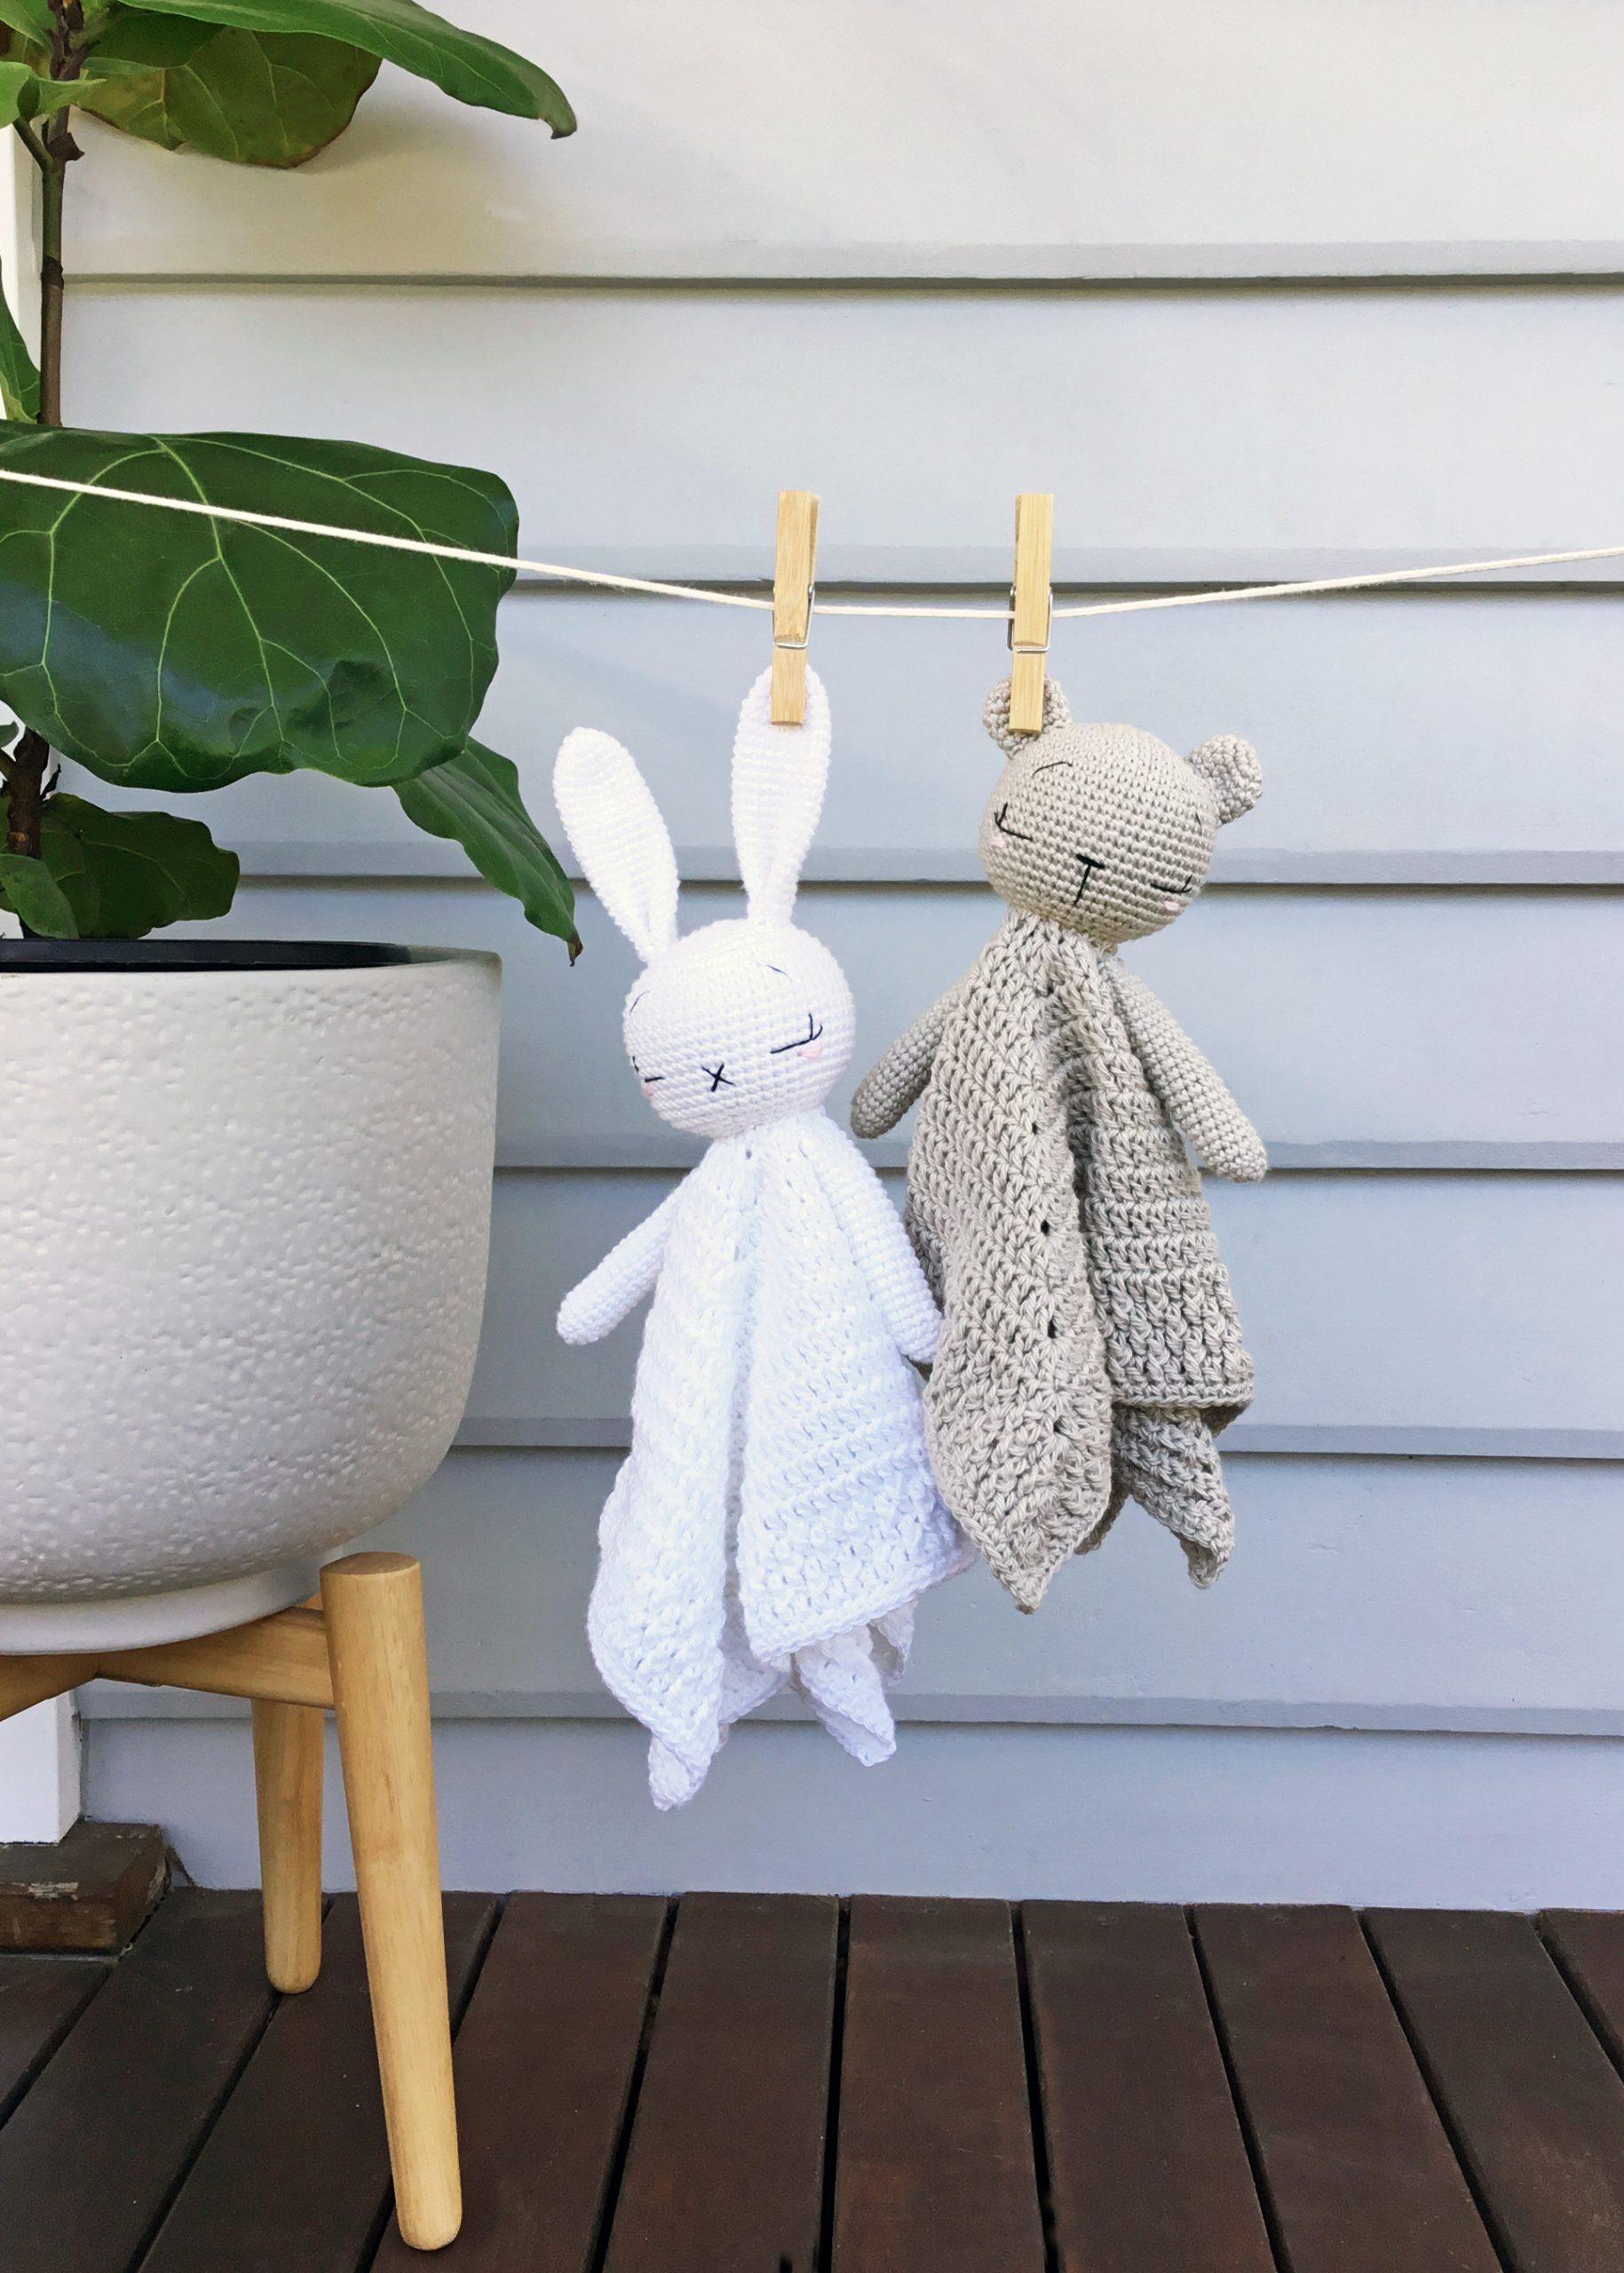
- Yarn: The example bunny and bear loveys were made using Heirloom Cotton 8 ply (120m/50g) in the following colours: Bear lovey yarn used: Oat (6630) and Parchment (6617) approx 100g (per comforter)
- Bunny lovey yarn used: Glacier (6619) and Snow (6607) approx 110g (per comforter)
- Pink yarn for cheeks. Only small amounts of yarn is required for the cheeks so leftover yarn can be used.
- Black embroidery thread for eyes and nose.
- Hook: 2.25mm (US B/1) and 4mm (US G/6)
- Toy stuffing approx 35-40g
- Stitch marker
- Scissors
- Darning Needle

Pattern Notes
- Skill level: beginner
- Written in UK terms – switchable to US terms below.
- When working amigurumi parts (head and ears), work in continuous spirals, without closing off the rounds with a slip stitch.
- Use a stitch marker at the beginning of each round. This helps when counting your stitches to compare it with the pattern.
- To help you when sewing pieces together, first pin them into place and check that you are happy with the positioning.
Gauge and Finished Size
- Blanket gauge: 19 stitches and 9 rows in a treble crochet = 10cm x 10cm
- Amigurumi gauge: 5 rounds = 3.7cm across (Note: crochet the first 5 rounds of the head pattern to use as a gauge swatch).
- Finished size: The finished blanket is approx 33cm x 33cm; the head is approx 22cm in diameter.

Convert Pattern Terms
Here you can quickly switch between UK and US crochet terms. This will make following the pattern easier as all terms will be converted to your preferred version.
Terms & Abbreviations
- Space: sp
- Stitche(s): st/s(s)
- Magic ring: MR
- Beginning: beg
- Chain: ch(s): Yarn over, pull through.
- Slip stitch (sl-st): sl-st: Insert hook, yarn over, pull through both stitch and loop on hook.
- Back loop only: BLO: Insert hook into back loop of the stitch only.
- Double crochet: dc(s): Insert hook into stitch, yarn over, pull up a loop, you will have two loops on the hook. Yarn over, pull through remaining two loops.
- Half Treble Crochet: htr(s): Yarn over, insert hook into stitch, yarn over, pull up a loop, you will have three loops on the hook. Yarn over, pull through all three loops.
- Treble crochet: tr(s): Yarn over, insert hook into stitch, yarn over, pull up a loop, you will have three loops on the hook. Yarn over, pull through two loops, yarn over, pull through remaining two loops.
Advanced Stitches
If you are an absolute beginner you might not have tried these techniques, I’ve linked some of the techniques to assisting video tutorials to help you.
- Double Treble Crochet (US Treble): dtr(s): Yarn over hook twice, insert hook into stitch, yarn over, pull up a loop, you will have four loops on the hook. Yarn over, pull through two loops, you will have three loops on the hook. Yarn over, pull through two loops, yarn over, pull through remaining two loops.
- Front loop only: FLO: Insert hook into front loop of the stitch only.
- Front Post Treble Crochet: fptr: Yarn over, insert hook into front post from right to left (or left to right if you are left-handed), yarn over, pull up a loop, you will have three loops on the hook. Yarn over, pull through two loops, yarn over, pull through remaining two loops.
- Double crochet increase: dc inc: Make two complete double crochets (dc) into the same stitch.
- Double crochet invisible decrease: dc dec: Insert hook into front loop only of next two stitches, yarn over, pull through, you will have two loops on the hook. Yarn over and pull through both loops on the hook.

Unsure of the differences between UK and US terms? Need a refresher on how to do your stitches? In my ‘How to crochet: A handy reference guide’ EBook I help you with all of these terms and you can always have them to hand! You will also get exclusive access to free video instructions. You can find my EBook HERE.
Pin for Later
“The inspiration behind this pattern was a combination of the stunning neutral palette of the Heirloom Cotton 8 I had in my yarn stash, as well as the fact that my boys both adored their little loveys as babies. They went with us everywhere – the car, the pram, the shops…Grandma and Grandad’s house – EVERYWHERE!! So, I wanted to create something that was just as adorable, safe for babies and toddlers to sleep with, durable and easy to care for, and specifically with a beginner crocheter in mind.”
Alanna
Free Crochet Pattern: interchangeable lovely blanket
You have chosen to view the pattern in UK terms.
The Head
- Using a 2.25mm (US B/1) hook and chosen yarn, make a magic ring.
- Rnd 1: ch1, dc 6 into ring. Pull the ring tightly closed. (6 sts)
- Rnd 2: dc inc in all 6 sts (12 sts)
- Rnd 3: [dc in next st, dc inc in next st] x6 (18 sts)
- Rnd 4: [dc in next 2 sts, dc inc in next st] x6 (24 sts)
- Rnd 5: [dc in next 3 sts, dc inc in next st] x6 (30 sts)
- Rnd 6: dc in next 2 sts, dc inc in next st, [dc in next 4 sts, dc inc in next st] x5, dc in next 2 sts (36 sts)
Weave in starting yarn tail.
- Rnd 7: [dc in next 5 sts, dc inc in next st] x6 (42 sts)
- Rnd 8: dc in next 3 sts, dc inc in next st, [dc in next 6 sts, dc inc in next st] x5, dc in next 3 sts (48 sts)
- Rnd 9-19: dc in all 48 sts (11 Rnds)
- Rnd 20: dc in next 3 sts, dc dec, [dc in next 6 sts, dc dec] x5, dc in next 3 sts (42 sts)
- Rnd 21: [dc in next 5 sts, dc dec] x6 (36 sts)
- Rnd 22: dc in next 2 sts, dc dec, [dc in next 4 sts, dc dec] x5, dc in next 2 sts (30 sts)
- Rnd 23: [dc in next 3 sts, dc dec] x6 (24 sts)
- Rnd 24: [dc BLO in next 2 sts, dc dec BLO] x6 (18 sts)
Note: This BLO round will act as a guide when attaching the head to the blanket.
Stuffing
Stuff the head firmly. Insert small amounts at a time until you get the right shape. Stuffing your toy can be tricky, but it is a very important step in getting the right shape and look for your toy.
Overstuffing might stretch the fabric too far and show gaps and understuffing will give your piece a deflated look. Take your time with this step.
- Rnd 25: [dc in next st, dc dec] x6 (12 sts)
- Rnd 26: dc dec x6 (6 sts)
Leaving a long yarn tail (about 30cm) for sewing the head to the blanket later, break the yarn and pull through. Weave the yarn tail through the FLO of round 26 and pull firmly to close off the head.
You are viewing this pattern in UK terms.
Bunny Ears (make 2)
- Using a 2.25mm (US B/1) hook and chosen yarn, make a magic ring.
- Rnd 1: ch1, dc 6 into ring. Pull the ring tightly closed. (6 sts)
- Rnd 2: [dc in next st, dc inc in next st] x3 (9 sts)
- Rnd 3: [dc in next 2 sts, dc inc in next st] x3 (12 sts)
- Rnd 4: [dc in next 3 sts, dc inc in next st] x3 (15 sts)
- Rnd 5: [dc in next 4 sts, dc inc in next st] x3 (18 sts)
- Weave in starting yarn tail.
- Rnd 6-23: dc in all 18 sts (18 sts) (18 Rnds)
Leaving a long tail of yarn for sewing the ears to the head later, break the yarn and pull through.
Bear Ears (make 2)
You are viewing this pattern in UK terms.
- Using a 2.25mm (US B/1) hook and chosen yarn, make a magic ring.
- Rnd 1: ch1, dc 6 into ring. Pull the ring tightly closed. (6 sts)
- Rnd 2: dc inc in all 6 sts (12 sts)
- Rnd 3: [dc in next st, dc inc in next st] x6 (18 sts)
- Rnd 4: dc in all 18 sts (18 sts)
- Weave in starting yarn tail.
- Rnd 5: [dc in next st, dc dec] x6 (12 sts)
- Rnd 6: dc in all 12 sts (12 sts)
Leaving a long tail of yarn for sewing the ears to the head later, break the yarn and pull through.
Arms (make 2)
You are viewing this pattern in UK terms.
- Using a 2.25mm (US B/1) hook and chosen yarn, make a magic ring.
- Rnd 1: ch1, dc 6 into ring. Pull the ring tightly closed. (6 sts)
- Rnd 2: [dc in next st, dc inc in next st] x3 (9 sts)
- Rnd 3: [dc in next 2 sts, dc inc in next st] x3 (12 sts)
- Weave in starting yarn tail.
- Rnd 4-22: dc in all 12 sts (12 sts) (19 Rnds)
Don’t forget to leave a long tail of yarn, break the yarn and pull through. Fill the first third of the arm with a little lightly packed toy stuffing. Sew the top of the arm closed with the yarn tail. Leave yarn tail attached for sewing arms to blanket later.

lovey Blanket
Using a 4mm (US G/6) hook and chosen yarn, make a magic ring.
14-15
You are viewing this pattern in UK terms.
- Rnd 14: sl-st into ch 2 sp, ch4, work 2 tr into same sp. [ * Work a fptr around first tr post, into next st work 1 tr * Repeat *…* all the way along until you reach the next ch 2 sp (you should finish with a tr). Into ch 2 sp work (2 tr, 1 dtr, 2 tr) ] Repeat […] 3 more times. Next work *…* into all st across. To finish work 2 tr into first ch 2 sp. Join round with a sl-st into top of beg ch 4. (228 sts)
- Rnd 15: ch2 (counts as first htr), dc into same st, * dc into each st across, into corner dtr work (2 dc, htr, 2 dc) * Repeat *…* 3 times. Work 1 dc into each st across, into corner tr work 2 dc. Join round with a sl-st into top of beg ch 2. (244 sts)
- Break the yarn and pull through. Weave in all yarn tails.
Embroidery Work
Pattern Note: I have chosen to use an X stitch for the amigurumi parts (head and ears), which gives a tighter, neater finish. The standard V stitch can be used, however if used it will result in a slightly larger head size.
Embroider the eyes, nose and eyebrows on to the head with black thread. I placed the eyes and the top of the nose between rounds 16 and 17 with 9 stitches between the eyes. Use pink yarn to add little pink cheeks under the eyes.

TIP: Bring the yarn up from the base of the head and return thread to the base when finished. Here you now can easily secure the yarn tails and the blanket will hide it all later for a professionally neat finish.
Construction
Bunny
If making the bunny, pinch the base of the ears together and secure with a few stitches. Sew the ears to the top of the head between rounds 5 and 6 on either side.
Bear
For the bear, sew the ears to the top of the head between rounds 6-10 on either side.
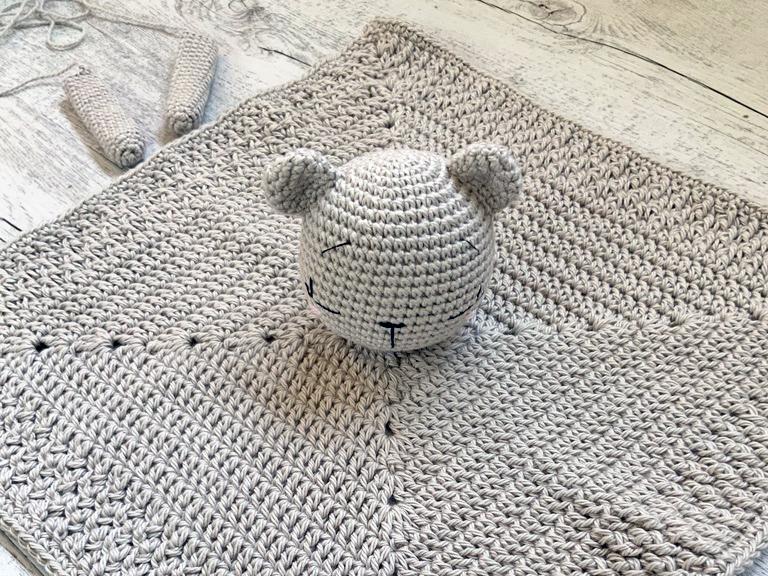
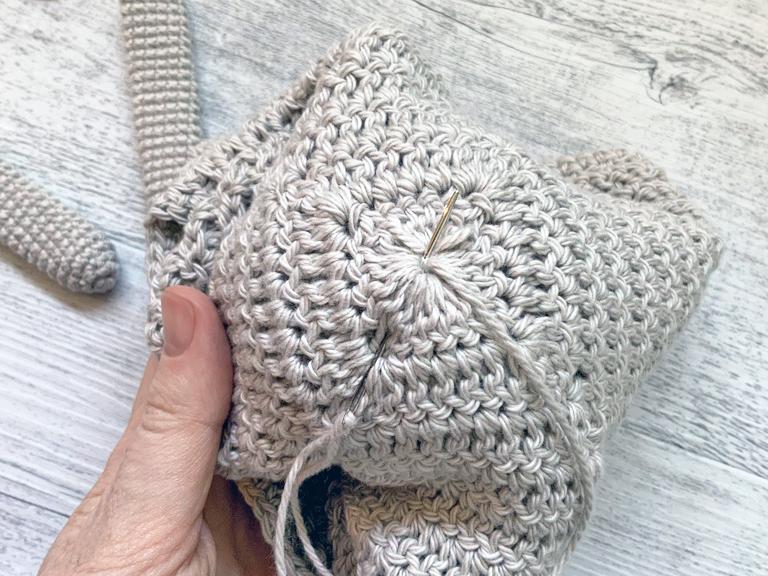
Blanket: step 1
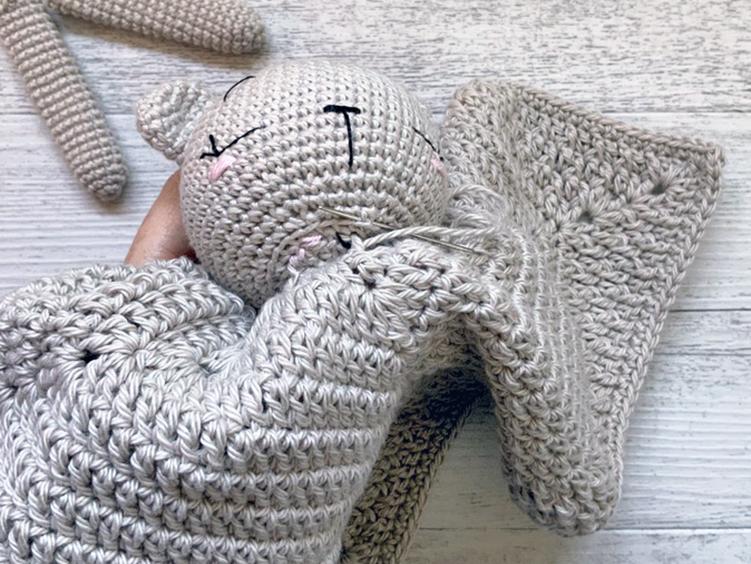
Lay the blanket flat and position the head on the blanket with the face centered on a diagonal with the blanket seam (starting point of each round) at the back. (Step 1). Carefully pin into position, turn your work over and using the long yarn tail from the head, sew an ‘X’, being sure to pass through both the blanket and the head together. (Step 2)
Step 2: blanket
Next, turn your work again to begin sewing the blanket to the head from the right side. Use BLO round (Rnd 24) as a guide, picking up a stitch just above this round as shown in Step 3. When you have made your way all around the head, secure and weave in the yarn tail.
Position the arms and sew securely to the blanket.
Congratulations!!! Your sleepy baby lovey is finished. I hope you enjoyed making them as much as I enjoyed creating them for you
Copyright
This document and the pattern contained within is the property of Alanna O’Dea (Theodore and Rose). Permission has been given for the publishing of this pattern on the Bella Coco website. The resale, copying or sharing (including online) of this document and the pattern within is not allowed. You may sell your completed sleepy baby bear and bunny comforters, but credit should be made to the designer.
Please enjoy this pattern & respect copyright
More Crochet Patterns
Whether you love making loveys, amigurumi or all things baby there are so many available on the blog for you to try. CLICK HERE to view the patterns or check out these patterns below that I think you’ll enjoy:
I always love to see your makes so if you try any of my patterns or follow my stitch tutorials please tag me @bellacococrochet or use the #bellacococrochet
sarah-jayne
Hi, I’m really struggling with the arms on this pattern! The rounds 4 to 22 don’t grow as a cylinder but rather as an expanding cone shape. Have you any tips? Should there be an increase chain stitch?
Hi Robin as this is a guest post blog you will be better contacting Alanna directly 🙂
Hi! I’m working on this project now. It should be one continuous spiral, with no slip stitches to join. Make sure that there are 12 stitches per round with no increases after round 3. Mine is looking great so far!
As this was a guest post you will need to contact the designer directly and she will be able to help you 🙂
Do you have a clip to show how to make the round 12? I got stuck in this step. Much appreciated!
Hi Mary as this was a guest post you will need to contact Alanna directly with any queries 🙂
How do I contact Alanna? I was almost finished with the head and couldn’t figure out why it was so long? The pattern says DC ( double crochet) but the description of the DC is actually a single crochet. I’m confused. I tried the single crochet and it doesn’t look right either. Is it supposed to be a half double crochet stitch for the head? Please help.
Hi Kim
I have contacted Alanna on your behalf and here is her reply :-
The pattern is written using UK terms i.e. a UK double crochet is equivalent to a US single crochet.
Hope this helps 🙂
This pattern is written in uk terms so a dc is actually an sc and a treble is actually a dc. Hope this helps.
I started with the head but it’s coming out cone shaped? I’ve made many heads before but for some reason, the top portion is more of a cone than a nice round ball. Not sure what I’m doing wrong?
Hi Linda as this is a guest post it’s better that you contact Alanna directly if you have any queries 🙂
It is not Double crochet but Single crochet you have to do. I was having the same problem and now it’s prettier.
The pattern uses UK terms so a double crochet as used here is equivalent to a single crochet in US terms. You can find a glossary of all the stitches used in the pattern and how to make them on my blog here: https://blog.tcctest.co.uk/sleepy-baby-bear-and-bunny-lovey-by-alanna-odea/
I am having the same problem! And I am doing single crochet but it’s still cone shaped. Did you ever figure out what went wrong?
Hi Jordan is it OK if I pass your information directly onto Alanna so that she can answer you direct?
You can but I actually figured it out! No more cone shape (:
Hi Linda,
I have the same issue like you had and unfortunately I didn’t saw your message before 🙁
I didn’t know that for UK the pattern is wroten in a different way.
Hello! I have found your channel on youtube while pregnant and isolated from my family due to COVID (i’m in the US). You do such a great job, learning to crochet has kept me sane. I am beginner and have used your videos to make hat, booties, and bassinet blanket. I can follow along nicely on a video. However, reading I get overwhelmed with the directions. Also things like X stitch in the notes ect. Any chance could request a video of this sweet lovey? Thanks so much for considering!!
Alia
Hi Alia as this was a guest post blog their isn’t a tutorial with it 🙂
Hello!
I hope someone can help me with round 12. I don’t know how it works. I just try it 2 weeks
I hope i will get an answer soon.
Does a video exist? Or something were I can see how it works?
Lra
Hi Lea as this is a guest post blog I am unable to answer this question for you. You could try and contact Alanna O’Dea directly for an answer 🙂
Hi Lea, search YouTube for the front post treble (fptr) and you will soon understand.
Hello,
I love that lovey and would really like to make it but I can’t find nowhere in Quebec, Canada where to buy that yarn… so I was wondering if there’s any other substitute yarn you can refer me to buy like at Michaels ?
Thanks in advance a lot!
Hi I live in the UK so I don’t know what yarns are available in Canada. This yarn can be purchased from various places, have you tried to google it to see if it can be shipped out to you? I’m sorry I can’t be more help 🙂
Hi, thanks for your help!
And yes I’ve tried from google and I can’t find it… I’m trying to find a substitute but I’m scared to not end up with the same finish.
We’ll see but thanks again!
I know it’s been a year but I’m from Spain and I had to substitute the yarn. I used DMC 100% Baby Cotton but you just have to find some DK weight baby cotton or 100% cotton, I recommend a 3-4 mm needle size yarn. I used the DMC one and a 2.5 mm and a 4 mm hook and it turned out exactly the same as in the picture.
Hello,
I did some looking and ebay has many available options of the Heirloom cotton. Hope this helps
Round 15 of blanket, after ch 2 it reads dc same space (its beginning corner), but all other corners are 2dc, htr, 2dc and once back to beg, 2dc then join. My question is will that corner only have dc, htr, 2dc or should it be 2dc after ch 2 (in same st) to make all corner stitches the same?
Hi Erinn as this was a guest post you would probably be better contacting Alanna directly 🙂
I love these so much! Is there a print-friendly link that I am missing?
Hi Jessica this was a guest post so their is a written pattern available only on my blog, if you have any queries regarding the post you would be better contacting the designer direct so that they can answer your questions 🙂
Hi Jessica, The written pattern is available on my blog post however if you require anything else you will need to contact the designer direct 🙂
What does break the yarn and pull through mean
It means cut off your yarn then pull it through to tie it off 🙂
I love your ideas. That’s all is so impressive and unique. you are doing nice and loveable crocheting.
Thank you 🙂
thank you!!
How do I contact Alanna? I’m struggling to figure out Rnd 12.
Hi Jessica is it OK if I pass your information directly onto Alanna so that she can answer you direct?
I’m not understanding Road 12 either did you get a response that helps you? I don’t understand after I slip stitch into the chain to space and chain for working the fptr around the first triple post but I’m not sure what post that is.
I am having the same problem, all is fine until I get to Rnd 12 then it gets all scrunch up so not sure it’s right. I did dc, fpdc, and then dc again. But wondering if it’s dc, fpdc , skip st dc instead. Very confused with that round. I would like to speak with her too if possible.
Hi Tasha if you have any queries regarding this pattern you will need to contact the designer directly as this was a Guest Post so I am unable to help you.
hi! i was struggling too. i recommend looking up “alpine stitch” on youtube for a better explanation.
Has anyone tried washing this yet/have any tips for washing a crochet project like this? I want to make this but I really want to make sure I’m able to clean it once it’s being loved on 🙂
If you look at the yarn label it should tell you all the information you need with regards to washing the yarn 🙂
Hi,
I don’t see any instruction for how to make the arms. Am I missing something?
Hi Amanda as this was a guest post you need to speak to Alanna directly and she will be able to help you 🙂
Hi Amanda, the instructions for arms are just under the instructions for the bear ears. It seems they just forgot to bold the words 🙂
Hi I’m in the process of making one of the bunny lovey blankets and I’ve struck a problem while making the head. I’ve messaged the designer through Instagram
Direct but havent had a reply (probably due to the holidays). I’m hoping someone can help or at least least me know how to contact the designer directly. Here’s what I sent her…
This is the first time I’ve tried a pattern like this and the stitch count doesn’t match the pattern after I’ve done a dc dec row. I’m wondering if it’s to do with how I’m reading the instructions in the brackets. Do I repeat only what’s in the brackets or all instructions up to and including the brackets?
Hello, how can I contact Anna? I was crocheting the blanket and I got to the 12th round but I do not really understand how to do that and I cannot keep crocheting.
Thank you for your response,
Edina 🙂
Alanna can be contacted on instagram @theodoreandrose 🙂
Unfortunately, after reading the comments, I’m going to stick with original Bella Coco patterns and not this guest crocheter pattern Love your work SJ!
Thank you 🙂
Hey, I am making this for a family member who is expecting a baby soon, but I am confused on rounds 5-11 on the blanket. Do you mean that on each side I add 4 stitches, or add one stitch per side on each round. It would be really great if you replied. Thank you 🙂
Hi Brooklynn as this is a guest post you will need to contact the designer direct with any queries 🙂
Hi I also struggling with the blanket. Mine seems to be going frilly and not lay flat
As this is a guest post you will need to contact the designer directly with any queries 🙂
Mine is also has a wave in it. I have pulled it out 3 times and am still struggling on the 4th. Did you reach out to the original poster and receive any tips? Please share if you do!
Hi Kara If you contact Alanna directly i’m sure she will be able to help you 🙂
Hi Brooklynn,
I’m at that part now too … I found that with the multiple corner stitches, it automatically increases the side stitch count, without needing to do any other increase stitches
As this is a Guest Designer I am unable to answer any questions, you should contact the designer directly and she will be able to help you 🙂
is there a free printable pattern for these??
As this is a guest post I don’t have a printable pattern, you could try and get in touch with Alanna the designer 🙂
Can I get this translated into US terms ?
As this is a guest post you will need to contact the designer directly 🙂
There’s an option above the stitch abbreviations where you can change whether it’s UK or US terms.
Hi, do we have to use the blanket pattern included or can we use a simpler pattern? I’m a beginner and do not know how to do that bit yet
Hi Alisha as this is a guest post you will need to contact the designer direct with any questions 🙂
Pingback: Cuddly Bear And Bunny Lovey Blanket Free Crochet Patterns
FABULOUS! Just finished this little project and it looks so so cute. It was very easy to make thanks to the really detailed descriptions. It must have been 20 years since I have done any crochet work but with all the detailed descriptions it all came back to me. Thank you so so much!
Hi ,
Thanks for the pattern. My stitches from 12-15 have a wave to it. What did I do wrong? The front post crochet isn’t falling straight but folding at the edges. Thank you.
You’re welcome When making front post stitches it’s important to raise our hook back up to the full height of our work after making the first yarn over. If we don’t do this it can shorten our stitch and cause our work to curl and fold. I would try again and make sure to raise the tip of your hook so you have plenty of height to your stitches.
Thank you so much for this adorable pattern! I just made the bunny and absolutely LOVE it!! Also love how you embroidered the face x
Made a bear and a bunny for my little girl to have while she is in the NICU for an extended time. Wish I could post a pic, they’re as big as she is! All the nurses love her little forest friends. Thank you for this pattern ❤️
Hi Angelina I am so sorry to hear that your Daughter is in Hospital and hope that she gets all the help she can to make her better and get home. I’m sure that they are of such a comfort to her. Sending you hugs 🙂
I’d like to make this but am a bit concerned about the following –
Finished size: The finished blanket is approx 33cm x 33cm; the head is approx 22cm in diameter.
22cm is enormous! In the photos it appears to sit in the palm of her hand. Do I assume this is an error ?
Thank you
Hi Kirstin as this is a guest post you will have to contact the designer directly 🙂
Hi!
I am struggling with the end/beginning of the new rounds of the blanket. It seems, there are bigger holes than in the rest of the pattern. Did anyone of you have the same issue and figured out how to fix it? I tried to contact the designer through instagram but didn’t get a response.
Thank you!
Hi Kate as this was a guest post you will have to contact the designer directly and she will be able to help you 🙂
I’ve read your article. Honestly, I’ve never read this type of informative and efficient article before. This article will help lots of beginners like me to build skills in embroidery. Love to read your incoming blogs too. Really appreciate your work and dedication.
Hi! I absolutely adore this pattern and have made a few of them, I was just wondering if you had any tips on how to make one as a deer? I’ve made a beautiful blanket with a baby deer on it and want to make a little deer lovey to go with it. Thanks!
Hi Shontae as this was a Guest Post you will have to contact the designer directly and she maybe able to help you 🙂
Hi! I’ve finished the head, arms, and ears, but I’ve been really struggling with the blanket part. In the 2nd round it says “ch 4, work 2 tr in corner dtr, [tr in next 4 sts, (2 tr, dtr, 2 tr) in corner dtr} x3”. I am mostly confused when it says “in corner dtr”, how do I do that?
Hi Naomi as this was a guest post you will have to contact the designer directly and she will be able to help you 🙂
Please please please I’m begging someone make a video for this cause I’m not figuring it out but i really want to make it for my new niece
Hi Eve, as this was a Guest post you will have to contact the designer directly and she will be able to help you 🙂
Crocheting an Interchangeable Lovey Blanket is a wonderful project that allows for creativity and personalization. To take it a step further, consider incorporating Emb digitizing to add custom embroidered details, such as a child’s name or playful designs. With Emb digitizing services, you can seamlessly blend crochet with embroidery, making each blanket unique and special. It’s the perfect way to create a cherished keepsake with a personal touch!
I have reviewed your article and must express that I have not encountered such an informative and effective piece before. This article will undoubtedly assist many beginners, including myself, in developing their embroidery skills. I look forward to reading your future blogs as well. I truly appreciate your effort and commitment.
thanks