Today I am delighted to welcome Kelly Groves from Crafty Cruella as this week’s featured designer. Kelly has put together this Battenberg Cushion for you inspired by her love of discovering new crochet stitches. This pattern uses 6 different stitches so it’s perfect for those of you wishing to expand your crochet knowledge.
“As this is a guest post, Bella Coco Crochet is unable to answer any queries. If you have a question, please contact the designer directly and they will be happy to help you.”
Materials and Tools Required
Yarn – Deramores Studio DK, 1 ball of each.
Yarn A – Blue Velvet,
Yarn B – Dusty Lilac,
Yarn C – Ocean,
Yarn D –Butterscotch,
Yarn E – Mist,
Yarn F – Smoke,
Yarn G – Pearl
Hook – 4mm
4 x 12mm buttons
40cm x 40cm cushion pad
Gauge
16 sts x 13 rows = 4″ x 4″ using the htr stitch
Measurements
Approximately 42 x 42cm
Pattern Notes
The nature of the different stitches will make some squares look smaller than others, don’t worry, once seamed together they will look more uniform.
You don’t need to make button holes on the back panel of the cushion, as your using 12mm buttons they can easily be pushed through the gaps in the stitches.
When using a fptr for the alpine stitch, on the 2nd yarn over, pull the yarn up nice and tall. In this pattern, you turn your work before working into the 3rd loop of a htr, so the bar (3rd loop) on the back of the st, can be found at the front of the work, facing you.
Skill Level
Intermediate
Convert Pattern Terms
Here you can quickly switch between UK and US crochet terms. This will make following the pattern easier as all terms will be converted to your preferred version.
Abbreviations
Chain: ch(s): Yarn over, pull through.
Stitch(s): st(s)
Slip Stitch (ss): Insert hook into space, yarn over and pull through stitch and loop on hook
Treble crochet: tr(s): Yarn over, insert hook into stitch, yarn over, pull up a loop, you will have three loops on the hook. Yarn over, pull through two loops, yarn over, pull through remaining two loops.
Double Crochet 3 together (dc3tog): Insert hook, yarn over, pull through stitch, insert hook into the next stitch, yarn over, pull through stitch, insert hook into the next stitch, yarn over, pull through stitch, (4 loops on your hook) yarn over, pull through all loops on hook.
Half Treble Crochet: htr(s): Yarn over, insert hook into stitch, yarn over, pull up a loop, you will have three loops on the hook. Yarn over, pull through all three loops.
Back loop only (blo): – Work into only the back loop of a stitch.
Front Post Treble Crochet (fptr): – yarn over, insert hook around the post of the next stitch (insert from front, around the back & back to the front) yarn over pull through stitch, yarn over pull through two loops, yarn over pull through two loops.
3rd loop – the 3rd loop of a htr is the horizontal bar on the back of a htr, just under the regular ‘v’ on the top of the stitch. Work a htr into this loop. (Just remember, when you turn your work this bar will now be on the front, facing you)
Unsure of the differences between UK and US terms? Need a refresher on how to do your stitches? In my ‘How to crochet: A handy reference guide’ EBook I help you with all of these terms and you can always have them to hand! You will also get exclusive access to free video instructions. You can find my EBook HERE.

Main Section
Special Stitches:
Multi Rib Stitch – Htr in 3rd loop, next row htr in blo, next row htr in 3rd loop……
Mini Bean Stitch – Insert hook, yarn over, pull through stitch, yarn over, insert hook into SAME stitch, yarn over, pull through stitch, yarn over pull through all 4 loops on hook, ch1 (this ch1 counts as the top of the stitch)
Alpine Stitch – Start with a row of tr, a row of dc, then on the next row alternate between, fptr & dc, a row of dc, and a row of tr & fptr, lastly a row of dc.
Trinity Stitch – dc3tog, ch1, dc3tog, ch1….starting each dc3tog in the 3rd leg of the previous dc3tog stitch.
Candy Candy Stitch – join yarn, ch4 in one colour, in a different colour join yarn, ch4 in the next stitch, *go back to the previous colour and bring it over to the next stitch, dc, ch4, repeat from*.
Pattern
You are viewing this pattern in UK terms.
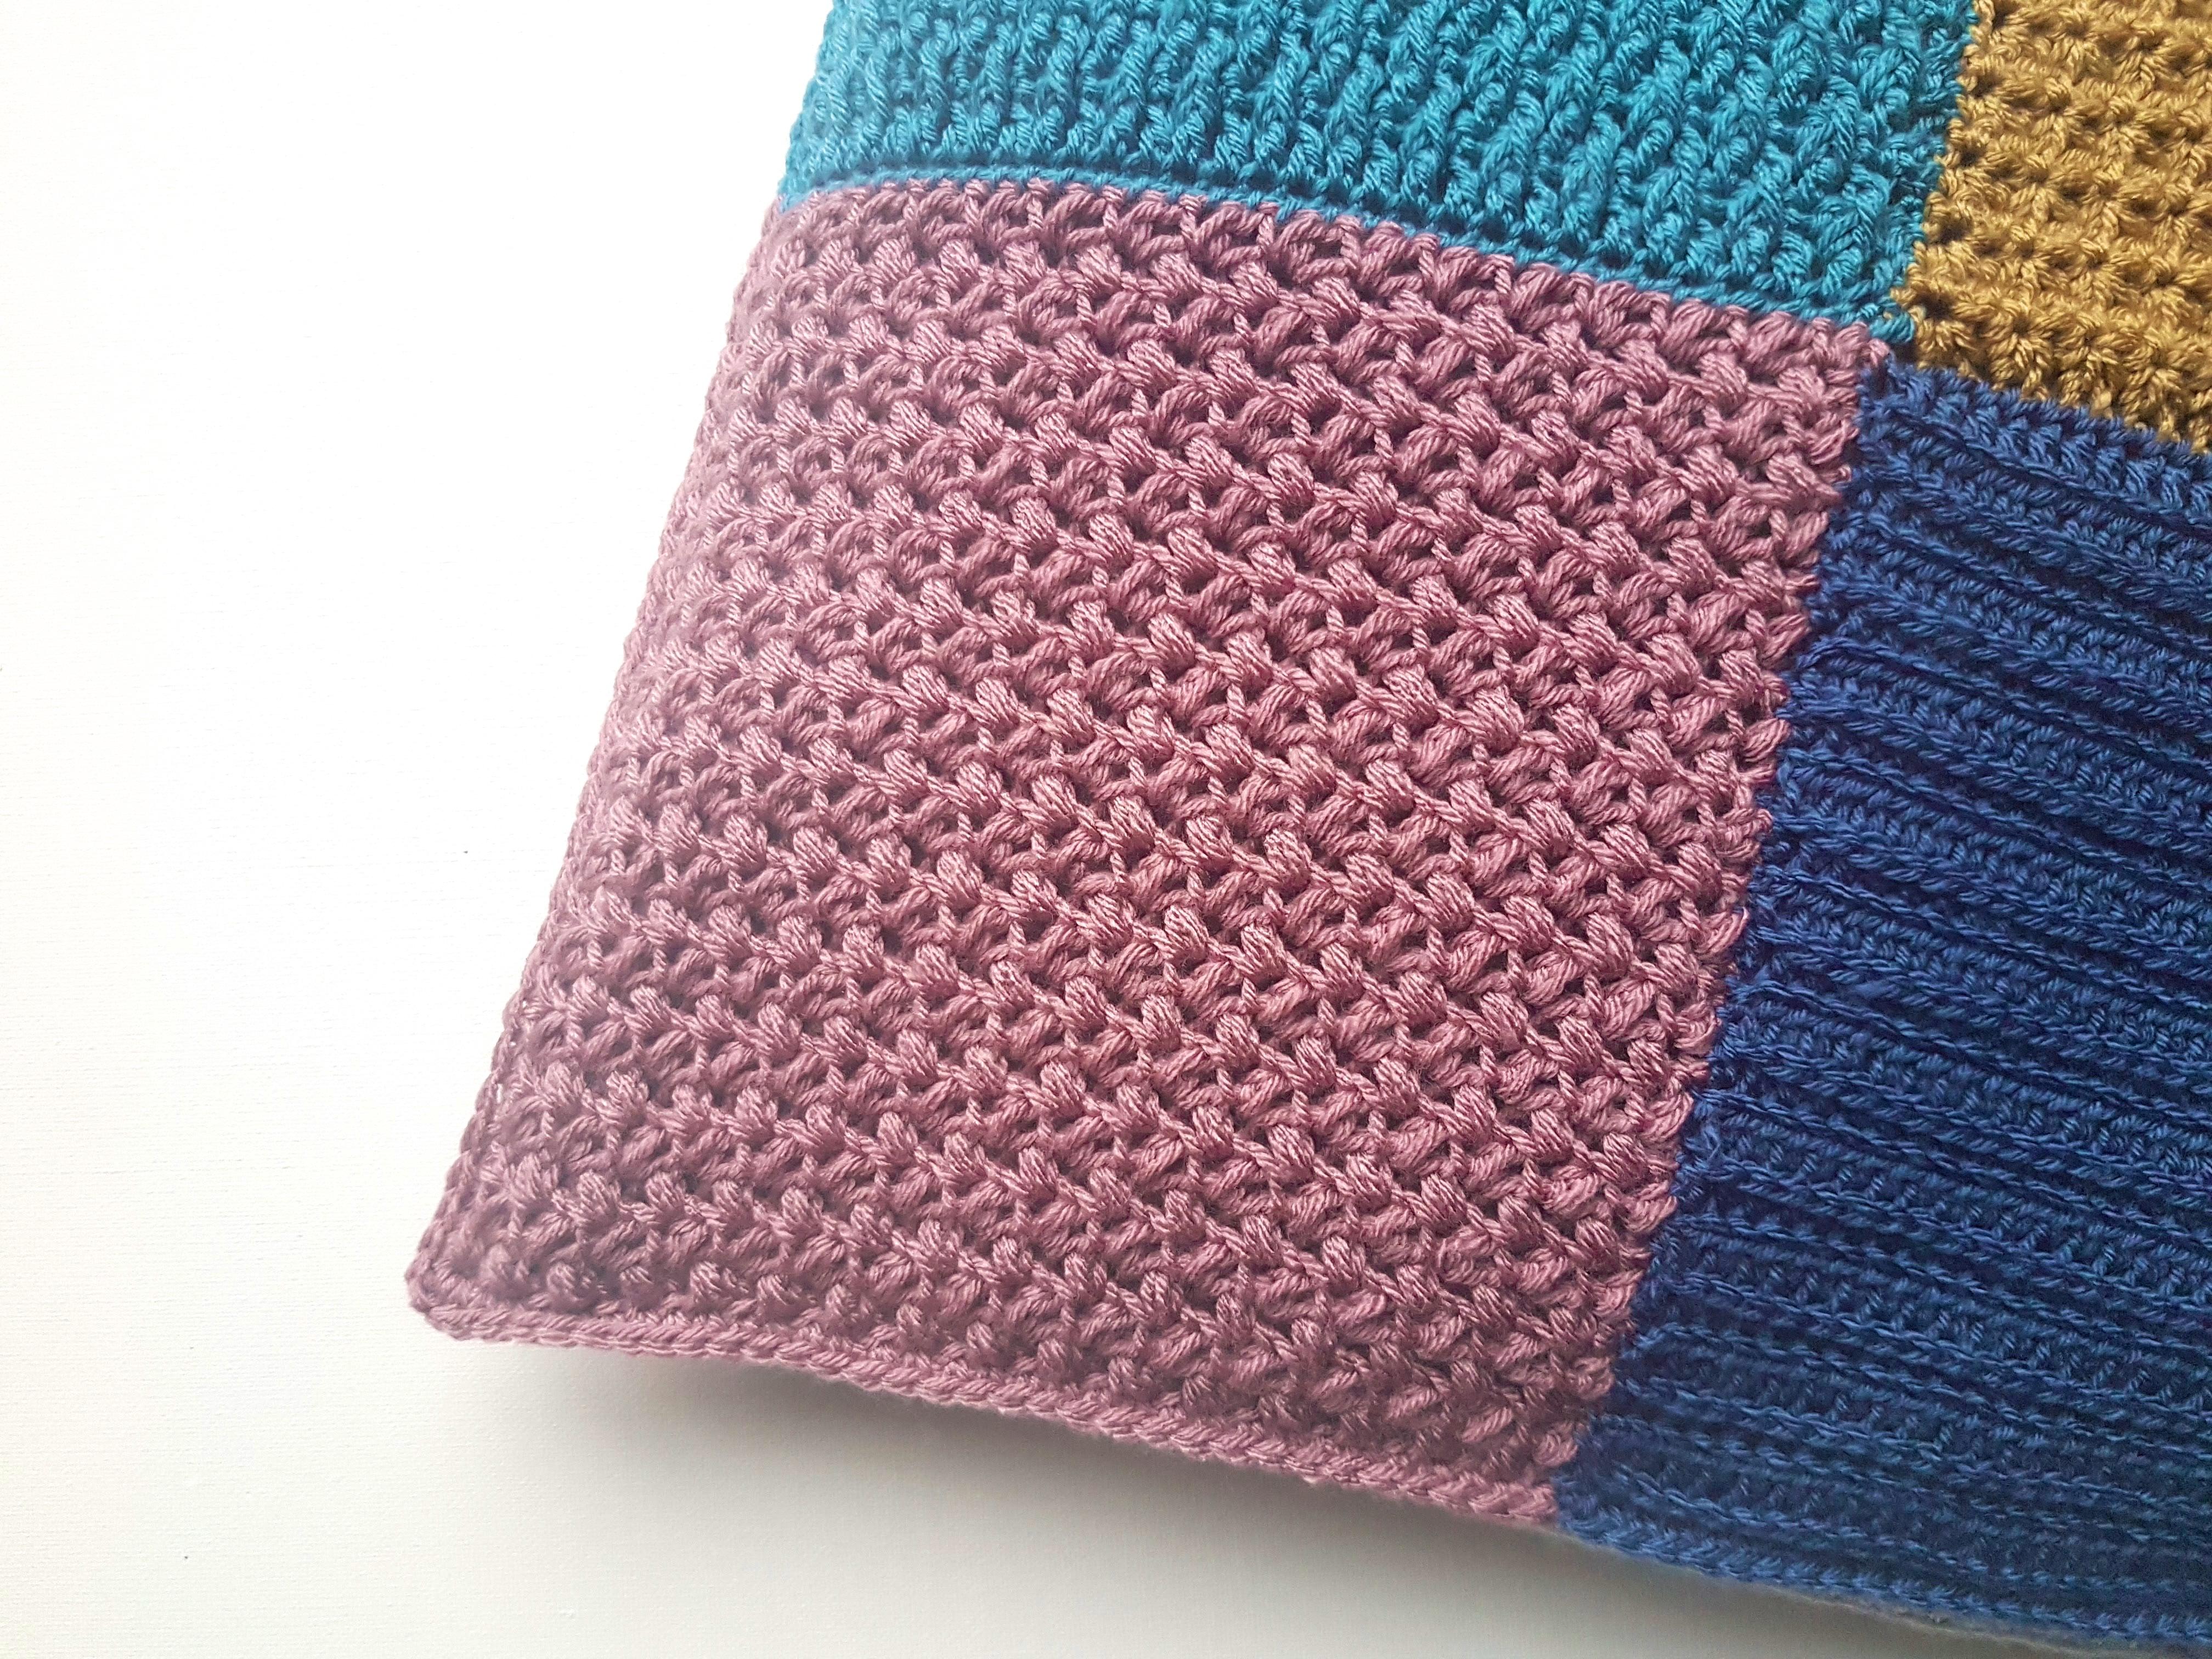
Multi Rib Stitch Square – using yarn A
(Ch2 at the end of the row, doesn’t count as a st)
Ch 34
Row 1. Htr in the 3rd ch from the hook, htr across to end, ch2, turn.
Row 2. Htr in the 3rd loop across to end, ch2, turn.
Row 3. Htr in the blo across to end, ch2, turn.
Row 4 – 21. Repeat rows 2 and 3. Fasten off.
Mini Bean Stitch Square – using yarn B
(Ch1 at the end of the row, doesn’t count as a st)
Ch 33
Row 1. In the 3rd ch the hook work a mini bean stitch, *skip 1 st, mini bean stitch, repeat from * across to the end, ch1, turn.
Row 2. Work a mini bean stitch in the side of the mini bean stitch in the previous row (not the top) *skip 1 st, mini bean stitch (in the side) repeat from * across to the end, ch1, turn.
Row 3 – 26. Repeat row 2. Fasten off.
Alpine Stitch Square – using yarn C
(Ch3 at the end of the row, does count as a st)
Ch 34
Row 1. Tr in the 4th ch from the hook, tr across to the end, ch1, turn.
Row 2. Dc across to the end, ch3, turn.
Row 3. Fptr, *tr, fptr, tr, repeat from * across to the end, tr in the last st, ch1, turn.
Row 4. Dc across to the end, ch3, turn.
Row 5. Dc, *fptr, tr, fptr, repeat from * across to the end, tr in the last st, ch1, turn.
Row 6 – 25. Repeat rows 2, 3, 4 & 5. Fasten off.

Trinity Stitch Square – using yarn D
(Ch1 at the end of the row, doesn’t count as a st)
Ch 34
Row 1. Dc in the 2nd ch from the hook, dc3tog (starting in the same stitch) *ch1, dc3tog repeat from * across. Do not ch1 after the last dc3tog, dc into the last st, ch1, turn.
Row 2. Dc in the first st, dc3tog (starting in the same stitch) *ch1, dc3tog repeat from * across. Do not ch1 after the last dc3tog, dc into the last st, ch1, turn.
Row 3 – 28. Repeat Row 2. Fasten off
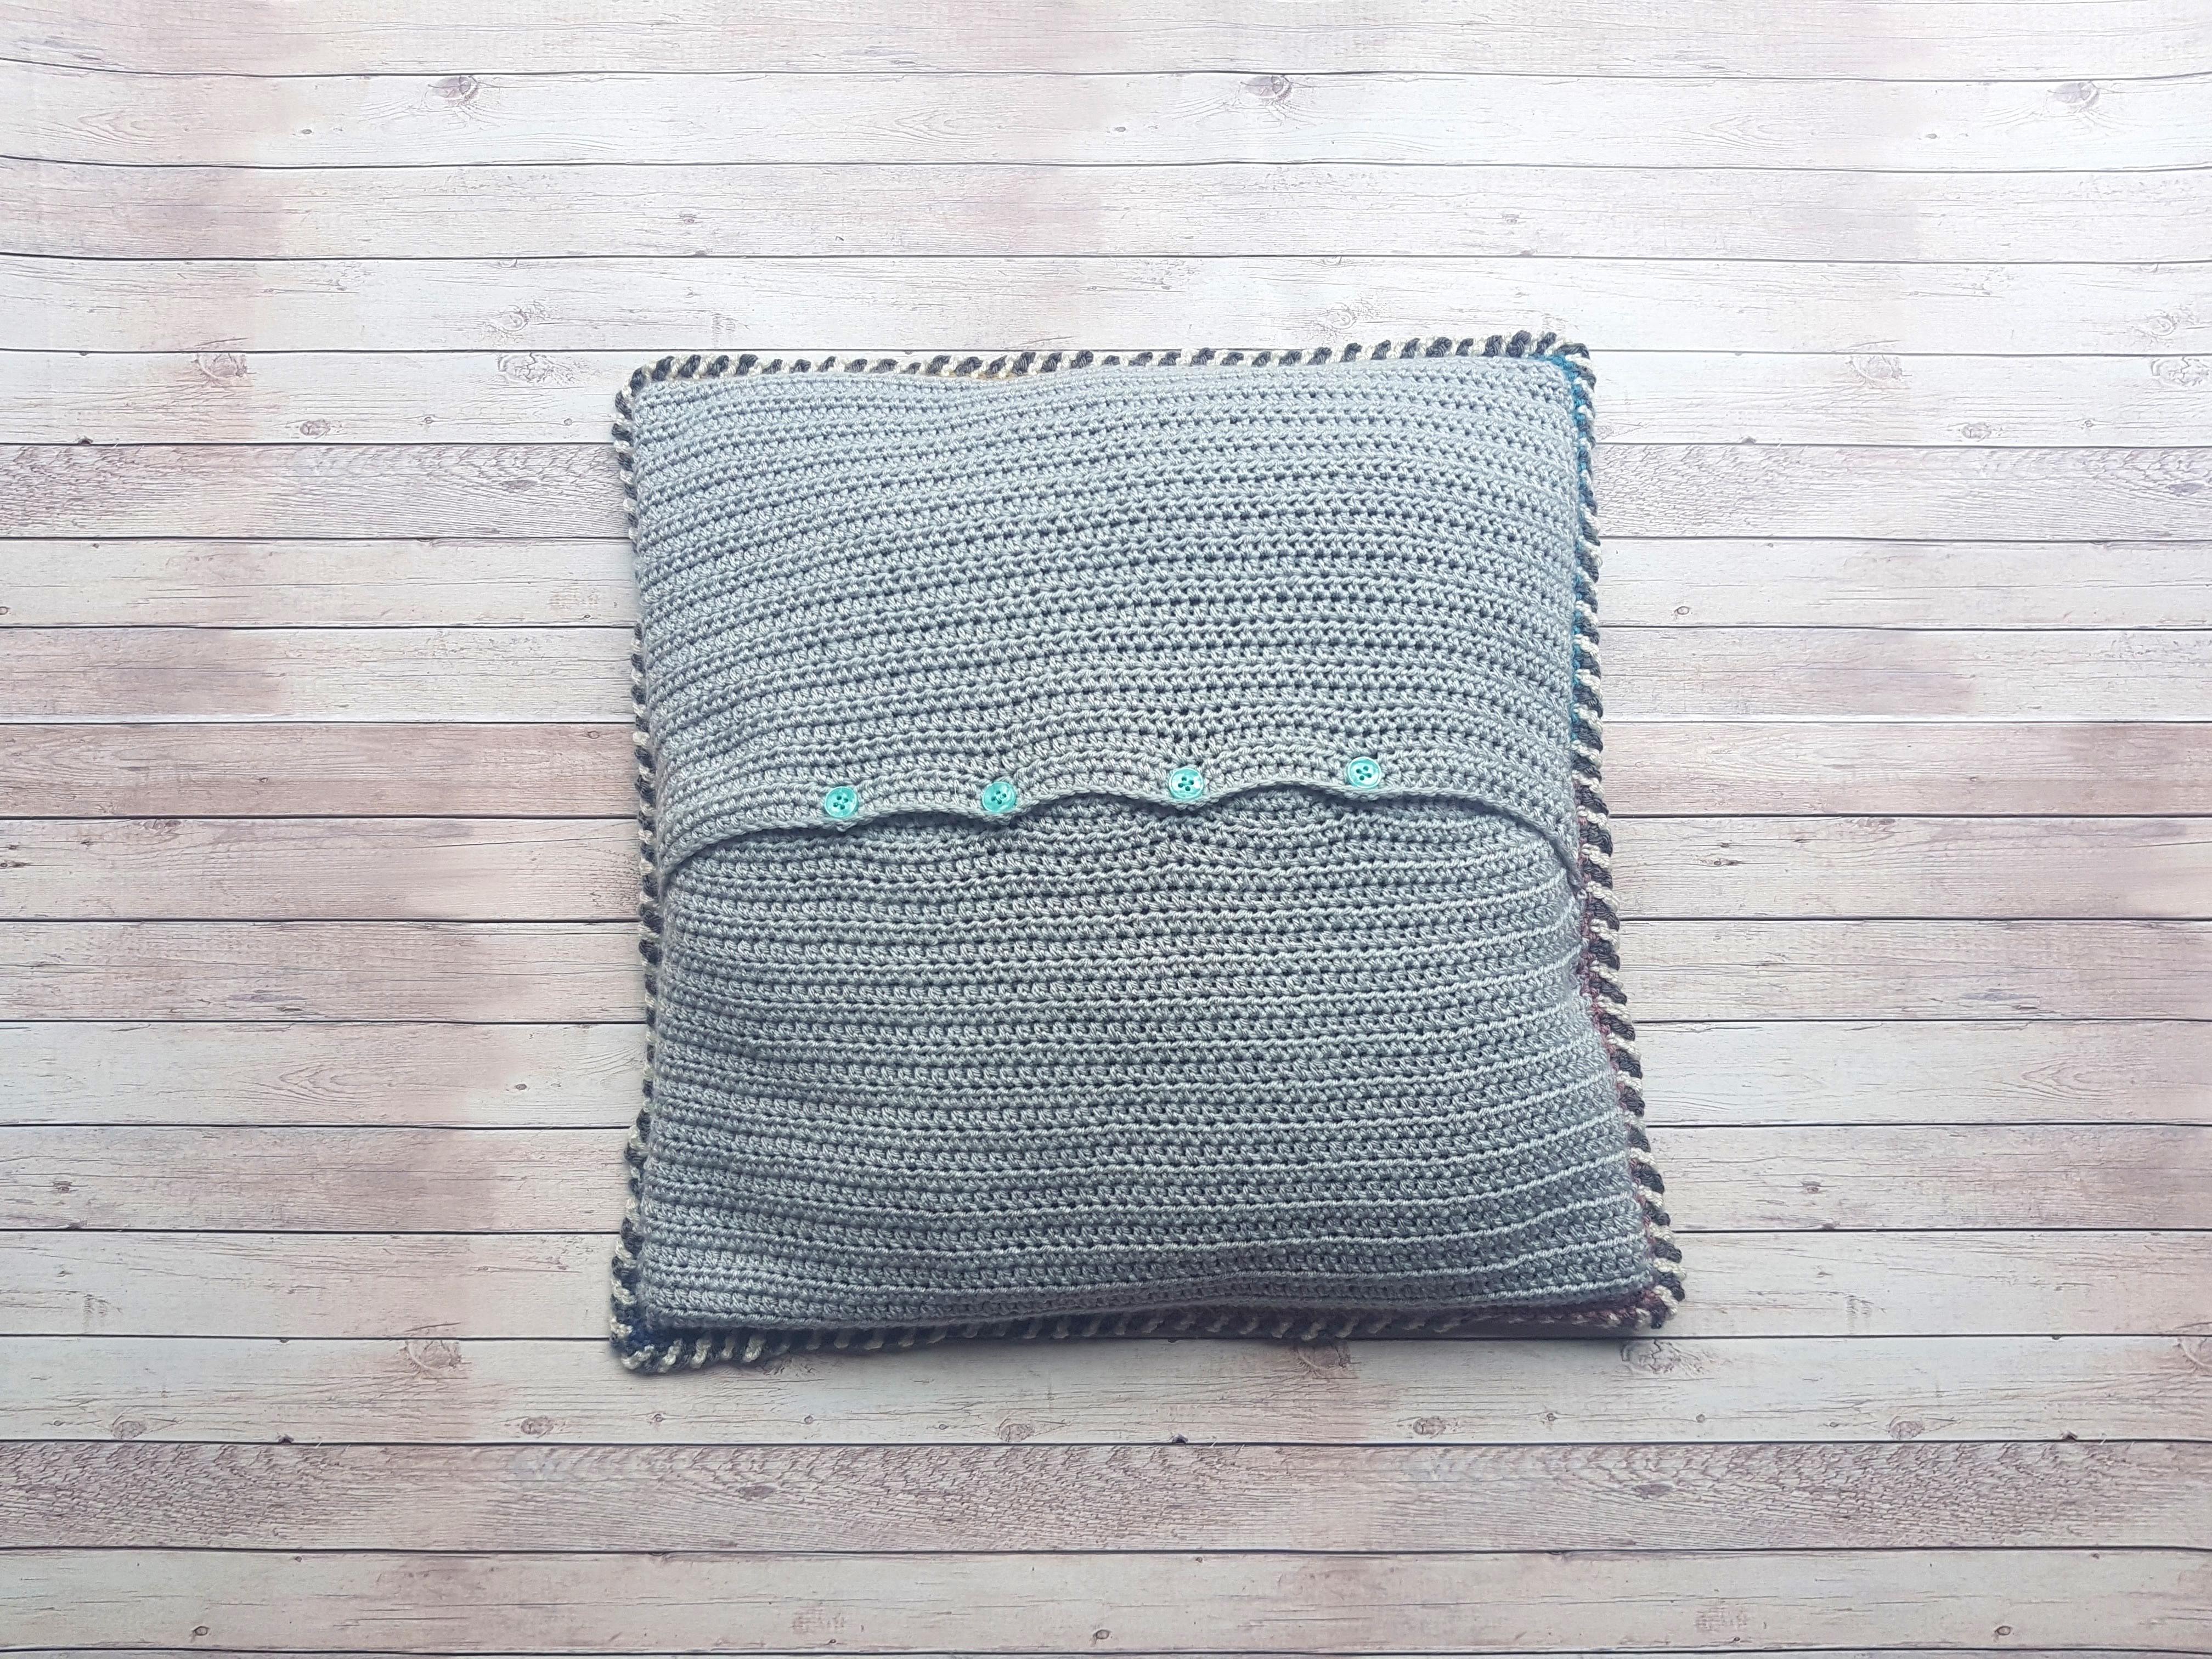
Back panel
Using yarn E – make 2
Use approximately 50g per panel, for my cushion, one panel has 27 rows, the other has 28 rows. If they both have 28 rows this is fine too, as they will be over-lapping.
Ch 66 (Ch2 does count as a st)
Row 1. Htr in the 3rd ch from the hook, htr across to the end, ch2, turn.
Row 2. Htr across, ch2, turn.
Row 3 – 28. Repeat row 2. Fasten off.
Construction:
Hold the Multi Rib & Mini Bean squares together (right side facing) and seam using a whip stitch, with one of the yarn colours used on these two squares.
Hold the Alpine & Trinity squares together (right side facing) and seam using a whip stitch, with one of the yarn colours used on these two squares.
Now hold these two pieces together (right sides facing) and seam using a whip stitch, making sure you use one of the colours that you are seaming at the time, you don’t want to see a different colour! When you get to the centre, change the colour yarn again to match one of these squares.
Turn this front piece over and lay face down, place one back panel on top (to the top) and the other back panel on top (to the bottom). Your piece will all be right
sides facing out!
Use your stitch markers to secure these pieces together.
Join your yarn anywhere, dc in the same colour as each square all the way around, changing colour on the last stitch before the next square, and making 3 dc in each corner, sl st to join.
Candy Cane Border – using yarn F & G
Join yarn F anywhere & ch4, pull up a big loop and drop the yarn.
Join yarn G in the next st, ch4, pull up a big loop and drop the yarn.
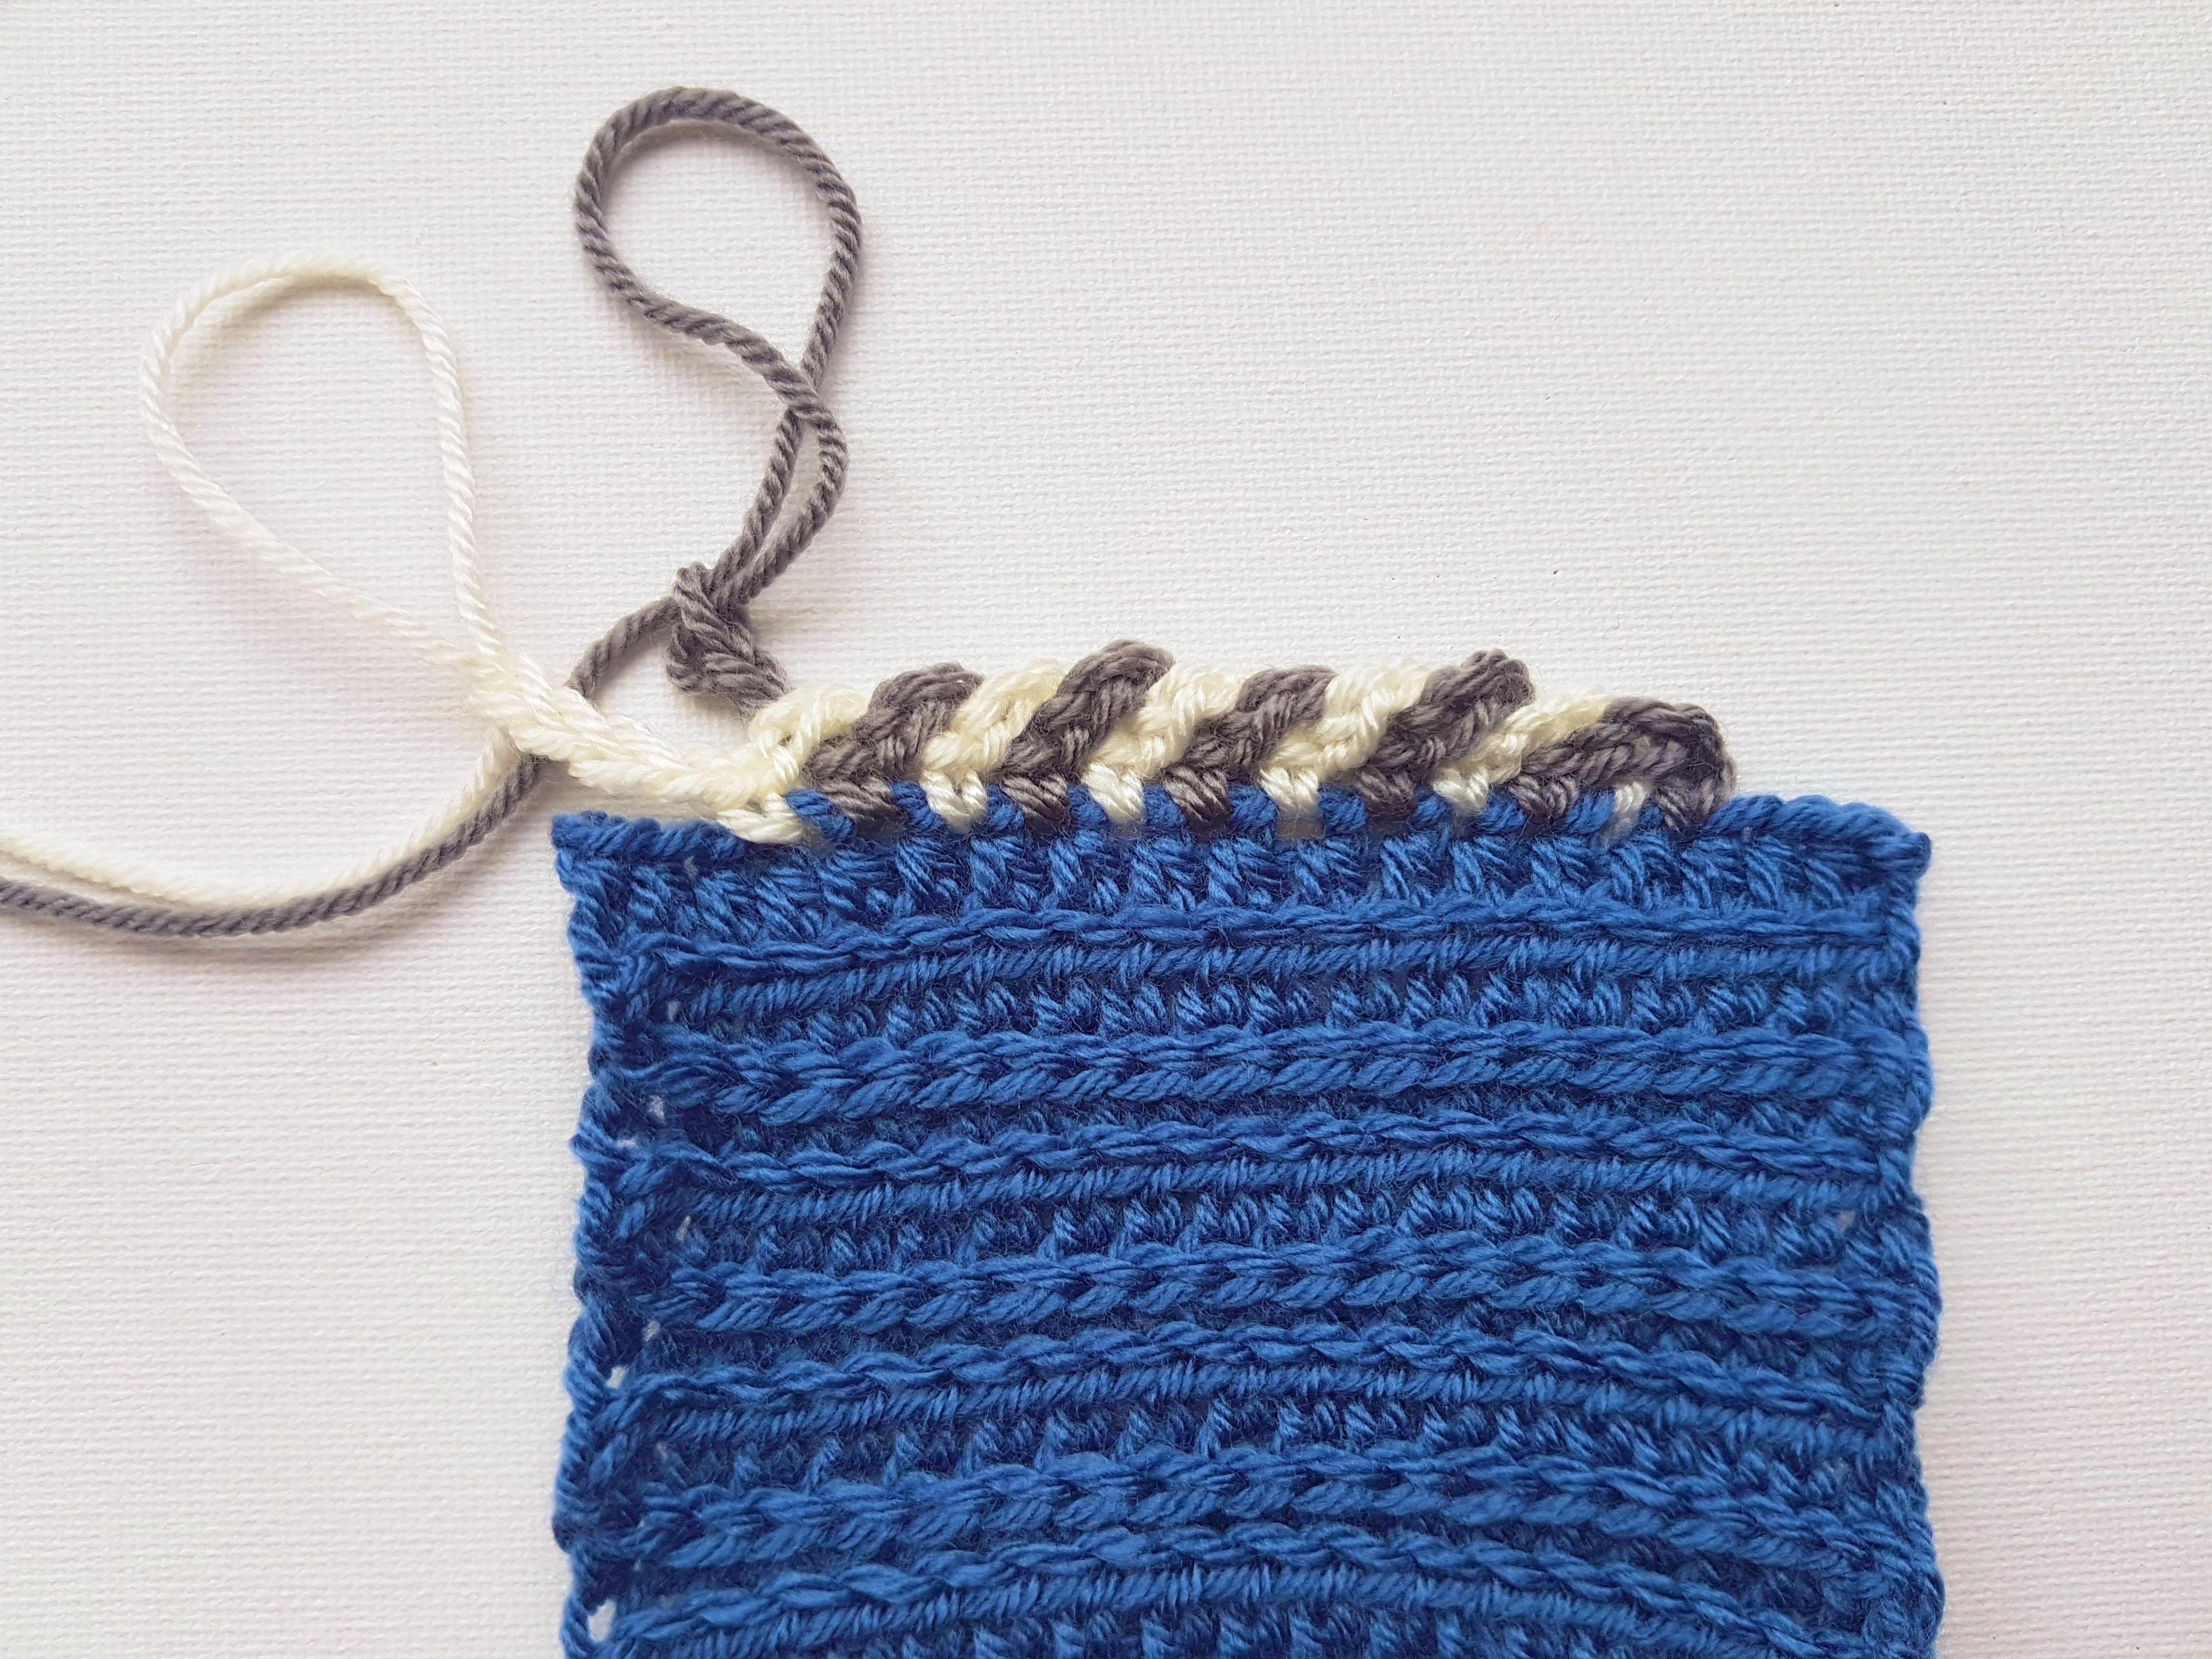
Step 1. Pick up yarn F, bring the hook over and in front & dc into the next stitch, ch4, pull up a big loop and drop the yarn.
Step 2. Pick up yarn G, bring the hook over and in front & dc into the next stitch, ch4, pull up a big loop and drop the yarn.
Repeat step 1 & 2 all the way around, sl st to the 1st st to finish.
“I love discovering new crochet stitches, and have chosen some of my favourites to use together in this design. This pattern includes 6 different stitches so is perfect for someone wishing to expand their crochet stitch knowledge.”
You can find more of Kelly’s crochet work on her blog craftycruella she can also be found over on Instagram. To read my interview with Kelly, head over and visit my Instagram stories today.
PIN THIS PROJECT FOR LATER
I love the cushion definitely want to try this